Panasonic BTLH80W BTLH80W User Guide - Page 17
Marker
 |
View all Panasonic BTLH80W manuals
Add to My Manuals
Save this manual to your list of manuals |
Page 17 highlights
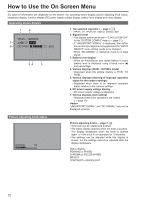
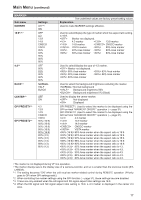
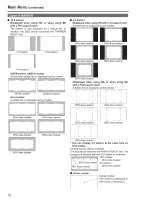
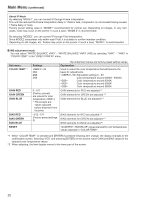
Main Menu (continued) MARKER Sub menu MARKER 16:9∗2∗3 4:3∗2 BACK∗2 CENTER∗2 GPI PRESET1∗4 GPI PRESET2∗4 Settings OFF∗1 ON OFF 4:3 13:9 14:9 CNSCO VISTA 95% 93% 90% 88% 80% OFF 95% 93% 90% 88% 80% NORMAL HALF BLACK OFF ON 4:3 13:9 14:9 CNSCO VISTA 95% (16:9) 93% (16:9) 90% (16:9) 88% (16:9) 80% (16:9) 95% (4:3) 93% (4:3) 90% (4:3) 88% (4:3) 80% (4:3) The underlined values are factory preset setting values. Explanation Used to make MARKER settings effective. Used to select/display the type of marker when the aspect ratio setting is 16:9. Marker not displayed. 4:3 marker 13:9 marker 14:9 marker CNSCO marker VISTA marker 95% Area marker 93% Area marker 90% Area marker 88% Area marker 80% Area marker Used to select/display the type of 4:3 marker. Marker not displayed. 95% Area marker 93% Area marker 90% Area marker 88% Area marker 80% Area marker Used to select the background brightness excluding the marker. Normal background Background brightness 50% Background brightness 0% (Black) Used to display the center marker. Not displayed Displayed GPI PRESET1: Used to select the marker to be displayed using the GPI terminal "MARKER1 ON/OFF" operation (→ page 31). GPI PRESET2: Used to select the marker to be displayed using the GPI terminal "MARKER2 ON/OFF" operation (→ page 31). 4:3 marker 13:9 marker 14:9 marker CNSCO marker VISTA marker 95% Area marker when the aspect ratio is 16:9. 93% Area marker when the aspect ratio is 16:9. 90% Area marker when the aspect ratio is 16:9. 88% Area marker when the aspect ratio is 16:9. 80% Area marker when the aspect ratio is 16:9. 95% Area marker when the aspect ratio is 4:3. 93% Area marker when the aspect ratio is 4:3. 90% Area marker when the aspect ratio is 4:3. 88% Area marker when the aspect ratio is 4:3. 80% Area marker when the aspect ratio is 4:3. • The marker is not displayed during VF line operation. • The marker display size is the display size of a camera-recorder, and so is smaller than the previous model (BT- LH900A). ∗1 The setting becomes "ON" when the unit receives marker-related control during REMOTE operation. (Priority goes to GPI when GPI settings exist.) ∗2 When controlling the marker settings using the GPI function (→ page 31), these settings become disabled. ∗3 These are only enabled when the HD signal and SD signal aspect ratio settings are 16:9. ∗4 When the HD signal and SD signal aspect ratio setting is 16:9, a 4:3 marker is displayed in the center 4:3 area. 17
-
 1
1 -
2
-
3
-
4
-
5
-
6
-
7
-
8
-
9
-
10
-
11
-
 12
12 -
 13
13 -
 14
14 -
 15
15 -
 16
16 -
 17
17 -
 18
18 -
 19
19 -
 20
20 -
 21
21 -
 22
22 -
23
-
24
-
25
-
26
-
27
-
28
-
29
-
30
-
31
-
32
-
33
-
34
-
35
-
36
-
37
-
38
 |
 |
