Panasonic BTLH80W BTLH80W User Guide - Page 23
Function
 |
View all Panasonic BTLH80W manuals
Add to My Manuals
Save this manual to your list of manuals |
Page 23 highlights
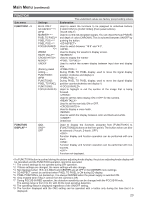
Main Menu (continued) FUNCTION Sub menu FUNCTION1 - 3 FUNCTION DISPLAY∗8 Settings BLUE ONLY SD ASPECT∗1∗2 WFM MARKER∗1∗3 PIXEL TO PIXEL∗4 PIXEL POS.+∗5 PIXEL POS.-∗5 FOCUS-IN-RED ∗4∗7 ZEBRA REAR TALLY∗6 CROSS HATCH MONO∗1 UNDEF (Factory preset setting→ FUNCTION1: WFM FUNCTION2: PIXEL TO PIXEL FUNCTION3: FOCUS-IN-RED) ON1 ON2∗9 OFF The underlined values are factory preset setting values. Explanation Used to select the functions to be assigned to individual buttons [FUNCTION1] to [FUNCTION3] (front-panel buttons). Used to cut the red and green signals. You can check the hue (PHASE) and depth of color (CHROMA). This is switched between ON/OFF by pushing the button. Used to switch between "16:9" and "4:3". Used to display the waveform display screen. Used to display the marker. Used to switch the screen display between input size and display size. During PIXEL TO PIXEL display, used to move the signal display position clockwise and display it. During PIXEL TO PIXEL display, used to move the signal display position counterclockwise and display it. Used to highlight in red the section of the image that is being focused. Used to set the zebra display ON or OFF for the camera. Used to set the rear tally ON or OFF. Used to display a cross hatch. Used to switch the display between color and black-and-white. Undefined. Used to display the functions assigned from [FUNCTION1] to [FUNCTION3] (buttons on the front panel). The button action can also be selected (1-touch, 2-touch, OFF). Function display and function operation can be performed with one touch. Function display and function operation can be performed with two touches. Function not displayed. • If a FUNCTION button is pushed during the picture adjusting knobs display, the picture adjusting knobs display will be cancelled and the FUNCTION operation cannot be executed. ∗1 The control settings do not operate during GPI operation. ∗2 If these settings are changed, the menu settings will also change. ∗3 Not displayed when 16:9, 4:3, BACK and CENTER are all OFF in the MARKER menu settings. ∗4 SD ASPECT cannot be switched when PIXEL TO PIXEL is ON during SD display. ∗5 PIXEL POSITION is not backed up. It is always CENTER when the power supply is switched ON. ∗6 Only enabled when TALLY control from the camera is ON. ∗7 During FOCUS-IN-RED operation, the detection sensitivity can be changed with the FOCUS-R knob. The setting range is from 0 to 30, with 30 the most sensitive detection. ∗8 The operating status is displayed regardless of the ON/OFF setting. ∗9 The function displayed with the ON2 setting can be operated with a button only during the time that it is displayed. 23
-
 1
1 -
2
-
3
-
4
-
5
-
6
-
7
-
8
-
9
-
10
-
11
-
12
-
13
-
14
-
15
-
16
-
17
-
 18
18 -
 19
19 -
 20
20 -
 21
21 -
 22
22 -
 23
23 -
 24
24 -
 25
25 -
 26
26 -
 27
27 -
 28
28 -
29
-
30
-
31
-
32
-
33
-
34
-
35
-
36
-
37
-
38
 |
 |