Panasonic CF- Notebook Computer - Page 20
Windows 98, Windows 2000, Select [Start] - [Settings] - [Control Panel] - [Network and Dial-up Connec
 |
UPC - 092281867281
View all Panasonic CF- manuals
Add to My Manuals
Save this manual to your list of manuals |
Page 20 highlights
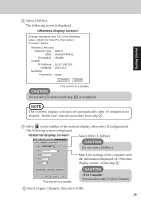
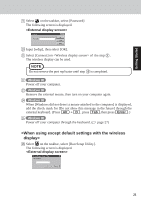
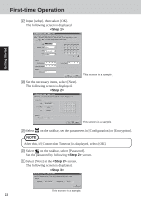
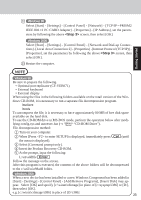
First-time Operation 6 Windows 98 Select [Start] - [Settings] - [Control Panel] - [Network] - [TCP/IP IEEE 802.11 PC CARD Adapter] - [Properties] - [IP Address]. The following screen is displayed. PRISM2 Getting Started This screen is a sample. Add the check mark for [Specify an IP address], match the settings of the computer with the information displayed on of the step 3 . Windows 2000 Select [Start] - [Settings] - [Control Panel] - [Network and Dial-up Connections] -[Local Area Connection 2] - [Properties] -[Internet Protocol (TCP/IP)] [Properties]. The following screen is displayed. Add the check mark for [Use the following IP address], match the settings of the computer with the information displayed on of the step 3 . This screen is a sample. 7 Select [OK], then select [OK]. 8 Windows 98 Select [Yes]. The computer will restart. 20
-
 1
1 -
2
-
3
-
4
-
5
-
6
-
7
-
8
-
9
-
10
-
11
-
12
-
13
-
14
-
 15
15 -
 16
16 -
 17
17 -
 18
18 -
 19
19 -
 20
20 -
 21
21 -
 22
22 -
 23
23 -
 24
24 -
 25
25 -
26
-
27
-
28
-
29
-
30
-
31
-
32
-
33
-
34
-
35
-
36
-
37
-
38
-
39
-
40
-
41
-
42
-
43
-
44
-
45
-
46
-
47
-
48
-
49
-
50
-
51
-
52
 |
 |
