Panasonic CF-H1ADBBGJM Reference Manual - Page 71
Extended Desktop, Click [OK].
 |
View all Panasonic CF-H1ADBBGJM manuals
Add to My Manuals
Save this manual to your list of manuals |
Page 71 highlights
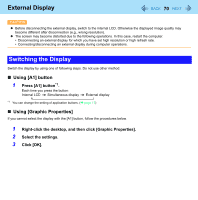
External Display 71 Extended Desktop The extended desktop function allows you to use the working area across both the internal LCD and the external display. You can drag an object from the internal LCD to the external display and vice versa. 1 Right-click the desktop, and click [Graphics Properties]. 2 Click [Extended Desktop], and select the settings for [Primary Device] and [Secondary Device]. 3 Click [Display Settings] and set the display color and resolution etc. 4 Click [OK]. NOTE z It may not be possible to use the extended desktop with some software applications. z When you click the maximize button, the window is displayed on one of the displays. You cannot move the maximized window to the other display. z You cannot switch the display by pressing [A1] button. z To switch left (primary device) and right (secondary device), once return the display to "notebook only". Follow the steps below. A Right-click the desktop and click [Graphics Options]. B Click [Output To] - [Notebook]. C Right-click the desktop and click [Graphics Options]. D Click [Output To] - [Extended Desktop], and click [Monitor + Notebook] (the external display will be set to primary device) or [Notebook + Monitor] (the internal LCD will be set to primary device). z To switch to the Extended Desktop, be sure to use the [Intel(R) GMA Driver for Mobile] screen or the [New Display Detected] screen. If you use other methods (e.g. display setting, etc.), the screen may not be displayed correctly. z Set the internal LCD to the primary device when using the operation by touching the screen. The cursor will move on the primary device when you touch the internal LCD. z You can select [Extended], even when no external display is connected, by one of the following operations. Do not select [Extended] when no external display is connected. • Pressing + P • Clicking [Control Panel] - [Display] - [Connect to a projector]
-
 1
1 -
2
-
3
-
4
-
5
-
6
-
7
-
8
-
9
-
10
-
11
-
12
-
13
-
14
-
15
-
16
-
17
-
18
-
19
-
20
-
21
-
22
-
23
-
24
-
25
-
26
-
27
-
28
-
29
-
30
-
31
-
32
-
33
-
34
-
35
-
36
-
37
-
38
-
39
-
40
-
41
-
42
-
43
-
44
-
45
-
46
-
47
-
48
-
49
-
50
-
51
-
52
-
53
-
54
-
55
-
56
-
57
-
58
-
59
-
60
-
61
-
62
-
63
-
64
-
65
-
 66
66 -
 67
67 -
 68
68 -
 69
69 -
 70
70 -
 71
71 -
 72
72 -
 73
73 -
 74
74 -
 75
75 -
 76
76 -
77
-
78
-
79
-
80
-
81
-
82
-
83
-
84
-
85
-
86
-
87
-
88
-
89
-
90
-
91
-
92
-
93
-
94
-
95
-
96
-
97
-
98
-
99
-
100
-
101
-
102
-
103
-
104
-
105
-
106
-
107
-
108
-
109
-
110
-
111
-
112
 |
 |
