Panasonic PT-LB90NTEA User Manual - Page 27
Setting up the image position automatically, Resetting to the factory default settings
 |
View all Panasonic PT-LB90NTEA manuals
Add to My Manuals
Save this manual to your list of manuals |
Page 27 highlights
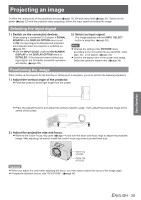
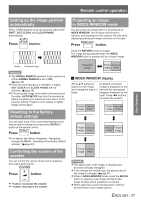
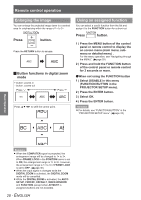
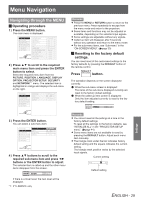
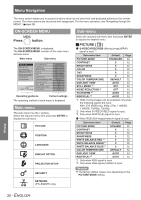
Remote control operation Setting up the image position automatically When a RGB signal is input, the projector adjusts the SHIFT, DOT CLOCK and CLOCK PHASE automatically. Press button. Projecting an image in INDEX-WINDOW mode You can project an image split in 2 windows as an INDEX WINDOW. One is frozen and stored in memory, and displayed on the screen's left side while displaying subsequent image continues on the right. Press button. Press the RETURN button to escape. The image being projected when the INDEXWINDOW button is pressed will be a frozen image. Basic Operation Screen Projected image Remarks zzThe SIGNAL SEARCH operation is also performed. (When SIGNAL SEARCH is set to ON) (Æpage 39) zzIf the dot clock frequency is 108 MHz or higher, DOT CLOCK and CLOCK PHASE are not effective. (Æpage 34) zzIf the projected image is too dark or blurred around the edge, AUTO SETUP may stop the processing before completing the adjustment and return to the previous setting. Project a much clearer or lighter image and try again. Resetting to the factory default settings You can reset most of the customised settings to the factory default settings by pressing the DEFAULT button of the remote control. Press button. zzFor details, see "Menu Navigation - Navigating through the MENU - Resetting to the factory default settings". (Æpage 29) Controlling the volume of the speaker You can control the volume of the built-in speakers and output audio sound. Press button. zz+ button: increases the volume zz- button: decreases the volume Projected image Frozen Continuing image image JJINDEX-WINDOW display Press ▲▼ buttons to capture a new image and change the size in 3 ways. In default, the frozen image is displayed on the left and the subsequent image is displayed on the right. Press ◄► buttons to switch the position. Frozen Continuing image image Frozen Continuing Image image Frozen Continuing image image Continuing Frozen image Image Frozen Continuing image image Remarks zzThe aspect ratio of the image is changed and becomes vertically elongated. zzIf you change the window size, the aspect ratio of the image is changed. (Æpage 35) zzWhile in INDEX-WINDOW mode, press the ENTER button to capture a new image and the frozen image window will be updated in a moment. zzWhen capturing a quick moving picture, perform several times to get a stable picture. ENGLISH - 27
-
 1
1 -
2
-
3
-
4
-
5
-
6
-
7
-
8
-
9
-
10
-
11
-
12
-
13
-
14
-
15
-
16
-
17
-
18
-
19
-
20
-
21
-
 22
22 -
 23
23 -
 24
24 -
 25
25 -
 26
26 -
 27
27 -
 28
28 -
 29
29 -
 30
30 -
 31
31 -
 32
32 -
33
-
34
-
35
-
36
-
37
-
38
-
39
-
40
-
41
-
42
-
43
-
44
-
45
-
46
-
47
-
48
-
49
-
50
-
51
-
52
-
53
-
54
-
55
-
56
-
57
-
58
-
59
-
60
 |
 |
