Panasonic PTAE8000 Operating Instructions - Page 21
Getting Started, Setting up, Projection method, Parts for ceiling mount (optional
 |
View all Panasonic PTAE8000 manuals
Add to My Manuals
Save this manual to your list of manuals |
Page 21 highlights
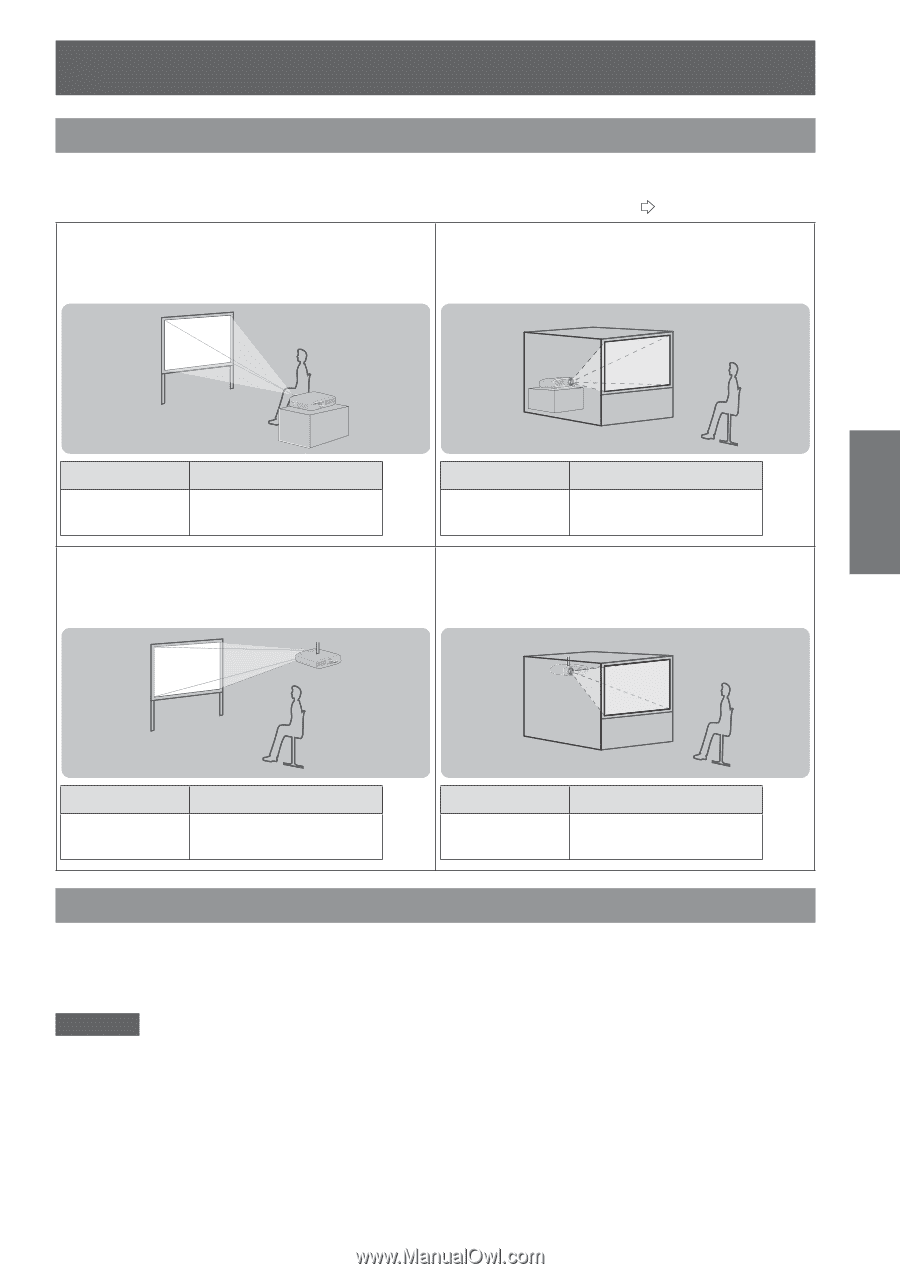
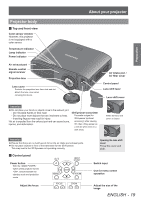
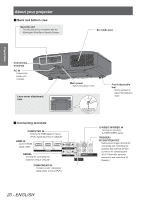
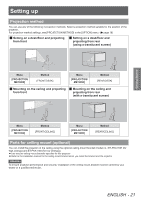
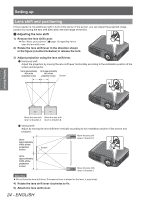
Setting up Setting up Projection method You can use any of the following 4 projection methods. Select a projection method suitable for the position of the projector. For projection method settings, see [PROJECTION METHOD] in the [OPTION] menu. ( page 78) ■■Setting on a desk/floor and projecting from front ■■Setting on a desk/floor and projecting from rear (using a translucent screen) Getting Started Menu [PROJECTION METHOD] Method [FRONT/DESK] Menu [PROJECTION METHOD] Method [REAR/DESK] ■■Mounting on the ceiling and projecting ■■Mounting on the ceiling and from front projecting from rear (with a translucent screen) Menu [PROJECTION METHOD] Method [FRONT/CEILING] Menu [PROJECTION METHOD] Method [REAR/CEILING] Parts for ceiling mount (optional) You can install the projector on the ceiling using the optional ceiling mount bracket (model no.: ET-PKA110H (for high ceilings) and ET-PKA110S (for low ceilings)). zzUse only the ceiling mount brackets specified for this projector. zzRefer to the installation manual for the ceiling mount bracket when you install the bracket and the projector. Attention To ensure projector performance and security, installation of the ceiling mount bracket must be carried by your dealer or a qualified technician. ENGLISH - 21
-
 1
1 -
2
-
3
-
4
-
5
-
6
-
7
-
8
-
9
-
10
-
11
-
12
-
13
-
14
-
15
-
 16
16 -
 17
17 -
 18
18 -
 19
19 -
 20
20 -
 21
21 -
 22
22 -
 23
23 -
 24
24 -
 25
25 -
 26
26 -
27
-
28
-
29
-
30
-
31
-
32
-
33
-
34
-
35
-
36
-
37
-
38
-
39
-
40
-
41
-
42
-
43
-
44
-
45
-
46
-
47
-
48
-
49
-
50
-
51
-
52
-
53
-
54
-
55
-
56
-
57
-
58
-
59
-
60
-
61
-
62
-
63
-
64
-
65
-
66
-
67
-
68
-
69
-
70
-
71
-
72
-
73
-
74
-
75
-
76
-
77
-
78
-
79
-
80
-
81
-
82
-
83
-
84
-
85
-
86
-
87
-
88
-
89
-
90
-
91
-
92
-
93
-
94
-
95
-
96
-
97
-
98
-
99
-
100
-
101
-
102
-
103
-
104
-
105
-
106
-
107
-
108
-
109
-
110
 |
 |