Panasonic SAXR58 SAXR58 User Guide - Page 14
Before Playback
 |
View all Panasonic SAXR58 manuals
Add to My Manuals
Save this manual to your list of manuals |
Page 14 highlights
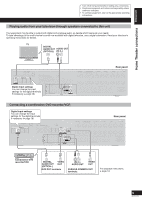
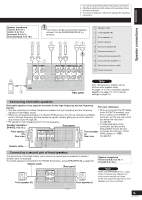
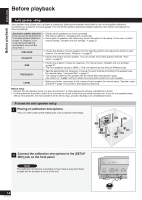
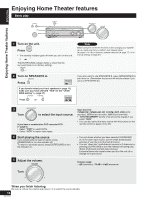
Before playback ENGLISH Before playback Auto speaker setup Auto speaker setup allows you to achieve a satisfactory listening environment easily with the use of the supplied calibration microphone as a detector of sound signals. The unit will first perform automatic speaker detection, then checks and adjusts the following settings. Automatic speaker detection (This can also be performed in "Automatic speaker detection", ➡ page 17. However, for a more optimized listening environment, carry out the setup here.) • Checks which speakers you have connected. • The factory setting is 7 speakers and a subwoofer. • Some types of speakers and cables may cause disruptions to the setup. In this case, conduct manual setting, "Speaker and size settings", ➡ page 27. DISTANCE • Checks the distance of each speaker from the listening position and adjusts the timing of each channel. For manual setup, "Distance", ➡ page 27. POLARITY • Checks the polarity of each speaker. You can choose not to have polarity checked, "Auto setup", ➡ page 27. SIZE FREQUENCY LEVEL • Checks the speaker's frequency response. For manual setup, "Speaker and size settings", ➡ page 27. • The front speakers are set to SMALL if the unit determines that they are different sizes. • Sets the appropriate low frequency crossover for each channel according to the speaker size. For manual setup, "Low-pass filter", ➡ page 27. • The setting is based on the speaker with the lowest bass reproduction range. • Also checks on "Level" setting to adjust the sound level (volume) for each speaker. • Makes any further corrections to the volume of each speaker (for manual setup, "Speaker output and level" ➡ page 17) and also to the frequency response. Before setup • Conduct the auto speaker setup in a quiet environment. A noisy background will give unsatisfactory results. • Put the subwoofer in position, switch it on, and sets its volume to the level you would normally use. If you do auto speaker setup without the subwoofer, the front speakers will be set as large, possibly resulting in an unsatisfactory bass. Process for auto speaker setup 1 Placing of calibration microphone. Place on a flat surface at the seating area. Use a tripod for best results. 2 Connect the calibration microphone to the [SETUP MIC] jack on the front panel. Note The calibration microphone is sensitive to heat. Keep it away from direct sunlight and do not place it on top of the unit. 14 RQTV0156 AUTO ADVANCED SPEAKER SETUP DUAL AMP BI-AMP SPEAKERS A B SURROUND AUTO DETECTOR AUX S VIDEO IN VIDEO IN L AUDIO IN R TUNE SETUP MIC
-
 1
1 -
2
-
3
-
4
-
5
-
6
-
7
-
8
-
 9
9 -
 10
10 -
 11
11 -
 12
12 -
 13
13 -
 14
14 -
 15
15 -
 16
16 -
 17
17 -
 18
18 -
 19
19 -
20
-
21
-
22
-
23
-
24
-
25
-
26
-
27
-
28
-
29
-
30
-
31
-
32
-
33
-
34
-
35
-
36
-
37
-
38
-
39
-
40
 |
 |
