Panasonic SAXR58 SAXR58 User Guide - Page 29
HDMI settings, Turning the, ADVANCED DUAL, AMP off, Clear audio at low, volume, Attenuating analogue
 |
View all Panasonic SAXR58 manuals
Add to My Manuals
Save this manual to your list of manuals |
Page 29 highlights
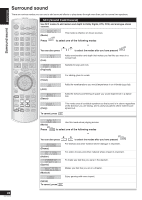
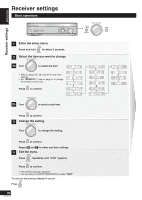
Receiver settings ENGLISH ➡ page 26 for basic operations Selecting Input 2a Select and confirm. Standby selection 2a Select and confirm. HDAVI Control 2a Select and confirm. HDMI settings • Specify the DVD equipment you have connected to the HDMI terminal. • To reduce standby power consumption. • Choice for turning off the HDAVI Control (➡ page 21). 2b Select and confirm. 2b Select and confirm. 2b Select and confirm. 3 Select the equipment 3 Select and confirm. and confirm. 3 3 Select and DVR: DVD: You have connected a DVD recorder (factory setting) You have connected a DVD player OFF: Standby power consumption reduced (approximately 0.35 W). • Signals from DVD equipment cannot pass through HDMI connection to the television when the unit is in standby (➡ page 5). • HDAVI Control (➡ page 21) does not work when the unit is in standby. confirm. OFF: HDAVI Control is OFF ON: HDAVI Control is ON (factory setting) ON: Normal standby power consumption (factory setting) Turning the ADVANCED DUAL AMP off 2 Select and confirm. 3 Select and confirm. OFF: The Advance Dual Amp is off AUTO: The Advanced Dual Amp works when possible Factory setting: AUTO Clear audio at low volume Set the dynamic range (the difference between the loudest and softest sounds) compression for Dolby Digital. Use this function when you have to turn the volume down, such as late at night. It compresses the dynamic range so that you can still hear dialogue and leave the sound field unaffected. 2 Select and confirm. 3 Select a level and confirm. Note This function depends on the disc so it may not work at times. Attenuating analogue input Analogue input can cause distortion and the "OVERFLOW" warning to appear on the display. Turn the attenuator on if this occurs. Delaying audio Delay audio if there appears to be a difference in timing between audio and pictures. 2 Select and confirm. 3 Select and confirm. Select "OFF" to cancel. 2 Select and confirm. 3 Select and confirm. OFF: STANDARD: MAX: Off The level recommended by the producer of the software for household viewing. The maximum allowable compression (recommended for night viewing) Factory setting: OFF OFF: Off ON: On Factory setting: OFF OFF: No delay ON: Audio delayed Factory setting: OFF Resetting factory settings Do the necessary settings again after this. 2 Select and confirm. 3 Select and confirm. YES: NO: Reset all settings to those made in the factory Cancel Select "NO" to cancel. Factory setting: YES Note Input switches to TUNER after you select "YES". (Preset channels remain intact.) 29 RQTV0156
-
 1
1 -
2
-
3
-
4
-
5
-
6
-
7
-
8
-
9
-
10
-
11
-
12
-
13
-
14
-
15
-
16
-
17
-
18
-
19
-
20
-
21
-
22
-
23
-
 24
24 -
 25
25 -
 26
26 -
 27
27 -
 28
28 -
 29
29 -
 30
30 -
 31
31 -
 32
32 -
 33
33 -
 34
34 -
35
-
36
-
37
-
38
-
39
-
40
 |
 |
