Panasonic SAXR58 SAXR58 User Guide - Page 15
Start performing auto speaker setup., Auto speaker setup finishes.
 |
View all Panasonic SAXR58 manuals
Add to My Manuals
Save this manual to your list of manuals |
Page 15 highlights
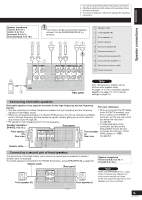
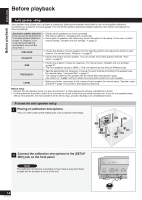
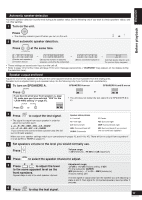
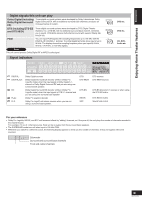
DIRECT NAVITGOAPTOMRENU Before playback ENGLISH 3 Start performing auto speaker setup. Turn on the unit. Press • The standby indicator goes off when you turn on the unit. AUTO a) Press and hold TEST for about 2 seconds. • [AUTO SPEAKER SETUP] indicator starts flashing. AUTO SPEAKER SETUP AUTO SPEAKER SETUP • "AUTO SETUP" appears on the display. b) The unit checks that you have correctly connected the calibration microphone. TUNER CD BAND PLAYER VCR DVD ANALOG 6CH • Turn off all components before making any connecCtHions. • Peripheral equipment and cables sold separately unless otherwise indicated. VOLUME • To connect equipment, refer to the apDpISrCopr0iate operating instructions. DIRECT TUNING -/-- SKIP SLOW/SEARCH STOP PAUSE PLAY DRIVE SELECT DVD RECORDER MANUAL SKIP ONE TOUCH PLAY FUNCTIONS AUTO SPEAKER SETUP AUTO ADVANCED SPEAKER SETUP DUAL AMP BI-AMP SPEAKERS A B SURROUND AUTO DETECTOR AUX S VIDEO IN VIDEO IN L AUDIO IN R TUNE SETUP MIC ENTER SUB MENU RETURN SUBWOOFER TV OFF DIMMER LEVEL EFFECT VOL NEO : 6 TV/AV SFC AUTO MUSIC MOVIE TEST MUTING c) The automatic setup starts the automatic speaker detection, STEP 1, STEP 2, and STEP 3 calibration as follows. (Automatic speaker detection) ↓ STEP1 L→STEP1 C→STEP1 R→STEP1 RS→STEP1 SBR →STEP1 SBL→STEP1 LS→STEP1 SUBW→PROCESSING ↓ Speaker abbreviations L: Front left C: Center S: Surround RS: Surround right SB: Surround back SBR: Surround back right W/SUBW: Subwoofer R: Front right LS: Surround left SBL: Surround back left STEP2 L→STEP2 C→STEP2 R→STEP2 RS→STEP2 SBR →STEP2 SBL→STEP2 LS→STEP2 SUBW→PROCESSING ↓ For your reference • Loud test tones are output from each speaker during the configuration. • The checked settings display for a minimum of 3 seconds each. STEP3 L→STEP3 C→STEP3 R→STEP3 RS→STEP3 SBR →STEP3 SBL→STEP3 LS→STEP3 SUBW→PROCESSING During setup, operations may stop when there is an error message on the display. Refer to page 16 for troubleshooting. 4 Auto speaker setup finishes. • "COMPLETE" appears on the display and all calibrations are saved. • [AUTO SPEAKER SETUP] indicator lights. AUTO • To exit, press TEST . • Disconnect the calibration microphone. To cancel during setup Press any button on the main unit or remote control. "CANCELED" appears on the display. Note Perform auto speaker setup again if you have changed the speakers, speaker positions, or the layout of your listening environment. 15 RQTV0156
-
 1
1 -
2
-
3
-
4
-
5
-
6
-
7
-
8
-
9
-
 10
10 -
 11
11 -
 12
12 -
 13
13 -
 14
14 -
 15
15 -
 16
16 -
 17
17 -
 18
18 -
 19
19 -
 20
20 -
21
-
22
-
23
-
24
-
25
-
26
-
27
-
28
-
29
-
30
-
31
-
32
-
33
-
34
-
35
-
36
-
37
-
38
-
39
-
40
 |
 |
