Panasonic SAXR58 SAXR58 User Guide - Page 5
CONNECTIONS, HOME THEATER CONNECTIONS, Connecting your television and DVD equipment - viera
 |
View all Panasonic SAXR58 manuals
Add to My Manuals
Save this manual to your list of manuals |
Page 5 highlights
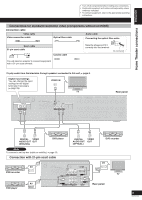
Home Theater connections ENGLISH Home Theater connections • Turn off all components before making any connections. • Peripheral equipment and cables sold separately unless otherwise indicated. • To connect equipment, refer to the appropriate operating instructions. Connecting your television and DVD equipment High-quality audio and video simply with HDMI connection AUTO ADVANCED SPEAKER SETUP DUAL AMP BI-AMP SPEAKERS A B SURROUND AUTO DETECTOR AUX S VIDEO IN VIDEO IN L AUDIO IN R TUNE SETUP MIC HDMI MENU SETUP INPUT SELECTOR RETURN ENTER VOLUME [HDMI] • The HDMI (High Definition Multimedia Interface) connection means you only need one cable to transmit digital audio and video between two pieces of equipment. It also carries a command signal that allows you to control your Panasonic TV (VIERA) or DVD recorder (DIGA) with one touch of a button (➡ page 21). • DVD-Audio multi-channel audio is carried as a digital signal. Some DVD equipment (e.g. with HDMI Ver.1.0) cannot output multi-channel audio as a digital signal. Use the 6-channel discrete connection (➡ pages 8 and 20) if this is the case. • The HDMI indicator lights when you are using this connection. Connection cable Video and Audio cable HDMI Cable (Use a Panasonic HDMI cable for best results.) [Recommended part number: RP-CDHG15 (1.5 m), RP-CDHG30 (3.0 m), RP-CDHG50 (5.0 m) etc.] • Use only HDMI cables that have the HDMI logo (as shown on the cover). To play audio from the television through speakers connected to this unit, ➡ page 9. TV HDMI (AV IN) LOOP EXT LOOP ANT GND FM ANT DIGITAL IN AM ANT (TV/STB) (DVD RECORDER) (DVD PLAYER) (CD) OPTICAL1 OPTICAL2 COAXIAL1 COAXIAL2 Rear panel �OU�T S VIDEO (�DDVVDDR�E�C�OR�D�E�R)�IN� VIDEO OUT IN IN IN OUT IN IN TV MONITOR DVD PLAYER DVD RECORDER TV/STB TV MONITOR DVD PLAYER DVD RECORDER CENTER IN VCR L IN TV/STB R IN CD SUBWOOFER SURROUND FRONT IN IN DVD/DVD 6CH IN DVD RECORDER VCR AUDIO IN OUT TV/STB SUBWOOFER If you decide to connect a DVD player through the HDMI, change the "HDMI settings" (➡ page 29). FRONT A FRONT B R LF L BI-WIRE R HF L CENTER SURROUND R L SURROUND BACK R L Note Connect only DVD equipment to the HDMI input terminal of the unit. Connecting other equipment may prevent the output SPEAKERS of sounds or show distorted Y pPiBcturPeR s. Y PB PR Y PB PR TV MONITOR OUT DVD RECORDER IN TV / STB IN In such caCsOMePsON,ENsTeVIDeEO"Connecting other equipment", ➡ page 10, for connections other than HDMI. DVD equipment DVD HDMI (AV OUT) Audio and video signal flow when you have used HDMI connections The audio and video signals from DVD equipment pass through to the television even if this unit is set to standby. When this unit is on Video Audio Video TV When this unit is in standby mode (in standby ON condition, ➡ page 29) Audio Speakers This unit Audio DVD equipment TV Video Video Audio Speakers This unit Audio DVD equipment For your reference • Audio signals from HDMI connection takes priority to digital terminal connections (➡ page 6 and 7). • This unit's HDMI can carry video signals up to 1125i (1080i) (even when this unit is in standby mode). 1125i: an interlace (jump scanning) system that divides 1,125 scan lines in two and sends each half alternately every 1/60 second. 5 RQTV0156
-
 1
1 -
 2
2 -
 3
3 -
 4
4 -
 5
5 -
 6
6 -
 7
7 -
 8
8 -
 9
9 -
 10
10 -
 11
11 -
12
-
13
-
14
-
15
-
16
-
17
-
18
-
19
-
20
-
21
-
22
-
23
-
24
-
25
-
26
-
27
-
28
-
29
-
30
-
31
-
32
-
33
-
34
-
35
-
36
-
37
-
38
-
39
-
40
 |
 |
