Panasonic VDRM30 VDRM30 User Guide - Page 19
NAMES OF PARTS, 2.5 type Liquid Crystal Display LCD
 |
View all Panasonic VDRM30 manuals
Add to My Manuals
Save this manual to your list of manuals |
Page 19 highlights
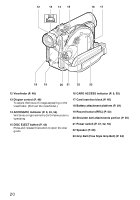
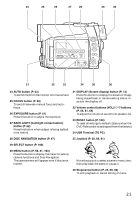
Names of Parts 1234 5 6 78 A/V MIC (Inside the cover) 11 9 10 BATTERY EJECT (Bottom) 1 Recording indicator (P. 95) The red indicator will light during recording. 2 Optical 10× zoom lens (P. 57) 3 Lens hood (P. 58) Always remove this lens hood when using generally available tele-conversion or wideconversion lens. 4 Infrared receiver (P. 37) When the remote controller is used to operate the DVD Palmcorder, this receiver will receive the infrared signal. 7 External microphone jack (P. 54) 8 AV input/output jack (P. 67, 74) 9 Stereo microphone (P. 54) 10 2.5" type Liquid Crystal Display (LCD) (inside) (P. 48) 11 BATTERY EJECT switch (P. 39) The BATTERY EJECT switch is located on the bottom of this DVD Palmcorder: Slide it when removing the battery pack. 5 Zoom lever (P. 57) Push the lever to the T side for telephoto, or to the W side for wide-angle. 6 Accessory shoe 19
-
 1
1 -
2
-
3
-
4
-
5
-
6
-
7
-
8
-
9
-
10
-
11
-
12
-
13
-
 14
14 -
 15
15 -
 16
16 -
 17
17 -
 18
18 -
 19
19 -
 20
20 -
 21
21 -
 22
22 -
 23
23 -
 24
24 -
25
-
26
-
27
-
28
-
29
-
30
-
31
-
32
-
33
-
34
-
35
-
36
-
37
-
38
-
39
-
40
-
41
-
42
-
43
-
44
-
45
-
46
-
47
-
48
-
49
-
50
-
51
-
52
-
53
-
54
-
55
-
56
-
57
-
58
-
59
-
60
-
61
-
62
-
63
-
64
-
65
-
66
-
67
-
68
-
69
-
70
-
71
-
72
-
73
-
74
-
75
-
76
-
77
-
78
-
79
-
80
-
81
-
82
-
83
-
84
-
85
-
86
-
87
-
88
-
89
-
90
-
91
-
92
-
93
-
94
-
95
-
96
-
97
-
98
-
99
-
100
-
101
-
102
-
103
-
104
-
105
-
106
-
107
-
108
-
109
-
110
-
111
-
112
-
113
-
114
-
115
-
116
-
117
-
118
-
119
-
120
-
121
-
122
-
123
-
124
-
125
-
126
-
127
-
128
-
129
-
130
-
131
-
132
-
133
-
134
-
135
-
136
-
137
-
138
-
139
-
140
-
141
-
142
-
143
-
144
-
145
-
146
-
147
-
148
-
149
-
150
-
151
-
152
-
153
-
154
-
155
-
156
-
157
-
158
-
159
-
160
-
161
-
162
-
163
-
164
-
165
-
166
-
167
-
168
-
169
-
170
-
171
-
172
-
173
-
174
-
175
-
176
 |
 |
