Panasonic WJRT416V WJRT416V User Guide - Page 11
Major operating controls and their functions, Front View - wj rt416v g
 |
View all Panasonic WJRT416V manuals
Add to My Manuals
Save this manual to your list of manuals |
Page 11 highlights
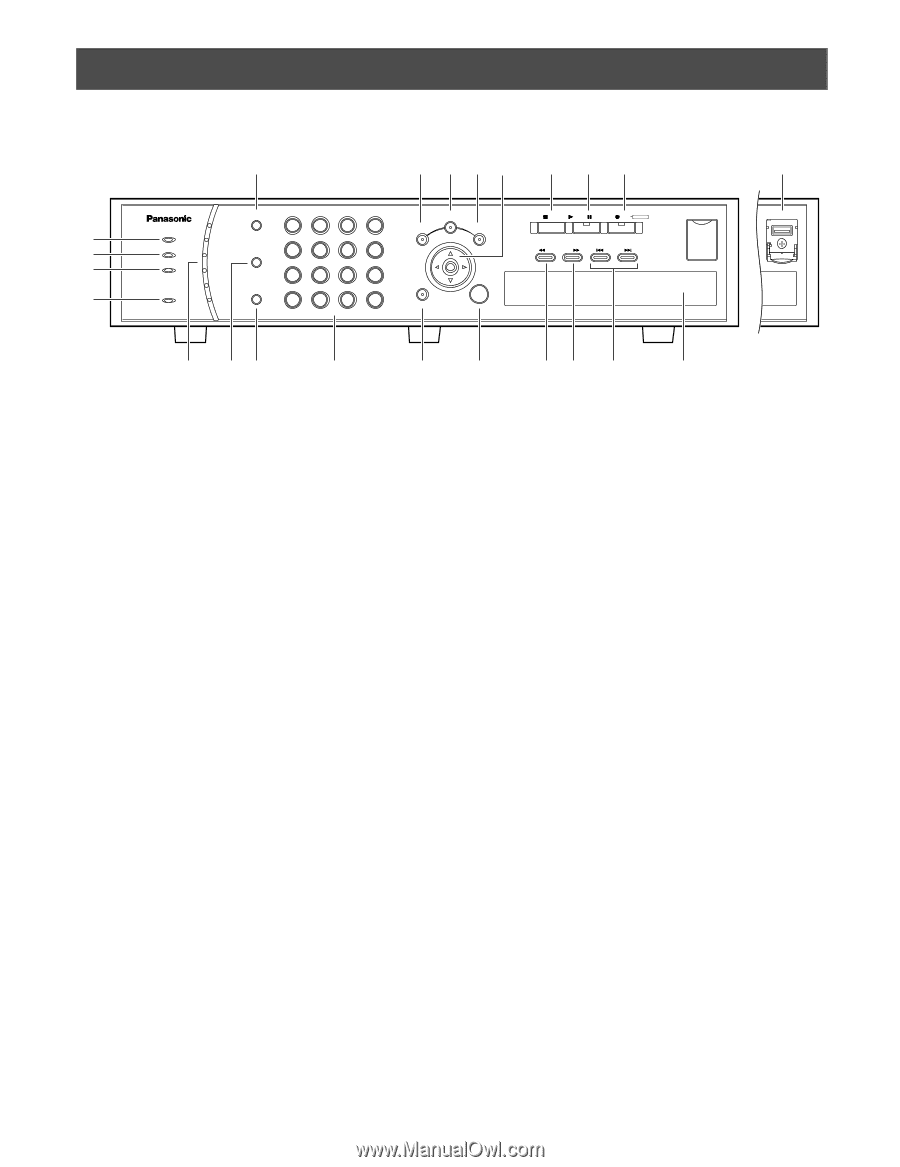
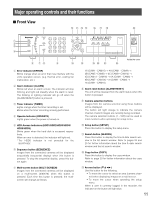
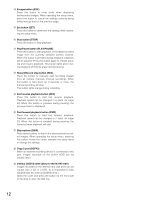
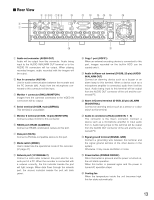
Major operating controls and their functions Front View y !0 !1 !2 !3 !6 !7 !8 @2 q w e r ERROR ALARM TIMER OPERATE HDD SEQUENCE 1 1 2 3 4 2 MULTI 5 6 7 8 3 SCREEN 4 9 10/0 11 12 5 ALARM RESET 6 13 14 15 16 SETUP SEARCH COPY ESC SET t ui o !4 !5 STOP PLAY PAUSE REC REC STOP REV FWD SKIP - + COPY2 Digital Disk Recorder WJ-RT416 !9 @0 @1 Inside the cover @3 q Error indicator (ERROR) Blinks orange when an error that may interfere with the unit's operation occurs. (e.g. thermal error, cooling fan malfunction, etc.) w Alarm Indicator (ALARM) Blinks red when an alarm occurs. The indicator will stop blinking and light red steadily when the alarm is reset. The blinking or lighting indicator will go off when the [ALARM RESET] button is pressed. e Timer Indicator (TIMER) Lights orange when the timer recording is set. Blinks while the timer recording is being performed. r Operate Indicator (OPERATE) Lights green when the power is turned on. t HDD Access Indicators (HDD1/HDD2/HDD3/HDD4/ HDD5/HDD6) Blinks green when the hard disk is accessed respectively. When an error is detected, the indicator will light red. * The HDD6 indicator is not provided for the WJ-RT416V. y Sequence button (SEQUENCE) Images from the connected cameras will be displayed sequentially (sequential display) when this button is pressed. To stop the sequential display, press this button again. u Multi-screen button (MULTI SCREEN) Images from the connected cameras will be displayed on a multi-screen (4/6/9/16) when this button is pressed. Each time this button is pressed, the multiscreen will change as follows. 16 (CAM1 - CAM16) → 4A (CAM1 - CAM4) → 4B (CAM5 - CAM8) → 4C (CAM9 - CAM12) → 4D (CAM13 - CAM16) → 6A (CAM1 - CAM6) → 6B (CAM7 - CAM12) → 9 (CAM1 - CAM9) → 16 (CAM1 - CAM16) i Alarm reset button (ALARM RESET) The unit will be released from the alarm status when this button is pressed. o Camera selection buttons Images from the camera selected using these buttons will be displayed. The button will light orange to indicate the camera channel of which images are currently being recorded. The camera selection buttons (1 - 10/0) can be used to enter numbers when operating the setup menu. !0 Setup button (SETUP) Press this button to display the setup menu. !1 Search button (SEARCH) Press this button to display the time & date search window or the list search window. Refer to pages 24 and 25 for further information about the time & date search window and the list search window. !2 Copy button (COPY) Press this button to display the copy window. Refer to page 29 for further information about the copy window. !3 Arrows button (CDAB) Use this button for the following. • To move the cursor to select an area (camera channel) when displaying images on a multi-screen. • To move the cursor when operating the setup menu. When a user is currently logged in the recorder, the indicator on the button will light blue. 11
-
 1
1 -
2
-
3
-
4
-
5
-
 6
6 -
 7
7 -
 8
8 -
 9
9 -
 10
10 -
 11
11 -
 12
12 -
 13
13 -
 14
14 -
 15
15 -
 16
16 -
17
-
18
-
19
-
20
-
21
-
22
-
23
-
24
-
25
-
26
-
27
-
28
-
29
-
30
-
31
-
32
-
33
-
34
-
35
-
36
-
37
-
38
-
39
-
40
-
41
-
42
-
43
-
44
-
45
-
46
-
47
-
48
-
49
-
50
-
51
-
52
-
53
-
54
-
55
-
56
-
57
-
58
-
59
-
60
-
61
-
62
-
63
-
64
-
65
-
66
-
67
-
68
-
69
-
70
-
71
-
72
-
73
-
74
-
75
-
76
-
77
-
78
-
79
-
80
 |
 |