Panasonic WJRT416V WJRT416V User Guide - Page 46
Connection with a PC, Connect the recorder and a PC directly, Add the recorder to the existing network
 |
View all Panasonic WJRT416V manuals
Add to My Manuals
Save this manual to your list of manuals |
Page 46 highlights
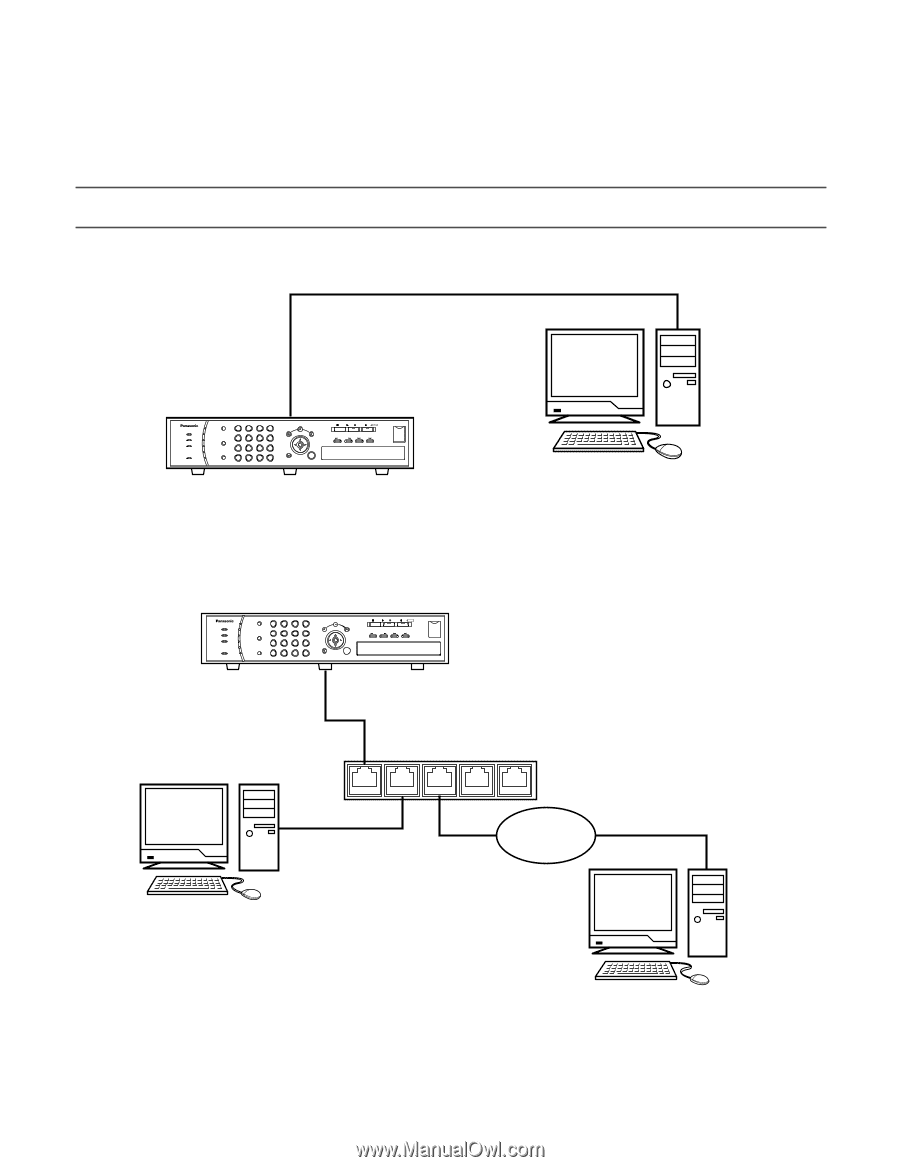
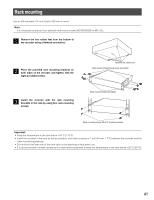
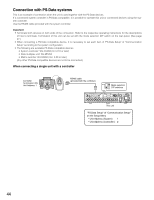
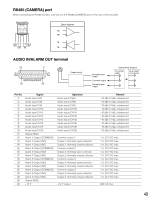
Connection with a PC Required devices and cables vary depending on how to connect them. Before starting the connections, check the required devices and cables for your environment. The IP addresses of the recorders in the following connection examples are the default settings. Connect the recorder and a PC directly Important: When connecting the recorder and a PC directly without using a hub or a router, use a cross LAN cable to connect them. LAN cable (10BASE-T/100BASE-Tx, category 5, cross) ERROR ALARM TIMER OPERATE HDD SEQUENCE 1 1 2 3 4 2 MULTI 5 6 7 8 3 SCREEN 4 9 10/0 11 12 5 ALARM RESET 6 13 14 15 16 SETUP SEARCH COPY ESC SET STOP PLAY PAUSE REC REC STOP REV FWD SKIP - + Digital Disk Recorder WJ-RT416 IP address: 192.168.0.250 Subnet mask: 255.255.255.0 PC IP address: 192.168.0.x (except 0, 250 and 255) Subnet mask: 255.255.255.0 Add the recorder to the existing network Install a hub or a router between the recorder and a PC. Use a LAN cable to connect between the recorder and the hub. ERROR ALARM TIMER OPERATE HDD SEQUENCE 1 1 2 3 4 2 MULT 5 6 7 8 3 SCREEN 4 9 10/0 11 12 5 ALARM RESET 6 13 14 15 16 SETUP SEARCH COPY ESC SET STOP PLAY PAUSE REC REC STOP REV FWD SKIP - + Digital Disk Recorder WJ-RT416 IP address: 192.168.0.250 Subnet mask: 255.255.255.0 Gateway address: 192.168.0.1 LAN cable (10BASE-T/100BASE-Tx, category 5, straight) Hub/router IP address: 192.168.0.1 Subnet mask: 255.255.255.0 LAN PC IP address: 192.168.0.x (except 0, 1, 250 and 255) Subnet mask: 255.255.255.0 Gateway address: 192.168.0.1 PC 46
-
 1
1 -
2
-
3
-
4
-
5
-
6
-
7
-
8
-
9
-
10
-
11
-
12
-
13
-
14
-
15
-
16
-
17
-
18
-
19
-
20
-
21
-
22
-
23
-
24
-
25
-
26
-
27
-
28
-
29
-
30
-
31
-
32
-
33
-
34
-
35
-
36
-
37
-
38
-
39
-
40
-
 41
41 -
 42
42 -
 43
43 -
 44
44 -
 45
45 -
 46
46 -
 47
47 -
 48
48 -
 49
49 -
 50
50 -
 51
51 -
52
-
53
-
54
-
55
-
56
-
57
-
58
-
59
-
60
-
61
-
62
-
63
-
64
-
65
-
66
-
67
-
68
-
69
-
70
-
71
-
72
-
73
-
74
-
75
-
76
-
77
-
78
-
79
-
80
 |
 |