Panasonic WVNW474S WVNW474S User Guide - Page 11
Mounting the Camera, Disassembling the Camera, Optional Heater Unit
 |
View all Panasonic WVNW474S manuals
Add to My Manuals
Save this manual to your list of manuals |
Page 11 highlights
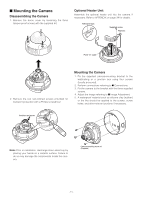
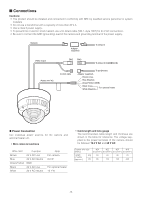
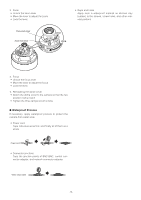
■ Mounting the Camera Disassembling the Camera 1. Remove the dome cover by loosening the three tamper-proof screws with the supplied bit. Optional Heater Unit Assemble the optional heater unit into the camera if necessary. Refer to APPENDIX on page 34 for details. Adhesive tape Fold Supplied screw Harness Point "A" (wall) 2. Remove the two red-colored screws provided for transport protection with a Philips screwdriver. Mounting the Camera 1. Fix the supplied camera-mounting bracket to the wall/ceiling or a junction box using four screws (locally procured). 2. Perform connections referring to ■ Connections. 3. Fix the camera to the bracket with the three supplied screws. 4. Adjust the image referring to ■ Image Adjustment. 5. A waterproof material such as silicone clay (rubber) or the like should be applied to the screws, screw holes, and other relevant portions if necessary. Another red screw Note: Prior to installation, discharge static electricity by placing your hands on a metallic surface. Failure to do so may damage the components inside the camera. Camera mounting screw x3 (Supplied) -11-
-
 1
1 -
2
-
3
-
4
-
5
-
 6
6 -
 7
7 -
 8
8 -
 9
9 -
 10
10 -
 11
11 -
 12
12 -
 13
13 -
 14
14 -
 15
15 -
 16
16 -
17
-
18
-
19
-
20
-
21
-
22
-
23
-
24
-
25
-
26
-
27
-
28
-
29
-
30
-
31
-
32
-
33
-
34
-
35
-
36
-
37
-
38
-
39
-
40
-
41
-
42
-
43
-
44
-
45
-
46
-
47
-
48
-
49
-
50
-
51
-
52
-
53
-
54
-
55
-
56
-
57
-
58
-
59
-
60
-
61
-
62
-
63
-
64
-
65
-
66
-
67
-
68
 |
 |
