Panasonic WVSC385 WVSC385 User Guide - Page 15
Installations/Connections, Install on ceiling - dome housing
 |
View all Panasonic WVSC385 manuals
Add to My Manuals
Save this manual to your list of manuals |
Page 15 highlights
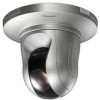
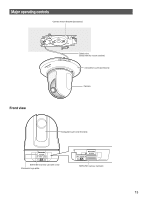
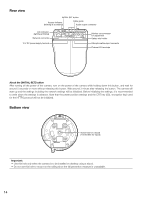
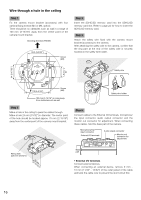
Installations/Connections Caution: • FOR UL LISTED MODEL(S), ONLY CONNECT 12 V DC CLASS 2 POWER SUPPLY. The following are descriptions of how to install the camera. The camera can be installed on a ceiling. The camera can also be installed upside down on the bracket or can be placed upside down on a desktop. Before starting the installation/connection, prepare the required devices and cables. Before starting the connection, turn off the power of the devices including the camera and the PC or disconnect from the 12 V DC power supply. Install on ceiling When installing the camera on a ceiling, there are two methods; wiring through a hole in the ceiling (☞ page 16) and wiring through a cable guide (unnecessary to make a hole in the ceiling) (☞ page 20). Important: • Procure 4 screws (M4 or M6) to secure the camera mount bracket (accessory) to the ceiling according to the material of the installation area. In this case, wood screws and nails should not be used. When installing on concrete ceiling: Fix with anchor bolts (M6). (Recommended tightening torque: M4: F1.6 N·m {1.18 lbf·ft}, M6: F5.0 N·m {3.69 lbf·ft}) • Required pull-out capacity of a single screw/bolt is 196 N {19.99 lbf} or more. • If a ceiling board such as plaster board is too weak to support the total weight, the area shall be sufficiently reinforced or the optional ceiling mount bracket for the camera, WV-Q105, or the optional ceiling embedding bracket, WV-Q155S/ WV-Q155C, shall be used. • When using an outdoor housing to install the camera, use an optional inner cover (WV-Q157). • When using an optional mount bracket or inner cover, refer to the operating instructions of the bracket in use. • Remove the cover film from the transparent part of the dome cover after the installation is complete. • Be sure to install the safety wire to prevent a fall of the camera resulting in injury or accidents in case the mount bracket comes off. Safety wire angle Anchor bolt (Procured locally) Safety wire Roof space WV-Q105 (option) Mounting screws (4 pcs, WV-Q105 supplied) Ceiling board such as plaster board WV-SC385 Camera mount bracket (accessory) Decorative cover (accessory) Camera 15
-
 1
1 -
2
-
3
-
4
-
5
-
6
-
7
-
8
-
9
-
 10
10 -
 11
11 -
 12
12 -
 13
13 -
 14
14 -
 15
15 -
 16
16 -
 17
17 -
 18
18 -
 19
19 -
 20
20 -
21
-
22
-
23
-
24
-
25
-
26
-
27
-
28
-
29
-
30
-
31
-
32
-
33
-
34
-
35
-
36
 |
 |
