Panasonic WVSC385 WVSC385 User Guide - Page 20
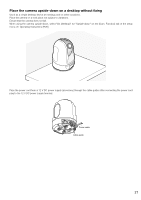
Place the camera upside-down by fixing on the bracket, Wire without making a hole in the ceiling - wv sc 385
 |
View all Panasonic WVSC385 manuals
Add to My Manuals
Save this manual to your list of manuals |
Page 20 highlights
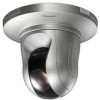
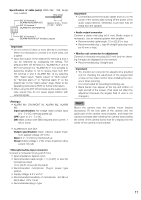
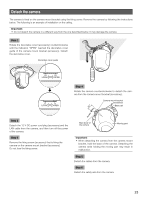
Wire without making a hole in the ceiling Step 1 Install the camera by following step 1 and steps 3 - 8 of the "Wire through a hole in the ceiling" section (☞ pages 16 - 18). It is unnecessary to make a hole in the ceiling as described in step 2 of the "Wire through a hole in the ceiling" section. Step 2 Remove the tab on the rear of the decorative cover (accessory) that is blocking the wiring hole. Attach the decorative cover by following step 9 of the "Wire through a hole in the ceiling" section (☞ page 19). Wire through the wiring hole of the decorative cover. LOCK OPEN OPEN LOCK Place the camera upside-down by fixing on the bracket When using the camera upside-down, fix the camera using the camera mount bracket (accessory) to prevent a fall. If necessary, attach the decorative cover (accessory) to the camera. Install the camera by following step 1 and steps 3 - 9 of the "Wire through a hole in the ceiling" section (☞ pages 16 - 19). When using the camera upside-down, select "On (desktop)" for "Upside-down" on the [Cam. Function] tab of the setup menu. (☞ Operating Instructions (PDF)) WV-SC385 Important: • Prepare four fixing screws (M4 or M6) to be used to mount the camera mount bracket (accessory) according to the material of the place where the camera mount bracket is to be installed. 20
-
 1
1 -
2
-
3
-
4
-
5
-
6
-
7
-
8
-
9
-
10
-
11
-
12
-
13
-
14
-
 15
15 -
 16
16 -
 17
17 -
 18
18 -
 19
19 -
 20
20 -
 21
21 -
 22
22 -
 23
23 -
 24
24 -
 25
25 -
26
-
27
-
28
-
29
-
30
-
31
-
32
-
33
-
34
-
35
-
36
 |
 |