Panasonic WVSC385 WVSC385 User Guide - Page 19
For Ul Listed Models, Only Connect 12 V, Dc Class 2 Power Supply. - cover
 |
View all Panasonic WVSC385 manuals
Add to My Manuals
Save this manual to your list of manuals |
Page 19 highlights
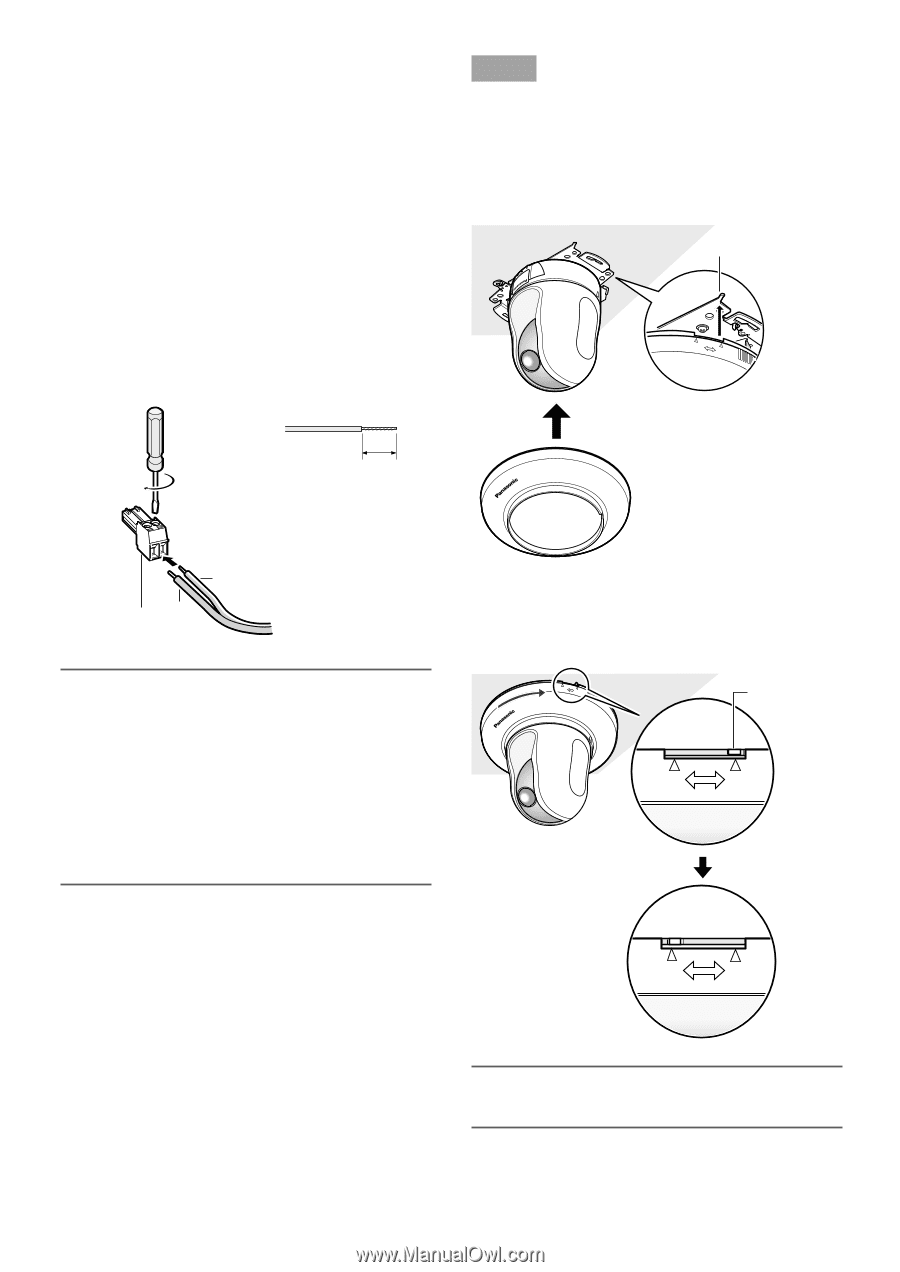
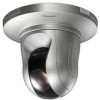
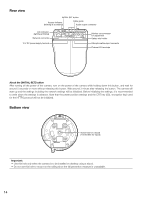
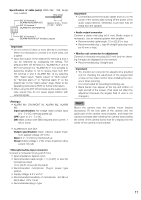
• 12 V DC power supply terminal q Loosen the screw of the power cord plug (accessory). w Connect the cable of the 12 V DC power supply* to the power cord plug. Strip 3 mm to 7 mm {1/8" to 9/32"} from the end of the wire, and twist the stripped part of the wire sufficiently to avoid short circuit. Specification of cable (wire): 16 AWG - 24 AWG, Single core, twisted • Check whether the stripped part of the wire is not exposed and is securely connected. e Tighten the screw of the power cord plug. r Connect the power cord plug to the 12 V DC power supply terminal on the rear of the camera. * FOR UL LISTED MODEL(S), ONLY CONNECT 12 V DC CLASS 2 POWER SUPPLY. Strip range Step 9 After completing the cable connections, attach the decorative cover (accessory). q Align the indication "OPEN" of the decorative cover to the decorative cover guide of the camera mount bracket. Decorative cover guide LOCK OPEN Approx. 3 mm - 7 mm {1/8" - 9/32"} −+ + - 12 V DC power cord plug (accessory) Important: • The 12 V DC power supply shall be insulated from the commercial AC power. • Be sure to use the power cord plug provided with this product. • Be sure to fully insert the power cord plug into the 12 V DC power supply terminal. Otherwise, it may damage the camera or cause malfunction. • Be sure to use an AC adapter compliant with the Specifications regarding power source and power consumption (☞ page 31). WV-SC385 Decorative cover (accessory) w Rotate the decorative cover clockwise until the indication "LOCK" reaches the decorative cover guide of the camera mount bracket. WV-SC385 LOCK OPEN Decorative cover guide LOCK OPEN LOCK OPEN Important: • Make sure that no cable is pinched by the decorative cover. 19
-
 1
1 -
2
-
3
-
4
-
5
-
6
-
7
-
8
-
9
-
10
-
11
-
12
-
13
-
 14
14 -
 15
15 -
 16
16 -
 17
17 -
 18
18 -
 19
19 -
 20
20 -
 21
21 -
 22
22 -
 23
23 -
 24
24 -
25
-
26
-
27
-
28
-
29
-
30
-
31
-
32
-
33
-
34
-
35
-
36
 |
 |