Pentax K100D User Manual - Page 92
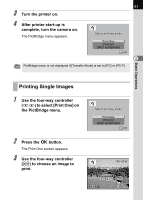
Connecting the Camera to the Printer, using the USB cable supplied with the camera.
 |
UPC - 027075121393
View all Pentax K100D manuals
Add to My Manuals
Save this manual to your list of manuals |
Page 92 highlights
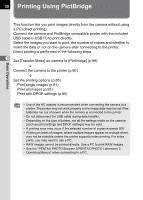
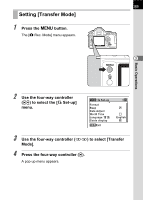
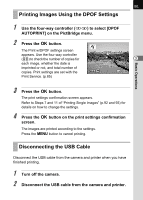
90 5 Use the four-way controller (mn) to select [PictBridge]. 6 3 Press the 4 button. The setting is changed. 7 Press the 3 button. Set-up Brightness Level Video Out Transfer Mode Auto Power Off Folder Name File # Cancel 0 NTSC PC PictBridge PC-F OK OK Basic Operations Connecting the Camera to the Printer 1 Turn the camera off. 2 Connect the camera and PictBridge compatible printer using the USB cable supplied with the camera. The PictBridge logo is displayed on PictBridge compatible printers.
-
 1
1 -
2
-
3
-
4
-
5
-
6
-
7
-
8
-
9
-
10
-
11
-
12
-
13
-
14
-
15
-
16
-
17
-
18
-
19
-
20
-
21
-
22
-
23
-
24
-
25
-
26
-
27
-
28
-
29
-
30
-
31
-
32
-
33
-
34
-
35
-
36
-
37
-
38
-
39
-
40
-
41
-
42
-
43
-
44
-
45
-
46
-
47
-
48
-
49
-
50
-
51
-
52
-
53
-
54
-
55
-
56
-
57
-
58
-
59
-
60
-
61
-
62
-
63
-
64
-
65
-
66
-
67
-
68
-
69
-
70
-
71
-
72
-
73
-
74
-
75
-
76
-
77
-
78
-
79
-
80
-
81
-
82
-
83
-
84
-
85
-
86
-
 87
87 -
 88
88 -
 89
89 -
 90
90 -
 91
91 -
 92
92 -
 93
93 -
 94
94 -
 95
95 -
 96
96 -
 97
97 -
98
-
99
-
100
-
101
-
102
-
103
-
104
-
105
-
106
-
107
-
108
-
109
-
110
-
111
-
112
-
113
-
114
-
115
-
116
-
117
-
118
-
119
-
120
-
121
-
122
-
123
-
124
-
125
-
126
-
127
-
128
-
129
-
130
-
131
-
132
-
133
-
134
-
135
-
136
-
137
-
138
-
139
-
140
-
141
-
142
-
143
-
144
-
145
-
146
-
147
-
148
-
149
-
150
-
151
-
152
-
153
-
154
-
155
-
156
-
157
-
158
-
159
-
160
-
161
-
162
-
163
-
164
-
165
-
166
-
167
-
168
-
169
-
170
-
171
-
172
-
173
-
174
-
175
-
176
-
177
-
178
-
179
-
180
-
181
-
182
-
183
-
184
-
185
-
186
-
187
-
188
-
189
-
190
-
191
-
192
-
193
-
194
-
195
-
196
-
197
-
198
-
199
-
200
-
201
-
202
-
203
-
204
-
205
-
206
-
207
-
208
-
209
-
210
-
211
-
212
-
213
-
214
-
215
-
216
-
217
-
218
-
219
-
220
 |
 |

90
3
Basic Operations
5
Use the four-way controller
(
mn
) to select [PictBridge].
6
Press the
4
button.
The setting is changed.
7
Press the
3
button.
1
Turn the camera off.
2
Connect the camera and PictBridge compatible printer
using the USB cable supplied with the camera.
The PictBridge logo is displayed on PictBridge compatible printers.
Connecting the Camera to the Printer
NTSC
PC
PC-F
Brightness Level
Set-up
Video Out
Transfer Mode
Auto Power Off
Folder Name
File #
0
OK
OK
Cancel
PictBridge