Pioneer DEH-P8300UB Owner's Manual
Pioneer DEH-P8300UB Manual
 |
UPC - 884938118569
View all Pioneer DEH-P8300UB manuals
Add to My Manuals
Save this manual to your list of manuals |
Pioneer DEH-P8300UB manual content summary:
- Pioneer DEH-P8300UB | Owner's Manual - Page 1
CD RDS RECEIVER AUTORADIO CD RDS REPRODUCTOR DE CD CON RECEPTOR RDS DEH-P8300UB Owner's Manual Mode d'emploi Manual de instrucciones Español Français English - Pioneer DEH-P8300UB | Owner's Manual - Page 2
5 CD/CD-R/CD-RW and USB storage devices 6 iPod 7 Using Pandoraâ 9 Audio Adjustments 10 Initial Settings 11 Other Functions 12 Available accessories Bluetooth Audio 13 Bluetooth Telephone 14 HD Radioä tuner 18 XM tuner 18 SIRIUS Satellite Radio tuner 19 Installation Connections 21 Installation 22 - Pioneer DEH-P8300UB | Owner's Manual - Page 3
loss or theft. ! Access owner's manuals, spare parts information, service information, and much more. About this manual ! In the following instructions, USB memories and USB audio players are collectively referred to as "USB storage device." ! In this manual, iPod and iPhone will be referred to as - Pioneer DEH-P8300UB | Owner's Manual - Page 4
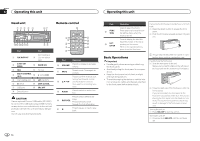
mm stereo jack) 2 S.Rtrv/SAT MODE 3 TAG a BAND/ESC b (list) 4 MULTI-CONTROL c (M.C.) (iPod)/LOC 5 Disc loading slot d (random) 6 h (eject) 7 USB port e DISP/ /SCRL f SRC/OFF 8 Detach button CAUTION Use an optional Pioneer USB cable (CD-U50E) to connect the USB audio player/USB memory - Pioneer DEH-P8300UB | Owner's Manual - Page 5
the HD Radio tuner is connected to this unit, tuner source is skipped. ! If plug and play is on and either an iPhone or iPod touch is connected, it may take time for your source to switch. Refer to USB plug&play (plug and play) on page 11. Use and care of the remote control Using the remote control - Pioneer DEH-P8300UB | Owner's Manual - Page 6
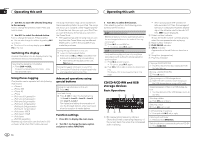
to only those radio stations with sufficiently strong signals for good reception. 1 Press M.C. to turn local on. ! To cancel, press M.C. again. 2 Push M.C. left or right to select the desired set- ting. For details, refer to Local seek tuning on this page. CD/CD-R/CD-RW and USB storage devices Basic - Pioneer DEH-P8300UB | Owner's Manual - Page 7
Rtrv indicator Appears when Sound Retriever function is on. 6 Song time (progress bar) 7 Play time indicator Playing songs on an iPod 1 Open the USB connector cover and plug in an iPod using the iPod Dock Connector to USB Cable. Selecting a track (chapter) 1 Push M.C. left or right. Fast forwarding - Pioneer DEH-P8300UB | Owner's Manual - Page 8
models. - iPod nano 1st generation - iPod 5th generation APP mode is compatible with the following iPod models. ! iPod touch 3rd generation (software version 3.0 or later) ! iPod touch 2nd generation (software version 3.0 or later) ! iPod touch 1st generation (software version 3.0 or later) ! iPhone - Pioneer DEH-P8300UB | Owner's Manual - Page 9
, and adjusting Cell Network Audio Quality. Pandora Internet radio is a music service not affiliated with Pioneer. More information is available at http://www.pandora.com. You can play the Pandora by connecting your iPod which was installed the Pandora application. Giving a Thumbs Down 1 Push - Pioneer DEH-P8300UB | Owner's Manual - Page 10
TAG to display the setting mode. 2 Push M.C. left or right to change the mode; press to output setting is Rear SP :S/W. Refer to S/W control (rear output and subwoofer setting) on down to adjust the output level of the subwoofer. Each time M.C. is pushed up or down, subwoofer level increases or - Pioneer DEH-P8300UB | Owner's Manual - Page 11
, this unit's source is turned off. ! OFF - When USB storage device/iPod is connected, the source is not switched to USB/iPod/Pandora automatically. Please change the source to USB/iPod/Pandora manually. Warning tone (warning tone setting) If the front panel is not detached from the head unit within - Pioneer DEH-P8300UB | Owner's Manual - Page 12
is 0000, but you can change it with this function. With some Bluetooth audio players, you may be required to enter the Bluetooth audio player PIN code in advance to set this unit for a connection. ! You can only operate this function when Blue- tooth adapter (e.g. CD-BTB200) is connected to this - Pioneer DEH-P8300UB | Owner's Manual - Page 13
. To control your audio player using this unit, connect a product featuring Bluetooth wireless technology (available on the market) to your audio player and connect the Bluetooth adapter (e.g. CD-BTB200) to this unit. Function settings 1 Press M.C. to display the main menu. 2 Turn M.C. to change the - Pioneer DEH-P8300UB | Owner's Manual - Page 14
the device name. Bluetooth Telephone If you use a Bluetooth adapter (e.g. CD-BTB200), you can connect a cellular phone featuring Bluetooth wireless technology to month and year (if connected with a phone). 6 Clock display Shows the time (if connected with a phone). 7 Automatic answering/Automatic - Pioneer DEH-P8300UB | Owner's Manual - Page 15
English 1 Connection For detailed instructions on connecting your phone to this unit via Bluetooth wireless technology, see following section Connected is displayed. ! PIN code is set to 0000 as the default. You can change this code. Refer to Pin code input (PIN code input) on page 12. Connection - Pioneer DEH-P8300UB | Owner's Manual - Page 16
If the registration fails, Reg.ERROR is displayed. In this instructions, refer to the instruction manual Bluetooth telephone is connected via HSP (head set profile). 1 Press M.C. to change the name view order. Inverted is displayed and the name view order is changed. Pressing M.C. repeatedly changes - Pioneer DEH-P8300UB | Owner's Manual - Page 17
Bluetooth telephone is connected via HSP (head set . Phone book-Missed call-Dialled call-Received call 2 Push M.C. left or right Use M.C. to control the following functions. Perform the following procedures to set the function. is displayed. # You can also change the phone number by pushing M.C. - Pioneer DEH-P8300UB | Owner's Manual - Page 18
Radioä tuner This HD Radio Ready receiver is ready to receive HD Radio broadcasts when connected to the HD Radio tuner (e.g. GEX-P20HD), sold separately. For details concerning operation, refer to the HD Radio tuner's operation manual mode) Seek tuning setting can be changed between digital station - Pioneer DEH-P8300UB | Owner's Manual - Page 19
XM setting) on this page. 2 Push M.C. left or right to select RADIO ID. # If you select another channel, display of the ID code is canceled. # RADIO ID and the ID codes are repeatedly displayed one after the other. SIRIUS Satellite Radio tuner You can use this unit to control a SIRIUS Satellite Radio - Pioneer DEH-P8300UB | Owner's Manual - Page 20
function on this page. ! Play time display indicates the time inverted from the live broadcast. The play time is displayed as a negative number. Displaying the Radio ID 1 Push M.C. left or right to select CH 000. ! To select CH 000, set the channel select set- ting to Channel number. About the - Pioneer DEH-P8300UB | Owner's Manual - Page 21
of the rating prescribed. - Never wire the negative speaker cable directly to ground. - Never band together negative cables of multiple speakers. ! When this unit is on, control signals are sent through the blue/white cable. Connect this cable to the system remote control of an external power amp or - Pioneer DEH-P8300UB | Owner's Manual - Page 22
Wired remote input Hard-wired remote control adaptor can be connected (sold separately). 6 Front output 7 Rear output 8 Subwoofer output 9 IP-BUS cable (sold separately) a Pioneer to speakers. ! Change the initial setting of this unit. Refer to S/W control (rear output and subwoofer setting) on page - Pioneer DEH-P8300UB | Owner's Manual - Page 23
supplied extraction keys into both sides of the unit until they click into place. 3 Pull the unit out of the dashboard. 2 1 Dashboard 2 Mounting sleeve 3 Install the unit as illustrated. 1 2 3 4 5 1 Nut 2 Firewall or metal support 3 Metal strap 4 Screw 5 Screw (M4 × 8) # Make sure that the unit is - Pioneer DEH-P8300UB | Owner's Manual - Page 24
Error messages When you contact your dealer or your nearest Pioneer Service Center, be sure to note the error message. Built-in CD Player Message Cause Action ERROR and play on. USB storage de- ! Connect a com- vice or iPod is patible USB stor- connected. age device/iPod. Sometimes Wait - Pioneer DEH-P8300UB | Owner's Manual - Page 25
version of the Pandora application is not supported. Connect an iPod/ iPhone that has a compatible version of the Pandora application installed. Check Device Device error message displayed in Pandora Application. Unable to play music from Pandora. Please check your iPod/iPhone. No Available No - Pioneer DEH-P8300UB | Owner's Manual - Page 26
the USB storage device, the following problems may occur. ! Operations may vary. ! The storage device may not be recognized. ! Files may not be played back properly. ! The device may generate noise in the radio. iPod To ensure proper operation, connect the dock connector cable from the iPod directly - Pioneer DEH-P8300UB | Owner's Manual - Page 27
. CAUTION Pioneer accepts no responsibility for data lost on the USB storage device even if that data is lost while using this unit. iPod compatibility This unit supports only the following iPod models. Supported iPod software versions are shown below. Older versions may not be supported. ! iPhone - Pioneer DEH-P8300UB | Owner's Manual - Page 28
dealer or nearest authorized Pioneer service station regarding the satellite radio tuner that can be connected to this unit. For satellite radio tuner operation, please refer to the satellite radio tuner owner's manual. ! The system will use direct satellite-to-receiver broadcasting technology to - Pioneer DEH-P8300UB | Owner's Manual - Page 29
English En 29 - Pioneer DEH-P8300UB | Owner's Manual - Page 30
-R/CD-RW et périphériques de stockage USB 34 iPod 36 Utilisation de Pandoraâ 37 Réglages sonores 39 Réglages initiaux 40 Autres fonctions 41 Accessoires disponibles Audio Bluetooth 43 Téléphone Bluetooth 43 Syntoniseur HD Radioä 48 Syntoniseur XM 48 Syntoniseur radio satellite SIRIUS 49 Installation - Pioneer DEH-P8300UB | Owner's Manual - Page 31
pour démarrer le mode inverse. Quelques mots sur ce mode d'emploi ! Dans les instructions suivantes, les mémoires USB et les lecteurs audio USB sont collectivement appelés "périphériques de stockage USB". ! Dans ce manuel, iPod et iPhone sont désignés par le terme "iPod". Section 01 Fr 31 Français - Pioneer DEH-P8300UB | Owner's Manual - Page 32
CONTROL c (M.C.) (iPod)/LOC 5 Fente de charge- d (lecture aléa- ment des disques toire) 6 h (éjection) e DISP/ /SCRL 7 Port USB f SRC/OFF 8 Touche de retrait de la face avant PRÉCAUTION Utilisez un câble USB Pioneer quand les sources sont hors service. Appuyez sur cette touche pour - Pioneer DEH-P8300UB | Owner's Manual - Page 33
OFF pour parcourir les op- tions disponibles : XM (syntoniseur XM)-SIRIUS (syntoniseur SIRIUS)-HD Radio (syntoniseur HD Radio)- TUNER (syntoniseur)-CD (lecteur de CD)- USB (périphérique de stockage USB)/iPod (iPod connecté via l'entrée USB)-Pandora (Pandora)-EXT (source extérieure 1)-EXT (source ext - Pioneer DEH-P8300UB | Owner's Manual - Page 34
du service de programme -titre de la plage musicale et nom de l'interprète Utilisation de l'étiquetage iTunes Cette fonction ne peut pas être utilisée avec les modèles d'iPods suivants. - iPhone 4 - iPhone 3GS - iPhone 3G - iPhone - iPod nano 5ème génération - iPod nano 4ème génération - iPod nano - Pioneer DEH-P8300UB | Owner's Manual - Page 35
service. 6 Temps écoulé de la plage musicale (barre d'avancement) 7 Indicateur du temps de lecture Lecture d'un CD/CD-R/CD Débranchez les périphériques de stockage USB de l'appareil lorsque vous ne l'utilisez iTunes utilisée pour enre- gistrer les fichiers MP3 sur un disque ou les types de fichiers - Pioneer DEH-P8300UB | Owner's Manual - Page 36
Sound Retriever est en service. 6 Temps écoulé de la plage musicale (barre d'avancement) 7 Indicateur du temps de lecture Lecture de plages musicales sur un iPod 1 Ouvrez le cache du connecteur USB et bran- chez un iPod à l'aide du câble iPod Dock Connector vers USB. Sélection d'une plage (chapitre - Pioneer DEH-P8300UB | Owner's Manual - Page 37
est réglé sur iPod/APP. - Changement des informations textuelles (iPod) - Pause - Avance Pandoraâ IMPORTANT: Conditions requises pour l'accès au service de musique Pandora à l'aide d'appareils audio/ vidéo pour véhicule Pioneer : ! Apple iPhone (première génération), iPhone 3G, iPhone 3GS ou iPhone - Pioneer DEH-P8300UB | Owner's Manual - Page 38
seau de téléphonie mobile. La radio Pandora sur Internet est un service de musique non affilié à Pioneer. Plus d'informations sont disponibles à l'adresse http://www.pandora.com. Vous pouvez écouter Pandora en connectant un iPod sur lequel est installée l'application Pandora. Opérations de base 12 - Pioneer DEH-P8300UB | Owner's Manual - Page 39
ère est défini sur Rear SP :S/W. Reportez-vous à la page suivante, S/W control (réglage de la sortie arrière et du haut-parleur d'extrêmes graves). é. Low (bas)-Mid (moyen)-High (élevé) Sub W.1 (réglage en service/hors service du hautparleur d'extrêmes graves) Cet appareil est équipé d'une sortie - Pioneer DEH-P8300UB | Owner's Manual - Page 40
adapt la date. Clock (réglage de USB/iPod/Pandora. Warning tone (réglage du signal sonore d'avertissement) Si vous ne retirez pas la face avant de l'appareil central dans les quatre secondes qui suivent la coupure du contact, un signal sonore d'avertissement retentit. Vous pouvez mettre hors service - Pioneer DEH-P8300UB | Owner's Manual - Page 41
service ou hors service. Pin code input (saisie du code PIN) Pour connecter votre téléphone cellulaire à cet appareil via la technologie sans fil Bluetooth, vous devez entrer un code reportez-vous au manuel d'installation. Cet appareil auxiliaire est RCA tel que le CD-RB20/CD-RB10 (vendu sé - Pioneer DEH-P8300UB | Owner's Manual - Page 42
source extérieure Appareil extérieur fait référence à un produit Pioneer, comme les produits prochainement disponibles. Bien que les appareils externes soient 4)-Auto/Manual (auto/manuel) 4 Appuyez sur M.C. pour choisir le mode désiré. % Appuyez sur BAND/ESC. Mise en service ou hors service de l' - Pioneer DEH-P8300UB | Owner's Manual - Page 43
des plages musicales sur votre lecteur audio. - Profil AVRCP (Audio/Video Remote Control Profile) : Vous pouvez écouter, interrompre la lecture, sélectionner des plages musicales, etc. ! Selon le type de lecteur audio Bluetooth, il est possible que les opérations varient. ! Reportez-vous au mode - Pioneer DEH-P8300UB | Owner's Manual - Page 44
Affiche REFUSE quand la fonction rejet automatique est en service (pour plus de détails, reportez-vous à la des instructions détaillées sur la connexion de votre téléphone à cet appareil via la technologie sans fil Bluetooth, -vous à la page suivante, Set phone (enregistrement d'un téléphone - Pioneer DEH-P8300UB | Owner's Manual - Page 45
phones cellulaires équipés de la technologie sans fil Bluetooth, le nom d'appareil de ces téléphones ou Name rifiez le nom de l'appareil (Pioneer BT Unit) et entrez le code de liaison sur votre téléphone cellulaire s'affiche. ! Si l'enregistrement échoue, Reg.ERROR s'affiche. Dans ce cas, revenez à - Pioneer DEH-P8300UB | Owner's Manual - Page 46
enregistré. ! Cette fonction ne peut pas être utilisée lorsqu'un téléphone Bluetooth est connecté via le profil HSP (profil casque). 1 Poussez M.C. vers le (historique des appels manqués)-Dialed calls (historique des appels composés)-Received calls (historique des appels reçus)-Dial preset (numéros - Pioneer DEH-P8300UB | Owner's Manual - Page 47
. Echo cancel (annulation d'écho et réduction de bruit) 1 Appuyez sur M.C. pour mettre l'annulation d'écho en service ou hors service. Device info. (affichage de l'adresse BD (Bluetooth Device)) 1 Poussez M.C. vers la gauche ou vers la droite pour afficher les informations. ! Poussez M.C. vers la - Pioneer DEH-P8300UB | Owner's Manual - Page 48
de fonctionnement, reportez-vous au mode d'emploi du syntoniseur HD Radio. Opérations de base 1 23 4 5 6 7 d'accord peut être changé entre la recherche d'accord service, la réception sera seulement analogique. 1 Appuyez sur M.C. pour mettre cette fonction en service ou hors service. Syntoniseur XM - Pioneer DEH-P8300UB | Owner's Manual - Page 49
, Sélection d'un canal dans une catégorie de canal.) Changement de l'affichage XM 1 Appuyez sur DISP/ /SCRL de façon prolon- gée. Utilisation avancée à dans la catégorie de canaux sélectionnée. Affichage du code d'identification de la radio 1 Sélectionnez les réglages de sélection des canaux pour - Pioneer DEH-P8300UB | Owner's Manual - Page 50
le temps de façon décroissante par rapport à l'émission en direct. Le temps de lecture s'affiche en chiffre négatif. Affichage du code d'identification de la radio 1 Poussez M.C. vers la gauche ou vers la droite pour sélectionner CH 000. ! Pour sélectionner CH 000, positionnez le ré- glage de - Pioneer DEH-P8300UB | Owner's Manual - Page 51
Pour utiliser cette fonction, une interface de bus SIRIUS de Pioneer (par exemple CD-SB10) est requise. ! Pour utiliser cette fonction, une unit faut, la fonction Alerte Match est en service. ! Après avoir sélectionné les équipes, vous devez mettre en service la fonction Alerte Match. 1 Appuyez sur - Pioneer DEH-P8300UB | Owner's Manual - Page 52
assurez-vous de respecter les instructions suivantes. - Déconnectez la borne négative de la batterie avant l'installation. - Fixez le câblage avec 9 Câble IP-BUS (vendu séparément) a Accessoires IP-BUS Pioneer (vendus séparé- ment) Cordon d'alimentation Réalisez ces connexions lorsqu'aucun fil - Pioneer DEH-P8300UB | Owner's Manual - Page 53
les réglages initiaux de cet appareil. Reportez-vous à la page 40, S/W control (réglage de la sortie arrière et du haut-parleur d'extrêmes graves). ou support métallique 3 Attache en métal 4 Vis 5 Vis (M4 × 8) # Assurez-vous que l'appareil est correctement mis en place. Toute installation instable - Pioneer DEH-P8300UB | Owner's Manual - Page 54
Installation Informations complémentaires Montage arrière DIN 1 Déterminez la position appropriée où les trous sur le support opération. L'étendue de répétition de lecture change de manière inattendue. En fonction de l'étendue ou le Service d'entretien agréé par Pioneer le plus proche, - Pioneer DEH-P8300UB | Owner's Manual - Page 55
READ NO AUDIO SKIPPED Quand la fonction Plug-andPlay est hors service, aucun périphérique de stockage USB et aucun iPod n'est connecté. ! Mettez la fonction Plug-andPlay en service. ! Connectez un périphérique de stockage USB/ iPod compatible. Le début de la lecture et le début de l'émission - Pioneer DEH-P8300UB | Owner's Manual - Page 56
Cette version de l'application Pandora n'est pas pris en charge. Connectez un iPod/iPhone dont la version est compatible avec l'application Pandora installée. Check Device Message d'er- Vérifiez votre reur de périphé- iPod/iPhone. rique affiché dans l'application Pandora. Impossible de lire de - Pioneer DEH-P8300UB | Owner's Manual - Page 57
adapter USB, les problèmes suivants peuvent survenir. ! Le fonctionnement peut varier. ! Le périphérique de stockage peut ne pas être reconnu. ! Les fichiers peuvent ne pas être lus correcte- ment. ! Le périphérique peut générer des parasites radio. iPod CD MP3 Extension de fichier : .mp3 - Pioneer DEH-P8300UB | Owner's Manual - Page 58
ne pas être disponibles. Les opérations peuvent différer selon la version du logiciel iPod. Quand vous utilisez un iPod, un câble iPod Dock Connector vers USB est requis. Un câble d'interface CD-IU50 Pioneer est également disponible. Pour plus de détails, consultez votre revendeur. Pour des détails - Pioneer DEH-P8300UB | Owner's Manual - Page 59
Licensing, Inc. iPod et iPhone iPhone, iPod, iPod classic, iPod nano et iPod touch sont des Radio Inc. et de XM Satellite Radio Inc. Technologie HD Radioä HD Radioä, HD Radio Readyä et le logo HD Radio Ready sont des marques de commerce exclusives à iBiquity Digital Corporation. Pandora Pandora - Pioneer DEH-P8300UB | Owner's Manual - Page 60
Sintonizador 63 CD/CD-R/CD-RW y dispositivos de almacenamiento USB 64 iPod 65 Uso de Pandoraâ 67 Ajustes de audio 68 Ajustes iniciales 69 Otras funciones 71 Accesorios disponibles Audio Bluetooth 72 Teléfono Bluetooth 72 Sintonizador de HD Radioä 76 Sintonizador XM 77 Sintonizador de radio por sat - Pioneer DEH-P8300UB | Owner's Manual - Page 61
2 S.Rtrv/SAT MODE a BAND/ESC 3 TAG b (lista) 4 MULTI-CONTROL c (M.C.) (iPod)/LOC 5 Ranura de carga d de discos (aleatorio) 6 h (expulsar) 7 Puerto USB e DISP/ /SCRL f SRC/OFF 8 Botón de soltar PRECAUCIÓN Utilice un cable USB Pioneer opcional (CDU50E) para conectar el reproductor de audio - Pioneer DEH-P8300UB | Owner's Manual - Page 62
1 Pulse SRC/OFF para desplazarse entre: XM (sintonizador XM)-SIRIUS (sintonizador SIRIUS)-HD Radio (sintonizador de HD Radio)-TUNER (sintonizador)-CD (reproductor de CD)-USB (dispositivo de almacenamiento USB)/iPod (iPod conectado por entrada USB)-Pandora (Pandora)-EXT (unidad externa 1)-EXT (unidad - Pioneer DEH-P8300UB | Owner's Manual - Page 63
a dis- Sintonizador tancia e instale una pila nueva. Funciones básicas FM-3 para FM o AM). Sintonización manual (paso a paso) 1 Pulse M.C. hacia Haga girar el control para cambiar el nú iPod. - iPhone 4 - iPhone 3GS - iPhone 3G - iPhone - iPod nano 5ª generación - iPod nano de 4ª generación - iPod - Pioneer DEH-P8300UB | Owner's Manual - Page 64
le permite sintonizar sólo las emisoras de radio con señales lo suficientemente intensas como local en esta página. CD/CD-R/CD-RW y dispositivos de almacenamiento USB Funciones básicas 12 3 la versión de iTunes utilizada para gra- bar archivos MP3 en un disco u otro tipo de archivos de medios, - Pioneer DEH-P8300UB | Owner's Manual - Page 65
del Dock del iPod para el cable USB. Selección de una pista (capítulo) 1 Pulse M.C. hacia la izquierda o hacia la dere- cha. Avance rápido o retroceso 1 Mantenga pulsado M.C. hacia la izquierda o hacia la derecha. Notas ! El iPod no puede encenderse o apagarse cuando el modo de control está ajustado - Pioneer DEH-P8300UB | Owner's Manual - Page 66
iPhone 3G (versión del software 3.0 o poste- rior) ! iPhone (versión del software 3.0 o posterior) 1 Pulse /LOC para cambiar el modo de con- trol. ! iPod - La función iPod de esta unidad se puede utilizar desde el iPod de control a iPod, se pausa la reproducción de la canción. Utilice el iPod para - Pioneer DEH-P8300UB | Owner's Manual - Page 67
de la red móvil. El servicio de música Pandora Internet Radio no está asociado con Pioneer. Encontrará mas información en http://www.pandora.com. Es posible reproducir música desde Pandora conectando un iPod que tenga instalada la aplicación de Pandora. Funciones básicas 12 3 45 6 1 Indicador de - Pioneer DEH-P8300UB | Owner's Manual - Page 68
traseros. ! No se puede ajustar el balance entre los altavoces delanteros/traseros cuando el ajuste de la salida posterior es Rear SP :S/W. Consulte S/W control (ajuste de la salida posterior y del altavoz de subgraves) en la página 70. 2 Pulse M.C. hacia la izquierda o hacia la derecha para ajustar - Pioneer DEH-P8300UB | Owner's Manual - Page 69
Pulse M.C. hacia arriba o hacia abajo para ajustar la fecha. Clock (ajuste del reloj) 1 Pulse M.C. hacia la izquierda o hacia dispositivo de almacenamiento USB o el iPod está conectado, la fuente no cambia automáticamente a USB/ iPod/Pandora. Cambie la fuente a USB/ iPod/Pandora manualmente. Warning - Pioneer DEH-P8300UB | Owner's Manual - Page 70
fuente BT Audio para utilizar un reproductor de audio Bluetooth. ! Sólo puede utilizar esta función cuando un adaptador Bluetooth (p. ej. CD-BTB200) está conectado a la unidad. 1 Pulse M.C. para activar o desactivar la fuente BT Audio. Pin code input (introducción del código PIN) Para conectar su - Pioneer DEH-P8300UB | Owner's Manual - Page 71
CD-RB20/CD-RB10 (se vende por separado) para conectar esta unidad a un equipo auxiliar provisto de una salida RCA. Para obtener más detalles, consulte el manual externa se entiende un producto Pioneer, como los que puedan estar para seleccionar FUNCTION. Gire el control para cambiar la opción de men - Pioneer DEH-P8300UB | Owner's Manual - Page 72
en su reproductor de audio. - Perfil AVRCP (Audio/Video Remote Control Profile): Puede reproducir, detener la reproducción, seleccionar canciones, etc. ! Las operaciones pueden variar según el tipo de reproductor de audio Bluetooth. ! Consulte el manual de instrucciones de su reproductor de audio - Pioneer DEH-P8300UB | Owner's Manual - Page 73
se conecta con su teléfono móvil mediante la tecnología inalámbrica Bluetooth sin encender el motor, se puede descargar la batería. ! Las operaciones esta unidad. 2 Registro Para registrar el teléfono conectado temporalmente, consulte Set phone (registro de un teléfono móvil conectado) en la página - Pioneer DEH-P8300UB | Owner's Manual - Page 74
de tecnología inalámbrica Bluetooth, se mostrará el Si desea cambiar este código, consulte Pin code input (introducción del código PIN) en la vez completada la conexión, aparece Connected. Set phone (registro de un teléfono ha realizado correctamente, aparecerá Reg.ERROR. En este caso, vuelva al paso - Pioneer DEH-P8300UB | Owner's Manual - Page 75
. Para obtener instrucciones detalladas, consulte el manual de instrucciones suministrado con su teléfono calls (historial de llamadas marcadas)-Received calls (historial de llamadas recibidas se puede utilizar si se ha conectado un teléfono Bluetooth mediante HSP (perfil de audífono). ! Asegúrese - Pioneer DEH-P8300UB | Owner's Manual - Page 76
eco. Device info. (visualización de la dirección BD (dispositivo Bluetooth)) 1 Pulse M.C. izquierda o derecha para mostrar la información. ! Sintonizador de HD Radioä Este receptor HD Radio Ready puede recibir transmisiones HD Radio cuando está conectado al sintonizador de HD Radio (p. ej. GEX- - Pioneer DEH-P8300UB | Owner's Manual - Page 77
la recepción será sólo analógica. 1 Pulse M.C. activar o desactivar esta función. Para obtener más información, consulte el manual de instrucciones del sintonizador XM. En esta sección se ofrece información sobre las funciones del XM con esta unidad que sean diferentes de las que se describen en el - Pioneer DEH-P8300UB | Owner's Manual - Page 78
gina.) Cambio de la visualización de XM 1 Mantenga pulsado DISP/ /SCRL. seleccionada en la memoria. Haga girar el control para cambiar el número de presintonía. el manual de instrucciones de SIRIUS. Este manual ha elegido. Recepción de SIRIUS Satellite Radio 1 2 34 Visualización de la - Pioneer DEH-P8300UB | Owner's Manual - Page 79
. Haga girar el control para cambiar el nú requiere una in- terfaz bus Pioneer SIRIUS (p.ej. CD-SB10). ! Para utilizar esta función, se requiere una uni- dad "plug-and-play" SIRIUS con la función de alerta de partido. ! Para obtener más detalles, consulte los manuales - Pioneer DEH-P8300UB | Owner's Manual - Page 80
bus Pioneer SIRIUS (p.ej. CD-SB10). ! Para utilizar esta función, se requiere una unidad "plug & play" SIRIUS con función de Repetición Instantánea. ! Para obtener más detalles, consulte los manuales instale en un vehículo sin posición ACC (accesorio) en la llave de encendido, el cable - Pioneer DEH-P8300UB | Owner's Manual - Page 81
control a través del cable azul/ blanco. Conecte este cable al mando a distancia del sistema de un amplificador de potencia externo o al terminal de control Cable IP-BUS (se vende por separado) a Accesorios Pioneer IP-BUS (se venden por separado) Cable instale esta unidad en un lugar donde: Es 81 - Pioneer DEH-P8300UB | Owner's Manual - Page 82
conducción del vehículo. - pueda lesionar a un pasajero como consecuencia de un frenazo brusco. ! El láser semiconductor se dañará si se sobrecalienta. Instale esta unidad alejada de zonas que alcancen altas temperaturas, como cerca de la salida del calefactor. ! Se logra un rendimiento óptimo si la - Pioneer DEH-P8300UB | Owner's Manual - Page 83
error Anote el mensaje de error antes de contactar con su concesionario o con el servicio técnico oficial de Pioneer más cercano. Reproductor de CD incorporado Mensaje Causa Resolución ERROR Sustituya el disco. Dispositivo de almacenamiento USB o iPod Mensaje Causa Resolución NO DEVICE FORMAT - Pioneer DEH-P8300UB | Owner's Manual - Page 84
ón ERROR-19 Error de comunicación. Desconecte el cable del iPod. Una vez que aparezca el menú principal del iPod, vuelva a conectar el iPod y reinícielo. Start up the Pandora Application La aplicación de Inicie la aplicaPandora no se ción de Pandora ha iniciado aún. desde el iPod/ iPhone. - Pioneer DEH-P8300UB | Owner's Manual - Page 85
Check Application Esta versión de la aplicación de Pandora no es compatible. Conecte un iPod/ iPhone que tenga instalada una versión compatible de Pandora. Check Device La aplicación de Compruebe su Pandora mues- iPod/iPhone. tra un mensaje de error de dispositivo. No es posible reproducir música - Pioneer DEH-P8300UB | Owner's Manual - Page 86
del archivo .m4p): no compatible Extensión de archivo: .mp3 Velocidad de grabación: de 8 kbps a 320 kbps (CBR Pioneer no asume ninguna responsabilidad por la pérdida de datos en el dispositivo de almacenamiento USB, incluso si la pérdida ocurre durante el uso de esta unidad. Compatibilidad con iPod - Pioneer DEH-P8300UB | Owner's Manual - Page 87
del Dock del iPod para el cable USB. El cable de la interfaz CD-IU50 de Pioneer también está disponible. Para obtener información, consulte con su proveedor. Si desea más información sobre la compatibilidad de archivos y formatos, consulte los manuales del iPod. Audiolibro, podcast: compatible - Pioneer DEH-P8300UB | Owner's Manual - Page 88
Intensificación de graves: Ganancia 12 dB a 0 dB Reproductor de CD Sistema Sistema de audio de discos compactos Discos utilizables Disco compacto Relación Clase USB MSC (Clase de almacena- miento masivo) Sistema de archivos ......... FAT12, FAT16, FAT32 Formato de decodificación MP3 MPEG - Pioneer DEH-P8300UB | Owner's Manual - Page 89
Español Es 89 - Pioneer DEH-P8300UB | Owner's Manual - Page 90
90 Es - Pioneer DEH-P8300UB | Owner's Manual - Page 91
Español Es 91 - Pioneer DEH-P8300UB | Owner's Manual - Page 92
- Pioneer DEH-P8300UB | Owner's Manual - Page 93
- Pioneer DEH-P8300UB | Owner's Manual - Page 94
- Pioneer DEH-P8300UB | Owner's Manual - Page 95
- Pioneer DEH-P8300UB | Owner's Manual - Page 96
ELECTRONICS OF CANADA, INC. 300 Allstate Parkway, Markham, Ontario L3R 0P2, Canada TEL: 1-877-283-5901 TEL: 905-479-4411 PIONEER ELECTRONICS DE MEXICO, S.A. de C.V. Blvd.Manuel Avila Camacho 138 10 piso Col.Lomas de Chapultepec, Mexico, D.F. 11000 TEL: 55-9178-4270 407號8 02) 2657-3588 9樓
-
 1
1 -
 2
2 -
 3
3 -
 4
4 -
 5
5 -
 6
6 -
 7
7 -
8
-
9
-
10
-
11
-
12
-
13
-
14
-
15
-
16
-
17
-
18
-
19
-
20
-
21
-
22
-
23
-
24
-
25
-
26
-
27
-
28
-
29
-
30
-
31
-
32
-
33
-
34
-
35
-
36
-
37
-
38
-
39
-
40
-
41
-
42
-
43
-
44
-
45
-
46
-
47
-
48
-
49
-
50
-
51
-
52
-
53
-
54
-
55
-
56
-
57
-
58
-
59
-
60
-
61
-
62
-
63
-
64
-
65
-
66
-
67
-
68
-
69
-
70
-
71
-
72
-
73
-
74
-
75
-
76
-
77
-
78
-
79
-
80
-
81
-
82
-
83
-
84
-
85
-
86
-
87
-
88
-
89
-
90
-
91
-
92
-
93
-
94
-
95
-
96
 |
 |

Owner
’
s Manual
Mode d
’
emploi
Manual de instrucciones
CD RDS RECEIVER
AUTORADIO CD RDS
REPRODUCTOR DE CD CON RECEPTOR RDS
DEH-P8300UB
English
Español
Français