Pioneer DVR-650H-S Operating Instructions - Page 126
Additional information, Front-panel displays
 |
UPC - 012562853048
View all Pioneer DVR-650H-S manuals
Add to My Manuals
Save this manual to your list of manuals |
Page 126 highlights
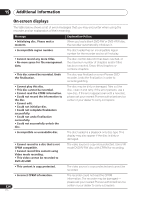
15 Additional information Message • There is no DV input or the input signal is unrecordable. Explanation/Action No signal was detected at the DV IN jack. This may appear if a blank section of DV tape is playing in the connected camcorder. • No DV camcorder connected. The camcorder is not connected properly, or the camcorder is switched off. • You cannot connect more than one DV camcorder at a time. This recorder's DV jack supports connection to just one camcorder. • Cannot operate the DV camcorder. This recorder cannot operate the DV camcorder. Try switching off the camcorder then turn it back on again. • Could not operate the DV camcorder. This recorder was not able to operate the DV camcorder. • The DV camcorder is not set for playback. Please select playback mode on the DV camcorder. The camcorder is in camera mode. Switch it to playback mode. • The printer is not ready or is not connected. Please check the printer. This message is displayed when communication could not be established with the printer. See the Troubleshooting section if you do not know the cause. • Printing has been cancelled because ... This message is displayed when there is a printer error during printing. After checking the printer for the cause of the error, either reconnect the printer and start the printing job again, or select "Yes" to resume printing (select "No" to cancel the print job). See also the operating instructions that came with your printer for possible causes of print errors. Front-panel displays The table below shows a list of error messages that you may encounter when using the recorder and an explanation of their meaning. Message • E01 Explanation/Action The HDD may be damaged or broken. Please ask your nearest Pioneer-authorized service center or your dealer to carry out repairs. • E02 126 En As the HDD info cannot be properly read, no new recordings can be made. Reinitializing the HDD (page 101) may result in your being able to make recording again. Note that reinitializing the HDD will erase all recorded contents, including protected files.
-
 1
1 -
2
-
3
-
4
-
5
-
6
-
7
-
8
-
9
-
10
-
11
-
12
-
13
-
14
-
15
-
16
-
17
-
18
-
19
-
20
-
21
-
22
-
23
-
24
-
25
-
26
-
27
-
28
-
29
-
30
-
31
-
32
-
33
-
34
-
35
-
36
-
37
-
38
-
39
-
40
-
41
-
42
-
43
-
44
-
45
-
46
-
47
-
48
-
49
-
50
-
51
-
52
-
53
-
54
-
55
-
56
-
57
-
58
-
59
-
60
-
61
-
62
-
63
-
64
-
65
-
66
-
67
-
68
-
69
-
70
-
71
-
72
-
73
-
74
-
75
-
76
-
77
-
78
-
79
-
80
-
81
-
82
-
83
-
84
-
85
-
86
-
87
-
88
-
89
-
90
-
91
-
92
-
93
-
94
-
95
-
96
-
97
-
98
-
99
-
100
-
101
-
102
-
103
-
104
-
105
-
106
-
107
-
108
-
109
-
110
-
111
-
112
-
113
-
114
-
115
-
116
-
117
-
118
-
119
-
120
-
 121
121 -
 122
122 -
 123
123 -
 124
124 -
 125
125 -
 126
126 -
 127
127 -
 128
128 -
 129
129 -
 130
130 -
 131
131 -
132
-
133
-
134
 |
 |
