Pioneer DVR-650H-S Operating Instructions - Page 39
Easy Timer' from the Home Menu.
 |
UPC - 012562853048
View all Pioneer DVR-650H-S manuals
Add to My Manuals
Save this manual to your list of manuals |
Page 39 highlights
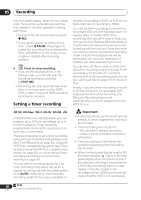
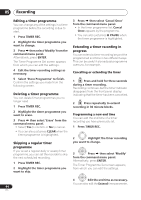
Recording 05 • Approximately two minutes before a timer recording is set to start, the recorder will go into timer recording standby. In timer recording standby you cannot use some functions. • The maximum length for timer recordings made to the HDD is 24 hours. However, because one title (HDD) is limited to 12 hours, recordings over 12 hours will be spread over two titles. Note that there will be a break in the recording of a few seconds between titles. • When a scheduled recording finishes, this unit's power is not turned off if the power for the plasma television is on. If you want this unit's power to turn off after a timer recording finishes, set the HDMI Control to Off (page 113). Easy Timer Recording As the name suggests, Easy Timer Recording makes setting up a timer recording as simple as possible. HOME MENU 1 Select 'Timer Recording', then 'Easy Timer' from the Home Menu. PREV 2 record. NEXT Set the TV channel to Easy Timer Recording 8:00 9:00 10:00 11:00 12:00 13:00 14:00 1/01 2/01 3/01 1/01 MON 9:30 - --:-- 7ch REC MODE SP HDD/DVD HDD 4 HDD DVD Select the HDD or DVD for recording. 5 Move the cursor to the recording start date and time on the grid. • You can move the cursor forward or back an hour at a time using the REV SCAN and FWD SCAN buttons. Current time Recording start time Easy Timer Recording 8:00 9:00 10:00 11:00 12:00 13:00 14:00 1/01 2/01 3/01 1/01 MON 11:45 - --:-- 7ch REC MODE SP HDD/DVD HDD Each row of the grid is one day (you can set the timer recording for up to a month in advance). Each column is a 15 minute interval. The darker area represents time that has already passed and can't therefore be selected. The lighter area is time that's available. 6 ENTER Set the start time. The start date and time is displayed in the middle of the screen. • You can go back and reset the start time if you need to by pressing RETURN. REC MODE 3 Set the recording quality. • DVD recording: The AUTO option automatically sets the best recording quality for the space available on the disc loaded at the time of recording. • HDD recording: The AUTO option automatically sets the best recording quality that would fit on to a blank DVD disc. 39 En
-
 1
1 -
2
-
3
-
4
-
5
-
6
-
7
-
8
-
9
-
10
-
11
-
12
-
13
-
14
-
15
-
16
-
17
-
18
-
19
-
20
-
21
-
22
-
23
-
24
-
25
-
26
-
27
-
28
-
29
-
30
-
31
-
32
-
33
-
 34
34 -
 35
35 -
 36
36 -
 37
37 -
 38
38 -
 39
39 -
 40
40 -
 41
41 -
 42
42 -
 43
43 -
 44
44 -
45
-
46
-
47
-
48
-
49
-
50
-
51
-
52
-
53
-
54
-
55
-
56
-
57
-
58
-
59
-
60
-
61
-
62
-
63
-
64
-
65
-
66
-
67
-
68
-
69
-
70
-
71
-
72
-
73
-
74
-
75
-
76
-
77
-
78
-
79
-
80
-
81
-
82
-
83
-
84
-
85
-
86
-
87
-
88
-
89
-
90
-
91
-
92
-
93
-
94
-
95
-
96
-
97
-
98
-
99
-
100
-
101
-
102
-
103
-
104
-
105
-
106
-
107
-
108
-
109
-
110
-
111
-
112
-
113
-
114
-
115
-
116
-
117
-
118
-
119
-
120
-
121
-
122
-
123
-
124
-
125
-
126
-
127
-
128
-
129
-
130
-
131
-
132
-
133
-
134
 |
 |
