Pioneer PDP-5060HD Owner's Manual - Page 61
Sound adjustments
 |
View all Pioneer PDP-5060HD manuals
Add to My Manuals
Save this manual to your list of manuals |
Page 61 highlights
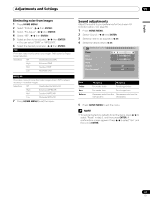
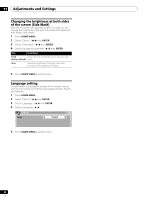
Adjustments and Settings 11 English Eliminating noise from images 1 Press HOME MENU. 2 Select "Picture". ( / then ENTER) 3 Select "Pro Adjust". ( / then ENTER) 4 Select "NR". ( / then ENTER) 5 Select an item to be adjusted. ( / then ENTER) • You can select "DNR" or "MPEG NR". 6 Select the desired parameter. ( / then ENTER) DNR Eliminates video noise for clean, crisp images. DNR stands for Digital Noise Reduction. Selections Off Deactivates the DNR. High Enhanced DNR Mid Standard DNR Low Moderate DNR MPEG NR Eliminates mosquito noise from video images when a DVD is played, resulting in noise-free images. Selections Off Deactivates the MPEG NR. High Enhanced MPEG NR Mid Standard MPEG NR Low Moderate MPEG NR 7 Press HOME MENU to exit the menu. Sound adjustments Adjust the sound to your preference for the chosen AV Selection option. See page 58. 1 Press HOME MENU. 2 Select "Sound". ( / then ENTER) 3 Select an item to be adjusted. ( / ) 4 Select the desired level. ( / ) Sound STANDARD Treble Bass Balance Reset FOCUS Front Surround 2 0 0 Off Off Item Treble Bass Balance button button For weaker treble For stronger treble For weaker bass For stronger bass Decreases audio from the Decreases audio from the right speaker. left speaker. 5 Press HOME MENU to exit the menu. NOTE • To restore the factory defaults for all the items, press / to select "Reset" in step 3, and then press ENTER. A confirmation screen appears. Press / to select "Yes", and then press ENTER. 61 En
-
 1
1 -
2
-
3
-
4
-
5
-
6
-
7
-
8
-
9
-
10
-
11
-
12
-
13
-
14
-
15
-
16
-
17
-
18
-
19
-
20
-
21
-
22
-
23
-
24
-
25
-
26
-
27
-
28
-
29
-
30
-
31
-
32
-
33
-
34
-
35
-
36
-
37
-
38
-
39
-
40
-
41
-
42
-
43
-
44
-
45
-
46
-
47
-
48
-
49
-
50
-
51
-
52
-
53
-
54
-
55
-
 56
56 -
 57
57 -
 58
58 -
 59
59 -
 60
60 -
 61
61 -
 62
62 -
 63
63 -
 64
64 -
 65
65 -
 66
66 -
67
-
68
-
69
-
70
-
71
-
72
-
73
-
74
-
75
-
76
-
77
-
78
-
79
-
80
-
81
-
82
-
83
-
84
-
85
-
86
-
87
-
88
-
89
-
90
-
91
-
92
-
93
-
94
-
95
-
96
-
97
-
98
-
99
-
100
-
101
-
102
-
103
-
104
-
105
-
106
-
107
-
108
-
109
-
110
-
111
-
112
-
113
-
114
-
115
-
116
-
117
-
118
-
119
-
120
-
121
-
122
-
123
-
124
-
125
-
126
-
127
-
128
-
129
-
130
-
131
-
132
-
133
-
134
-
135
-
136
-
137
-
138
-
139
-
140
-
141
-
142
-
143
-
144
-
145
-
146
-
147
-
148
-
149
-
150
-
151
-
152
-
153
-
154
-
155
-
156
-
157
-
158
-
159
-
160
-
161
-
162
-
163
-
164
-
165
-
166
-
167
-
168
-
169
-
170
-
171
-
172
-
173
-
174
-
175
-
176
-
177
-
178
-
179
-
180
-
181
-
182
-
183
-
184
-
185
-
186
-
187
-
188
-
189
-
190
-
191
-
192
-
193
-
194
-
195
-
196
-
197
-
198
-
199
-
200
-
201
-
202
-
203
-
204
-
205
-
206
-
207
-
208
-
209
-
210
-
211
-
212
-
213
-
214
-
215
-
216
-
217
-
218
-
219
-
220
-
221
-
222
-
223
-
224
-
225
-
226
-
227
-
228
-
229
-
230
-
231
-
232
-
233
-
234
-
235
-
236
-
237
-
238
-
239
-
240
-
241
-
242
-
243
-
244
-
245
-
246
-
247
-
248
-
249
-
250
-
251
-
252
-
253
-
254
-
255
-
256
-
257
-
258
-
259
-
260
-
261
-
262
-
263
-
264
-
265
-
266
-
267
-
268
 |
 |
