Pioneer PDP-5060HD Owner's Manual - Page 64
Manual image position and clock, adjustments PC mode only, Selecting a screen size manually - resolution
 |
View all Pioneer PDP-5060HD manuals
Add to My Manuals
Save this manual to your list of manuals |
Page 64 highlights
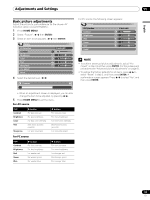
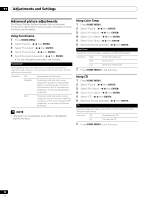
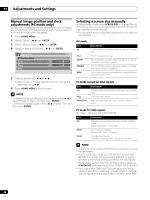
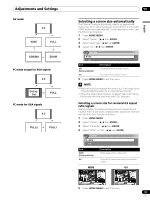
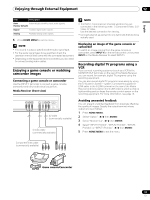
11 Adjustments and Settings Manual image position and clock adjustments (PC mode only) Usually you can easily adjust the positions and clock of images using Auto Setup. Use Manual Setup to optimize the positions and clock of images when necessary. 1 Press HOME MENU. 2 Select "Option". ( / then ENTER) 3 Select "Manual Setup". ( / then ENTER) 4 Select an item to be adjusted. ( / then ENTER) Manual Setup H/V Position Adjust Clock 0 Phase 0 Reset 5 Perform adjustment. ( / or / ) • With "Clock" or "Phase" selected, you can change the parameter using / . 6 Press HOME MENU to exit the menu. NOTE • To restore the factory defaults for all the items, press / to select "Reset" in step 4, and then press ENTER. A confirmation screen appears. Press / to select "Yes", and then press ENTER. Selecting a screen size manually In single-screen mode, press SCREEN SIZE to change the size of the screen from among the selectable options for the type of video signals currently received. • The selectable screen sizes differ depending on the types of input signals. AV mode Item 4:3 FULL ZOOM CINEMA WIDE Description For 4:3 "standard" pictures. A side bar appears on each side. For 16:9 squeezed pictures. For 16:9 letterbox pictures. Bars may appear on the top and bottom on some programs. For 14:9 letterbox pictures. Bars may appear on the top and bottom on some programs. In this mode pictures are progressively stretched toward each side of the screen. PC mode except for XGA signals Item 4:3 Description Fills the screen without altering the input signal aspect ratio. FULL Full 16:9 screen display Dot by Dot Matches input signal with same number of screen pixels. PC mode for XGA signals (Ex. 1024 × 768 input with PDP-5060HD) Item 4:3 Description Matches input signal with the same number of screen pixels. Optimized for 1024 × 768 display FULL1 Full 16:9 screen display Optimized for 1024 × 768 display FULL2 For wide signal display Use when displaying 1280 × 768 signal resolution. NOTE • In 2-screen mode, press SCREEN SIZE to change the size of the left screen. • The PC mode above is for the PDP-5060HD. For the PDP4360HD the number of panel pixels is different, so signal processing and actual viewing conditions will vary slightly. • While watching High Definition TV broadcasting, pressing SCREEN SIZE switches among FULL, ZOOM, WIDE, and 4:3. • If you watch High Definition TV broadcasting with WIDE selected, part of the screen (e.g., images, graphic interface) may not appear on the display. If this is the case, select FULL. 64 En
-
 1
1 -
2
-
3
-
4
-
5
-
6
-
7
-
8
-
9
-
10
-
11
-
12
-
13
-
14
-
15
-
16
-
17
-
18
-
19
-
20
-
21
-
22
-
23
-
24
-
25
-
26
-
27
-
28
-
29
-
30
-
31
-
32
-
33
-
34
-
35
-
36
-
37
-
38
-
39
-
40
-
41
-
42
-
43
-
44
-
45
-
46
-
47
-
48
-
49
-
50
-
51
-
52
-
53
-
54
-
55
-
56
-
57
-
58
-
 59
59 -
 60
60 -
 61
61 -
 62
62 -
 63
63 -
 64
64 -
 65
65 -
 66
66 -
 67
67 -
 68
68 -
 69
69 -
70
-
71
-
72
-
73
-
74
-
75
-
76
-
77
-
78
-
79
-
80
-
81
-
82
-
83
-
84
-
85
-
86
-
87
-
88
-
89
-
90
-
91
-
92
-
93
-
94
-
95
-
96
-
97
-
98
-
99
-
100
-
101
-
102
-
103
-
104
-
105
-
106
-
107
-
108
-
109
-
110
-
111
-
112
-
113
-
114
-
115
-
116
-
117
-
118
-
119
-
120
-
121
-
122
-
123
-
124
-
125
-
126
-
127
-
128
-
129
-
130
-
131
-
132
-
133
-
134
-
135
-
136
-
137
-
138
-
139
-
140
-
141
-
142
-
143
-
144
-
145
-
146
-
147
-
148
-
149
-
150
-
151
-
152
-
153
-
154
-
155
-
156
-
157
-
158
-
159
-
160
-
161
-
162
-
163
-
164
-
165
-
166
-
167
-
168
-
169
-
170
-
171
-
172
-
173
-
174
-
175
-
176
-
177
-
178
-
179
-
180
-
181
-
182
-
183
-
184
-
185
-
186
-
187
-
188
-
189
-
190
-
191
-
192
-
193
-
194
-
195
-
196
-
197
-
198
-
199
-
200
-
201
-
202
-
203
-
204
-
205
-
206
-
207
-
208
-
209
-
210
-
211
-
212
-
213
-
214
-
215
-
216
-
217
-
218
-
219
-
220
-
221
-
222
-
223
-
224
-
225
-
226
-
227
-
228
-
229
-
230
-
231
-
232
-
233
-
234
-
235
-
236
-
237
-
238
-
239
-
240
-
241
-
242
-
243
-
244
-
245
-
246
-
247
-
248
-
249
-
250
-
251
-
252
-
253
-
254
-
255
-
256
-
257
-
258
-
259
-
260
-
261
-
262
-
263
-
264
-
265
-
266
-
267
-
268
 |
 |