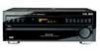
Pioneer VSX-14 Owner's Manual
Pioneer VSX-14 Manual
 |
View all Pioneer VSX-14 manuals
Add to My Manuals
Save this manual to your list of manuals |
Pioneer VSX-14 manual content summary:
- Pioneer VSX-14 | Owner's Manual - Page 1
AUDIO/VIDEO MULTI-CHANNEL RECEIVER VSX-D412 VSX-D512 Operating Instructions - Pioneer VSX-14 | Owner's Manual - Page 2
Thank you for buying this Pioneer product. Please read through these operating instructions so you will know how to operate your model properly. After you have finished reading the instructions, put them away in a safe place for future reference. IMPORTANT NOTICE H006AEn The serial number for - Pioneer VSX-14 | Owner's Manual - Page 3
Manufactured under license from Dolby Laboratories. "Dolby", "Pro Logic" and the double-D symbol are trademarks of Dolby Laboratories. "DTS", and "DTS Digital Surround" are registered trademarks of Digital Theater Systems, Inc. - Pioneer VSX-14 | Owner's Manual - Page 4
17 To improve AM reception 17 Connecting the speakers 18 Speaker terminals 18 Hints on speaker placement 19 AC outlet 20 Operating other Pioneer components .......... 20 4 Controls and displays Remote Control (VSX-D512 21 Remote Control (VSX-D412 24 Front Panel 26 Display 28 5 Playing - Pioneer VSX-14 | Owner's Manual - Page 5
codes (VSX-D512 only) ........ 45 Direct function (VSX-D512 only 46 Clearing the Preset Codes (VSX-D512 only 47 Controls for TVs (VSX-D512 only 48 Controls for other components (VSX-D512 only 49 Preset Code List (VSX-D512 only 51 10 Additional information Troubleshooting 53 Specifications 55 - Pioneer VSX-14 | Owner's Manual - Page 6
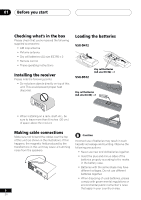
TONE QUICK SETUP MULTI JOG AUDIO/VIDEO MULTI-CHANNEL MULTI JOG RECEIVER N∫m-Û.,, ENTER SINEPLUETCTOR DOWN MASTER VOLUME UP R • When installing on a rack, shelf, etc., be sure to leave more than 8 inches (20 cm.) of space above the receiver. Loading the batteries VSX-D412 VSX-D512 Dry - Pioneer VSX-14 | Owner's Manual - Page 7
remote control unit The remote control may not work properly if: • There are obstacles between the remote control and the receiver's remote sensor. • Direct sunlight or fluorescent light is shining onto the remote sensor. • The receiver SETUP MULTI JOG AUDIO/VIDEO MULTI-CHANNEL MULTI JOG RECEIVER - Pioneer VSX-14 | Owner's Manual - Page 8
is what creates a surround sound effect and gives you the feeling of 'being there'. This receiver will automatically decode Dolby Digital, DTS, or Dolby Surround DVD-Video discs, according to your speaker setup. In most cases, you won't have to make changes for realistic surround sound, but other - Pioneer VSX-14 | Owner's Manual - Page 9
DIGITAL IN COAX OPT (DVD/LD) ¥ (TV/SAT) ¥ This receiver* VIDEO OUT STANDBY/ON 41 ¡¢ 0 7 8 Î 3 DVD PLAYER DVD player VIDEO IN TV IN Video cord MONITOR OUT SUB WOOFER PREOUT *The illustration shows the VSX-D512, but DVD connections for the VSX-D412 will be the same. 9 En - Pioneer VSX-14 | Owner's Manual - Page 10
02 5 minute guide 3 Connect your speakers. A complete setup of six speakers (including the subwoofer) is shown here, but everyone's home setup will vary. Simply connect the speakers you have in the manner shown below. The receiver will work with just two stereo speakers (the front speakers in the - Pioneer VSX-14 | Owner's Manual - Page 11
do this. Also make sure that DVD/LD is showing in the receiver's display, indicating that the DVD input is selected. If it isn't, press DVD/LD on the remote control to set the receiver to the DVD input. 5 Press QUICK SETUP on the front panel to specify your speaker setup and your room size. Use the - Pioneer VSX-14 | Owner's Manual - Page 12
settings after you have selected your speaker setup and room size. If you want to make more specific settings, refer to Choosing your receiver setup on pages 35 to 39. Use the front panel controls for the steps below. T LOUDNESS TONE QUICK SETUP MULTI JOG MULTI JOG ENTER INPUT SELECTOR - Pioneer VSX-14 | Owner's Manual - Page 13
used) or optical cables (not supplied) are used to connect digital components to this receiver. Be sure to insert completely. Digital audio coaxial cord (or standard video cord) Optical cable S-video cables (VSX-D512 only) Use S-video cables (not supplied) to get clearer picture reproduction than - Pioneer VSX-14 | Owner's Manual - Page 14
, the coaxial output from the component to the coaxial input on the receiver). This receiver has both a coaxial and an optical input for a total of two (OPTICAL) TV tuner (or Satellite tuner) DIGITAL OUT (COAXIAL) DVD player The arrows indicate the direction of the audio signal. Connecting audio - Pioneer VSX-14 | Owner's Manual - Page 15
for decoding DVDs, you can connect a decoder or a DVD player with multi-channel analog outputs to the multi-channel inputs of this receiver. When up using the S-video jacks on the rear of the receiver instead of the regular video jacks (VSX-D512 only). Make sure you use an S-video cable to - Pioneer VSX-14 | Owner's Manual - Page 16
TV tuner (or Satellite tuner) OUTPUT S-VIDEO OUTPUT VIDEO OUTPUT AUDIO DVD player (or LD player) OUTPUT The arrows indicate the direction of the (see Using external antennas, next page). Always make sure that the receiver is switched off and unplugged from the wall outlet before making or changing - Pioneer VSX-14 | Owner's Manual - Page 17
Connecting up 03 AM loop antenna Assemble the antenna and connect to the receiver. Attach to a wall, etc. (if desired) and face in the direction that gives the best reception. Using external antennas To improve FM reception Connect an - Pioneer VSX-14 | Owner's Manual - Page 18
shown here, but everyone's home setup will vary. Simply connect the speakers you have in the manner shown below. The receiver will work with just two stereo speakers (the front speakers in the diagram) but using at least three speakers is recommended, and a complete setup is best for surround sound - Pioneer VSX-14 | Owner's Manual - Page 19
good quality speaker wire to connect the speakers to the receiver. Hints on speaker placement Speakers are usually speakers and notice discoloration of the TV picture, move the speakers farther away from the TV. • Place the center speaker above or below the TV so that the sound of the center channel - Pioneer VSX-14 | Owner's Manual - Page 20
service center or your dealer for a replacement. Operating other Pioneer components By connecting a control cord (optional), you can point the remote controls of other Pioneer components at the receiver's remote sensor. You can also use the remote control from this unit to control a Pioneer DVD - Pioneer VSX-14 | Owner's Manual - Page 21
04 Remote Control (VSX-D512) 1 2 3 4 5 6 7 8 9 10 11 RECEIVER INPUT SELECT SOURCE DVD/LD MULTI CONTROL TV / SAT VCR/DVR TV CONT CD CD-R/TAPE TUNER RECEIVER ADVANCED STEREO/ MIDNIGHT/ STANDARD SURROUND DIRECT LOUDNESS CH TEST SELECT LEVEL TONE MUTE EFFECT RECEIVER CONTROL MASTER - Pioneer VSX-14 | Owner's Manual - Page 22
CHANNEL +/- buttons Use to select channels on other components such as a DVR or satellite tuner. 12 INPUT SELECT Use to select the input source. 13 LED indicator This indicator flashes when a command is sent from the remote control to the receiver menus associated with your DVD player. INPUT ATT Use - Pioneer VSX-14 | Owner's Manual - Page 23
the subtitles included in multilingual DVD-Video discs. 20 ENTER (page 48-50) It can be used to enter commands for TV, CATV and TUNER. 21 TV CONTROL buttons: These controls are for your TV. They are dedicated TV controls and will work no matter what mode the remote control is in. They can, however - Pioneer VSX-14 | Owner's Manual - Page 24
Remote Control (VSX-D412) DVD/LD TV/SAT CD 1 8 2 MASTER VOLUME 3 9 4 ATT MUTE 5 TUNING STATION 10 BAND CLASS MPX DISPLAY MENU TOP MENU 6 11 TUNER EDIT SETUP 7 ENTER DVD VER 12 13 DVD CH SELECT AUDIO EFFECT 14 SUB TITLE 1 3¡ 7 8 4¢ DVD CONTROL AV RECEIVER - Pioneer VSX-14 | Owner's Manual - Page 25
the disc 'top' menu of a DVD. 12 } ] ' ' and ENTER/SETUP buttons Use these arrow buttons when setting up your surround sound system. These buttons are also used to control DVD menus/options. 13 RECEIVER Use to switch to the receiver controls on the remote control. Also used when setting up the - Pioneer VSX-14 | Owner's Manual - Page 26
Selects the frequency when using the tuner. 5 Remote sensor Receives the signals from the remote control. 9 TUNER EDIT (pages 42-43) Press to a number of tasks. Use it to select options after pressing TONE, QUICK SETUP or TUNER EDIT. 13 INPUT ATT Use to attenuate (lower) the level of speakers. En - Pioneer VSX-14 | Owner's Manual - Page 27
pages 30-31) Switches direct playback on or off. Direct playback bypasses the tone controls and channel levels for the most accurate reproduction of a source. 16 SIGNAL SELECT (page 31 to access the bass and treble controls, which you can then adjust with the MULTI JOG/INPUT SELECTOR dial. 21 QUICK - Pioneer VSX-14 | Owner's Manual - Page 28
PRO LOGIC II When the Standard mode of the receiver is on, this lights to indicate Prologic II controls and channel levels for the most accurate reproduction of a source. 7 MIDNIGHT Lights during Midnight listening. 8 MONITOR Lights when MONITOR is selected. 9 Speaker indicator Shows if the speaker - Pioneer VSX-14 | Owner's Manual - Page 29
MPX button. TUNED : Lights when a broadcast is being received. 14 Master volume level Shows the overall volume level. --- dB indicates the minimum level, and - 0dB indicates the maximum level. Depending on the level settings you make for each channel, the maximum level can range between -10dB and - Pioneer VSX-14 | Owner's Manual - Page 30
speaker settings). Dolby Digital and DTS multi-channel sources are downmixed to stereo. In STEREO, the audio plays according to the surround setup settings and you can still use Midnight mode, Loudness mode and Tone Control with multi channel surround sound audio/visual sources (like DVDs and LDs). - Pioneer VSX-14 | Owner's Manual - Page 31
the previous page for more on these modes. • Press STEREO/DIRECT (STEREO on the VSX-D412 remote control) repeatedly to switch between the two options. If you switch on Midnight listening, Loudness, or the Tone controls when DIRECT is selected, the receiver automatically switches to STEREO. 31 En - Pioneer VSX-14 | Owner's Manual - Page 32
05 Playing sources Listening to multi-channel playback VSX-D412 VSX-D512 INPUT SELECTOR RECEIVER DVD/LD TV/SAT CD TUNER CD-R/ TAPE/MD VCR/ DVR STANDARD RECEIVER DVD/LD MULTI CONTROL TV / SAT VCR/DVR TV CONT CD CD-R/TAPE STANDARD TUNER RECEIVER 5 Start playback of the component you - Pioneer VSX-14 | Owner's Manual - Page 33
to Stereo mode. Playing other sources VSX-D412 VSX-D512 INPUT SELECTOR RECEIVER DVD/LD TV/SAT CD TUNER CD-R/ TAPE/MD VCR/ DVR RECEIVER DVD/LD MULTI CONTROL TV / SAT VCR/DVR TV CONT CD CD-R/TAPE TUNER RECEIVER MIDNIGHT LOUDNESS TONE QUICK SETUP MULTI JOG MULTI JOG ENTER INPUT - Pioneer VSX-14 | Owner's Manual - Page 34
05 Playing sources Selecting the multi-channel analog inputs Connect a DVD player with 5.1 channel output to listen to 5.1 channel playback. 1 Select DVD/LD if it is not already selected. Use the INPUT SELECTOR (VSX-D412)/MULTI CONTROL (VSX-D512) buttons on the remote (or the MULTI JOG/INPUT - Pioneer VSX-14 | Owner's Manual - Page 35
details on each of the settings. If you are using the Pioneer S-FCRW230 speaker system, you'll have to set the Crossover frequency to 200 Hz. You can leave the Speaker setting and the Subwoofer setting in the default settings. VSX-D412 VSX-D512 It will be easiest to adjust each of the settings - Pioneer VSX-14 | Owner's Manual - Page 36
or ' and choose a configuration that matches your speaker setup. One of the following configurations should match your setup: FS-CS-SS FL-C -SS FS-CS-S point where the receiver divides the high and low sounds (the frequencies) between the speakers. Since most smaller speakers can't handle deep - Pioneer VSX-14 | Owner's Manual - Page 37
up the receiver 06 100Hz 150Hz 200Hz 100 Hz Sends bass frequencies below 100 Hz to the subwoofer (or L speakers). 150 Hz Sends bass frequencies below 150 Hz to the subwoofer (or L speakers). 200 Hz Sends bass frequencies below 200 Hz to the subwoofer (or L speakers). If all speakers (front - Pioneer VSX-14 | Owner's Manual - Page 38
the dynamic range control (OFF, MAX, or MID). • speaker will play channel 1 and the right front speaker will play channel 2. • Use ' or ' to cycle through the possible DUAL MONO settings. L ch 1.R ch 2 ch2 ch1 Coaxial digital input setting • Default setting: DVD Here you tell the receiver - Pioneer VSX-14 | Owner's Manual - Page 39
an ultra-low frequency its sound may seem quieter than it actually is. VSX-D412 VSX-D512 STANDARD MASTER VOLUME STANDARD CH TEST SELECT LEVEL TONE MASTER VOLUME CH SELECT TEST TONE LEVEL Î RECEIVER The speaker volume can be adjusted without outputting the test tone by pressing CH - Pioneer VSX-14 | Owner's Manual - Page 40
-). High speed tuning Press and hold the tuning buttons ( TUNING (VSX-D412)/ TUNE (VSX-D512) + / -) for high speed tuning. Release the button at the frequency you want. TUNE BAND DTV ON/OFF MPX 1 Press the TUNER button on the remote control to select the tuner. 2 Use the BAND button to change the - Pioneer VSX-14 | Owner's Manual - Page 41
VSX-D512 only) Sometimes, you'll already know the frequency of the station you want to listen to. In this case, you can simply enter the frequency directly using the number buttons on the remote control. 1 Press the TUNER button on the remote control the receiver into mono reception mode. This should improve - Pioneer VSX-14 | Owner's Manual - Page 42
the receiver store the frequency for easy recall whenever you want to listen to that station. This saves the effort of manually tuning 42 En 2 If you're using the remote control, press RECEIVER (VSX-D412 only). 3 Press TUNER EDIT (T. EDIT on the VSXD512 remote). The display shows ST. MEMORY, then - Pioneer VSX-14 | Owner's Manual - Page 43
to name. See Listening to station presets (this page) for how to do this. 2 If you're using the remote control, press RECEIVER (VSX-D412 only). 3 Press TUNER EDIT (T. EDIT on the VSXD512 remote). The display shows ST. NAME, then a blinking cursor at the first character position. 4 Input the name you - Pioneer VSX-14 | Owner's Manual - Page 44
original source signal. The receiver's volume, balance, tone (bass, treble, loudness), and surround effects have no effect on the recorded signal. 1 Select the source you want to record. Use the INPUT SELECTOR (VSX-D412)/MULTI CONTROL (VSX-D512) buttons on the remote (or MULTI JOG/INPUT SELECTOR - Pioneer VSX-14 | Owner's Manual - Page 45
tuner Selecting preset codes (VSX-D512 only) MULTI CONTROL DVD/LD TV / SAT VCR/DVR TV CONT CD CD-R/TAPE TUNER RECEIVER MASTER VOLUME TUNE ST ST ENTER TUNE The remote control will exit an operation after 1 minute of inactivity. RECEIVER 1 While pressing the RECEIVER button press and hold - Pioneer VSX-14 | Owner's Manual - Page 46
MULTI CONTROL button for the component you want to control. The LED lights. 3 Use the number buttons to enter the 3 digit setup VSX-D512 only) • Default setting: ON You can use the direct function feature to control one component using the remote control while at the same time, using your receiver - Pioneer VSX-14 | Owner's Manual - Page 47
of your system 09 Clearing the Preset Codes (VSX-D512 only) You can clear all presets and restore the factory default settings. 1 While pressing the RECEIVER button press and hold the 0 button for three seconds. The LED on the remote control blinks three times indicating all the preset codes have - Pioneer VSX-14 | Owner's Manual - Page 48
Controls for TVs (VSX-D512 only) This remote control can control components after entering the proper codes (see pages 45-46). Use the MULTI CONTROL a specific TV channel. Buttons +10 button Use to add a decimal point when selecting a specific TV channel. ENTER/ DISC Use to enter a channel. - Pioneer VSX-14 | Owner's Manual - Page 49
(VSX-D512 only) This remote control can control these components after entering the proper codes (see pages 45- 46). Use the MULTI CONTROL buttons to select the component. Button (s) Function Components SOURCE Press to switch the component between standby and on. CD/MD/CD-R/VCR/DVD/LD - Pioneer VSX-14 | Owner's Manual - Page 50
the tape. Cassette deck }]'' & Navigates DVD menu/options. ENTER DVD/DVR Player CHANNEL Selects channels. +/- VCR/DVR Player TOP MENU Displays the disc 'top' menu of a DVD. DVD/DVR Player AUDIO Changes the audio language or channel. DVD/DVR Player GUIDE Displays/changes the subtitles on - Pioneer VSX-14 | Owner's Manual - Page 51
system 09 Preset Code List (VSX-D512 only) You should have no problem controlling a component if you find 101 105, 106 104 103 100 107 100, 111(DVD/LD) SONY PANASONIC TOSHIBA SHARP HITACHI SANYO MITSUBISHI GOLDSTAR JVC RADIOSHACK FUNAI GRANDIENTE LOEWE PIONEER 604 607, 608, 622 605, 602, 626, - Pioneer VSX-14 | Owner's Manual - Page 52
09 Controlling the rest of your system VCR Manufacturer ORION FUNAI RCA ZENITH MAGNAVOX FISHER PANASONIC TOSHIBA JVC HITACHI SONY MITSUBISHI SANYO SHARP GOLDSTAR OPTIMUS GRADIENTE LOEWE PIONEER DVD Recorder Manufacturer PIONEER TAPE Manufacturer DENON FISHER JVC KENWOOD ONKYO OPTIMUS PANASONIC SONY - Pioneer VSX-14 | Owner's Manual - Page 53
are no loose strands of speaker wire touching the rear panel. This could cause the receiver to shut off automatically. No sound is output when a function is selected. • Make sure the component is connected correctly (refer to pages 13-18). • Press MUTE on the remote control to turn muting off - Pioneer VSX-14 | Owner's Manual - Page 54
manual supplied with the DVD player. When a search is performed by • This is not a malfunction, but be sure to turn the volume a DTS compatible CD player down to prevent the output of loud noise from your speakers. during playback, noise is output. Can't operate the remote control. • Replace - Pioneer VSX-14 | Owner's Manual - Page 55
Additional information 10 Specifications Amplifier Section Continuous average power output of 100 watts* per channel, min., at 8 ohms, from 20 Hz to 20,000 Hz with no more than 0.2 %** total harmonic distortion (front). Continuous Power Output (Stereo) Front 100 W per channel (20-20,000 Hz, THD - Pioneer VSX-14 | Owner's Manual - Page 56
9.0 kg (19.8 lb) Furnished Parts AM loop antenna 1 FM wire antenna 1 Dry cell batteries (AA size IEC R6 2 Remote control 1 Operating instructions 1 Specifications and the design are subject to possible modifications without notice, due to improvements. * Measured pursuant to the Federal Trade - Pioneer VSX-14 | Owner's Manual - Page 57
Additional information 10 57 En - Pioneer VSX-14 | Owner's Manual - Page 58
10 Additional information 58 En - Pioneer VSX-14 | Owner's Manual - Page 59
Additional information 10 59 En - Pioneer VSX-14 | Owner's Manual - Page 60
ELECTRONICS OF CANADA, INC. 300 Allstate Parkway, Markham, Ontario L3R OP2, Canada TEL: (905) 479-4411 PIONEER EUROPE NV Haven 1087, Keetberglaan 1, B-9120 Melsele, Belgium TEL: 03/570.05.11 PIONEER ELECTRONICS ASIACENTRE PTE. LTD. 253 Alexandra Road, #04-01, Singapore 159936 TEL: 656-472-1111
-
 1
1 -
 2
2 -
 3
3 -
 4
4 -
 5
5 -
 6
6 -
 7
7 -
8
-
9
-
10
-
11
-
12
-
13
-
14
-
15
-
16
-
17
-
18
-
19
-
20
-
21
-
22
-
23
-
24
-
25
-
26
-
27
-
28
-
29
-
30
-
31
-
32
-
33
-
34
-
35
-
36
-
37
-
38
-
39
-
40
-
41
-
42
-
43
-
44
-
45
-
46
-
47
-
48
-
49
-
50
-
51
-
52
-
53
-
54
-
55
-
56
-
57
-
58
-
59
-
60
 |
 |

AUDIO/VIDEO MULTI-CHANNEL
RECEIVER
VSX-D412
VSX-D512
Operating Instructions