Pioneer VSX-14 Owner's Manual - Page 26
Controls and displays, Front Panel
 |
View all Pioneer VSX-14 manuals
Add to My Manuals
Save this manual to your list of manuals |
Page 26 highlights
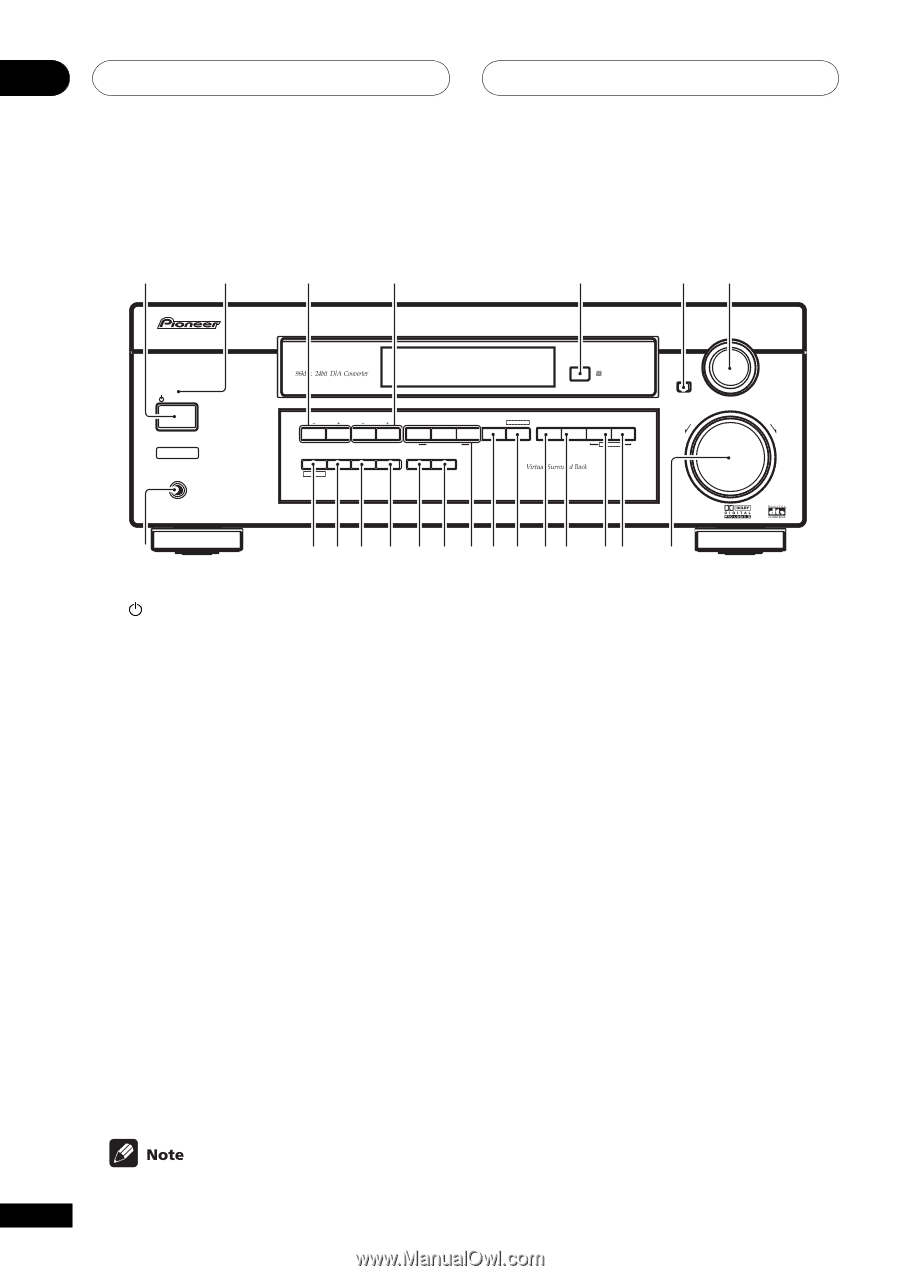
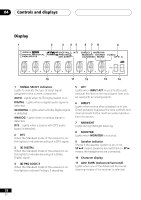
04 Controls and displays Front Panel 1 2 3 4 5 67 STANDBY STANDBY/ON PHONES STATION TUNING ADVANCED STEREO/ STANDARD SURROUND DIRECT SIGNAL SELECT MONITOR MIDNIGHT LOUDNESS TONE QUICK SETUP TUNER EDIT CLASS BAND MPX MULTI JOG LISTENING MODE INPUT ATT FL DIMMER MULTI JOG MULTI JOG ENTER INPUT SELECTOR MASTER VOLUME DOWN UP R 8 9 10 11 12 13 14 15 16 17 18 19 20 21 22 1 STANDBY/ON Switches the receiver between on and standby. 2 STANDBY indicator Lights when the receiver is in standby mode. 3 STATION (+/-) buttons (pages 42-43) Selects station presets when using the tuner. 4 TUNING (+/-) buttons (page 40) Selects the frequency when using the tuner. 5 Remote sensor Receives the signals from the remote control. 9 TUNER EDIT (pages 42-43) Press to memorize and name a station for recall using the STATION (+/-) buttons. 10 CLASS (pages 42-43) Switches between the three banks (classes) of station presets. 11 BAND (page 40-41) Switches between AM and FM radio bands. 12 MPX (page 41) Press the MPX button to receive a radio broadcast in mono. 6 ENTER 7 MULTI JOG/INPUT SELECTOR dial The MULTI JOG/INPUT SELECTOR dial performs a number of tasks. Use it to select options after pressing TONE, QUICK SETUP or TUNER EDIT. 13 INPUT ATT Use to attenuate (lower) the level of an analog input signal to prevent distortion. 14 FL DIMMER Use this button to make the fluorescent display (FL) dimmer or brighter. 8 PHONES jack Use to connect headphones. 15 LISTENING MODE buttons STANDARD (pages 30, 32, 39) Press for Standard decoding and to switch between the various Pro Logic II options. When the headphones are connected, there 26 is no sound output from the speakers. En
-
 1
1 -
2
-
3
-
4
-
5
-
6
-
7
-
8
-
9
-
10
-
11
-
12
-
13
-
14
-
15
-
16
-
17
-
18
-
19
-
20
-
 21
21 -
 22
22 -
 23
23 -
 24
24 -
 25
25 -
 26
26 -
 27
27 -
 28
28 -
 29
29 -
 30
30 -
 31
31 -
32
-
33
-
34
-
35
-
36
-
37
-
38
-
39
-
40
-
41
-
42
-
43
-
44
-
45
-
46
-
47
-
48
-
49
-
50
-
51
-
52
-
53
-
54
-
55
-
56
-
57
-
58
-
59
-
60
 |
 |