Pioneer VSX-43TX Owner's Manual - Page 29
Preparation
 |
View all Pioneer VSX-43TX manuals
Add to My Manuals
Save this manual to your list of manuals |
Page 29 highlights
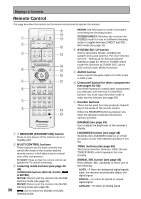
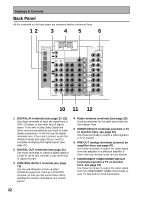
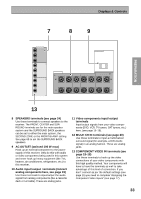
PREPARATION PREPARATION Displays & Controls 9 MULTI CH IN button Use this button to select the component you have hooked up to the MULTI CH IN terminals (for example, a DVD-Audio player). 10 ACOUSTIC EQ button (see page 47) Use to switch on and off the Acoustic Calibration EQ. 11 MASTER VOLUME dial Use to raise or lower the volume of the receiver. 12 MULTI JOG CONTROL buttons SET UP Press to switch the SYSTEM SETUP mode. RETURN Press to move back one step in the SYSTEM SETUP process. 13 SIGNAL SELECT button (see page 42) Press SIGNAL SELECT repeatedly to select one of the following: AUTO - If there are analog and digital signals input, the receiver automatically selects the digital signal. DIGITAL - To select an optical or coaxial digital signal. ANALOG - To select an analog signal. 14 HI-BIT HI-SAMPLING button (see page 50) Use this button to switch the HI-BIT HI-SAMPLING on or off. Use to hear CD and DVD, as well as other digital soundtracks at a wider dynamic range, allowing for finer audio reproduction. 15 SB CH MODE button (see pages 51) Use this button to turn the surround back channels ON/OFF/AUTO or switch the VIRTUAL SURROUND BACK mode between ON/ OFF/AUTO. 16 MIDNIGHT button (See page 48) Switches the MIDNIGHT mode on or off (cannot be used in THX CINEMA mode). 17 LOUDNESS button (see page 48) Switches the LOUDNESS mode on or off (for all modes except THX CINEMA and MULTI CH IN). 18 TUNER CONTROL buttons (See page 54-58) BAND Press to select the AM or FM band. CLASS Press repeatedly to switch the preset station classes. SELECT Switches the -/+ buttons between station memory and frequency select modes. -/+ Selects station memories or frequencies when using the tuner. TUNER EDIT Press to memorize and name a station for recall using the MULTI JOG and ENTER buttons. 19 PHONES jack Connect headphones for private listening (no sound will be heard through the speakers). 20 SPEAKERS (A/B) button The use of this button depends on how the SURRBACK SYSTEM (see page 35) are set. If NORMAL SYSTEM is chosen this button toggles between A and OFF. If SECOND ZONE is chosen this button toggles between A, B, A+B and OFF (see page 66). If FRONT BI-AMP is chosen this button toggles between A+B and OFF (see page 66). 21 TONE CONTROL buttons (see page 49) TONE button This button switches between TONE ON and TONE BYPASS, which bypasses the tone circuitry. BASS/TREBLE button Use to select whether the bass or treble will be adjusted. -/+ buttons Use to adjust the frequency levels. 22 VIDEO INPUT jacks (see page 17) S-VIDEO Video input for connecting a portable DVD player, video camera (etc.), that has an S video out. RCA VIDEO / AUDIO (L/R) Video input for connecting a portable DVD player, video camera, etc., that has standard RCA video/audio outputs. 29
-
 1
1 -
2
-
3
-
4
-
5
-
6
-
7
-
8
-
9
-
10
-
11
-
12
-
13
-
14
-
15
-
16
-
17
-
18
-
19
-
20
-
21
-
22
-
23
-
 24
24 -
 25
25 -
 26
26 -
 27
27 -
 28
28 -
 29
29 -
 30
30 -
 31
31 -
 32
32 -
 33
33 -
 34
34 -
35
-
36
-
37
-
38
-
39
-
40
-
41
-
42
-
43
-
44
-
45
-
46
-
47
-
48
-
49
-
50
-
51
-
52
-
53
-
54
-
55
-
56
-
57
-
58
-
59
-
60
-
61
-
62
-
63
-
64
-
65
-
66
-
67
-
68
-
69
-
70
-
71
-
72
-
73
-
74
-
75
-
76
-
77
-
78
-
79
-
80
-
81
-
82
-
83
-
84
-
85
-
86
-
87
-
88
-
89
-
90
-
91
-
92
-
93
-
94
-
95
-
96
-
97
-
98
-
99
-
100
-
101
-
102
-
103
-
104
 |
 |
