Pioneer VSX-92TXH Owner's Manual - Page 31
Listening to your system, Selecting MCACC presets, Choosing the input signal
 |
View all Pioneer VSX-92TXH manuals
Add to My Manuals
Save this manual to your list of manuals |
Page 31 highlights
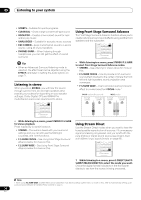
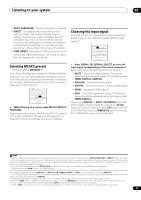
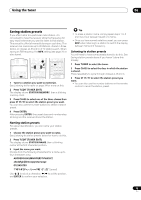
Listening to your system 05 • AUTO SURROUND - See Auto playback on page 28. • DIRECT - Sources are heard according to the settings made in the Surround Setup (speaker setting, channel level, speaker distance, acoustic calibration EQ, and X-curve), as well as with dual mono, the input attenuator, and any sound delay and hi-bit/hi-sampling settings. You will hear sources according to the number of channels in the signal. • PURE DIRECT - Analog and PCM sources are heard without any digital processing.1 No sound is output from the Speaker B in this mode. Selecting MCACC presets • Default setting: MEMORY 1 If you have calibrated your system for different listening positions2, you can switch between settings to suit the kind of source you're listening to and where you're sitting (for example, watching movies from a sofa, or playing a video game close to the TV). PHOTO T.DISP STEREO/ STATUS SIGNAL SEL SBch F.S.SURR MULTI OPE THX STANDARD ADV. SURR SHIFT PHASE MCACC S.DIRECT RECEIVER • While listening to a source, press MCACC (MCACC POSITION). Press repeatedly to select one of the six MCACC presets3 or to switch calibration off. See Data Management on page 45 to check and manage your current settings. Choosing the input signal You need to hook up a component to both analog and digital inputs on the receiver to select between input signals.4 DISP CH PHOTO T.DISP STATUS SIGNAL SEL SBch CH STEREO/ F.S.SURR MULTI OPE THX STANDARD ADV. SURR SHIFT PHASE MCACC S.DIRECT RECEIVER • Press SIGNAL SEL (SIGNAL SELECT) to select the input signal corresponding to the source component. Each press cycles through the options as follows: • AUTO - This is the default setting. The receiver selects the first available signal in the following order: HDMI; DIGITAL; ANALOG. • ANALOG - Selects an analog signal. • DIGITAL - Selects an optical or coaxial digital signal. • HDMI - Selects an HDMI signal.5 • PCM - Only PCM signals are output.6 The receiver selects the first available signal in the following order: HDMI; DIGITAL. When set to DIGITAL or AUTO, 2 DIGITAL lights with Dolby Digital or Dolby Digital Plus decoding, 2 HD lights with Dolby TrueHD decoding, DTS lights with DTS or DTS-HD decoding, and WMA9 Pro lights to indicate that a WMA9 Pro signal is being decoded. Note 1 There are cases where a brief noise is heard before playback of sources other than PCM. Please select AUTO SURROUND or DIRECT if this is a problem. 2 Different presets might also have separate calibration settings for the same listening position, depending on how you're using your system. These presets can be set in Automatically setting up for surround sound (MCACC & Full Band Phase Control) on page 8 or Automatic MCACC (Expert) on page 36, either of which you should have already completed. 3 • You can't use these settings when MULTI CH IN is switched on, and they has no effect when headphones are connected. • You can also press / to select the MCACC preset. 4 • This receiver can only play back Dolby Digital, PCM (32 kHz to 192 kHz), DTS (including DTS 96 kHz / 24 bit) and WMA9 Pro digital signal formats. With other digital signal formats, set to ANALOG (the MULTI CH IN, TUNER, PHONO and iPod input functions are all fixed to ANALOG). • You may get digital noise when a LD or CD player compatible with DTS is playing an analog signal. To prevent noise, make the proper digital connections (page 17) and set the signal input to DIGITAL. • Some DVD players don't output DTS signals. For more details, refer to the instruction manual supplied with your DVD player. 5 When the HDMI option in Setting the Audio options on page 71 is set to THROUGH, the sound will be heard through your TV, not from this receiver. 6 • This is useful if you find there is a slight delay before AUTO recognizes the PCM signal on a CD, for instance. • When PCM is selected, noise may be output during playback of non-PCM sources. Please select another input signal if this is a problem. 31 En
-
 1
1 -
2
-
3
-
4
-
5
-
6
-
7
-
8
-
9
-
10
-
11
-
12
-
13
-
14
-
15
-
16
-
17
-
18
-
19
-
20
-
21
-
22
-
23
-
24
-
25
-
 26
26 -
 27
27 -
 28
28 -
 29
29 -
 30
30 -
 31
31 -
 32
32 -
 33
33 -
 34
34 -
 35
35 -
 36
36 -
37
-
38
-
39
-
40
-
41
-
42
-
43
-
44
-
45
-
46
-
47
-
48
-
49
-
50
-
51
-
52
-
53
-
54
-
55
-
56
-
57
-
58
-
59
-
60
-
61
-
62
-
63
-
64
-
65
-
66
-
67
-
68
-
69
-
70
-
71
-
72
-
73
-
74
-
75
-
76
-
77
-
78
-
79
-
80
-
81
-
82
-
83
-
84
-
85
-
86
-
87
-
88
-
89
-
90
-
91
-
92
-
93
-
94
-
95
-
96
-
97
-
98
-
99
-
100
 |
 |
