Pioneer VSX-92TXH Owner's Manual - Page 66
HDMI Control, Setting the HDMI options, Before using synchronization, Synchronized amp mode, About
 |
View all Pioneer VSX-92TXH manuals
Add to My Manuals
Save this manual to your list of manuals |
Page 66 highlights
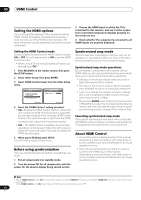
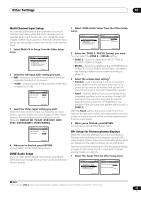
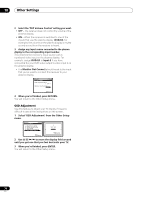
09 HDMI Control Setting the HDMI options You must adjust the settings of this receiver as well as HDMI Control-compatible connected components in order to make use of the HDMI Control function. For more information see the operating instructions for each component. 3 Choose the HDMI input to which the TV is connected to this receiver, and see if video output from connected components displays properly on the screen on not. 4 Check whether the components connected to all HDMI inputs are properly displayed. Setting the HDMI Control mode Choose whether to set this unit's HDMI Control function ON or OFF. You will need to set it to ON to use the HDMI Control function. • When using a TV not manufactured by Pioneer, put this setting to OFF. 1 Press RECEIVER on the remote control, then press the SETUP button. 2 Select 'Other Setup' then press ENTER. 3 Select 'HDMI Control Setup' from the Other Setup menu. DVD/LD 8. Other Setup - 55.0dB a. Multi Ch In Setup b. ZONE Audio Setup c. SR+ Setup d. HDMI Control Setup e. OSD Adjustment DVD/LD - 55 .0dB 8d. HDMI Control Setup HDMI Control OFF :Return :Finish 4 Select the 'HDMI Control' setting you want. • ON - Enables the HDMI Control function. When this unit's power is turned off and you have a supported source begin playback while using the HDMI Control function, the audio and video output from the HDMI connection are output from the plasma display.1 • OFF - The HDMI Control is disabled. Synchronized operations cannot be used. When this unit's power is turned off, audio and video of sources connected via HDMI are not output. 5 When you're finished, press SETUP. You will finish to System Setup menu. Before using synchronization Once you have finished all connections and settings, you must: 1 Put all components into standby mode. 2 Turn the power ON for all components, with the power for the plasma display being turned on last. Synchronized amp mode Synchronized amp mode begins once you carry out an operation for the plasma display. For more information, see the operating manual of your plasma display. Synchronized amp mode operations By connecting a component to this receiver with an HDMI cable you can use synchronized amp mode, which allows you to synchronize the following operations: • Displays on the plasma display when you mute or adjust the volume of this receiver. • The input of this receiver is automatically changed when playback occurs on a connected component. • Even if you change this receiver's input to a device that is not connected by HDMI, the synchronized amp mode remains in effect. • By pressing GENRE when listening to a source from a HDD/DVD recorder, the most appropriate listening mode is automatically selected (see Using the genre synchronizing function on page 33 for more on this). Canceling synchronized amp mode If you cancel synchronized amp mode while connected via HDMI to a plasma display or while you are watching a TV programme, the power for this unit is turned off. About HDMI Control • Connect the plasma display directly to this receiver. Interrupting a direct connection with other amps or an AV converter (such as an HDMI switch) can cause operational errors. • Only connect components you intend to use as a source to the HDMI input of this receiver. Interrupting a direct connection with other amps or an AV converter (such as an HDMI switch) can cause operational errors. Note 1 • When HDMI Control is set to ON, the audio/video signals input at the HDMI IN terminals are output at the HDMI OUT terminal even when this receiver is switched off. • With HDMI Control set to ON, Input Setup and HDMI Input are automatically set to OFF. 66 En
-
 1
1 -
2
-
3
-
4
-
5
-
6
-
7
-
8
-
9
-
10
-
11
-
12
-
13
-
14
-
15
-
16
-
17
-
18
-
19
-
20
-
21
-
22
-
23
-
24
-
25
-
26
-
27
-
28
-
29
-
30
-
31
-
32
-
33
-
34
-
35
-
36
-
37
-
38
-
39
-
40
-
41
-
42
-
43
-
44
-
45
-
46
-
47
-
48
-
49
-
50
-
51
-
52
-
53
-
54
-
55
-
56
-
57
-
58
-
59
-
60
-
 61
61 -
 62
62 -
 63
63 -
 64
64 -
 65
65 -
 66
66 -
 67
67 -
 68
68 -
 69
69 -
 70
70 -
 71
71 -
72
-
73
-
74
-
75
-
76
-
77
-
78
-
79
-
80
-
81
-
82
-
83
-
84
-
85
-
86
-
87
-
88
-
89
-
90
-
91
-
92
-
93
-
94
-
95
-
96
-
97
-
98
-
99
-
100
 |
 |
