Pioneer VSX-92TXH Owner's Manual - Page 82
Control Out
 |
View all Pioneer VSX-92TXH manuals
Add to My Manuals
Save this manual to your list of manuals |
Page 82 highlights
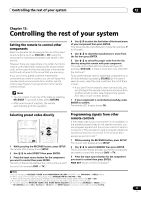
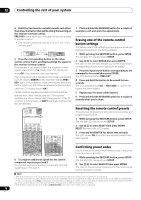
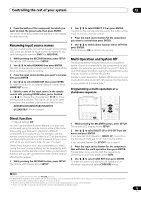
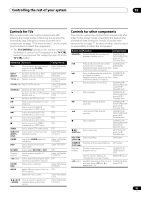
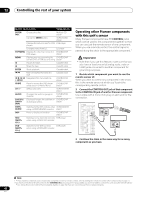
12 Controlling the rest of your system Button (s) Function Components ENTER/ DISC Chooses the disc. Multiple CD player Use as the ENTER button. VCR/DVD/BD player Displays the setup screen for DVR DVR player players. Changes sides of the LD. LD player TOP MENU Displays the disc 'top' menu of a DVD/BD/DVR DVD player. player MENU Displays menus concerning the DVD/BD/DVR current DVD or DVR you are using. player Pauses the tape. Cassette deck Stops the tape. Cassette deck ENTER Starts playback. / Fast rewinds/fast forwards the tape. Navigates DVD menu/options. & ENTER Cassette deck Cassette deck DVD/BD/DVR player GUIDE Press to access the DVD player setup screen or Home Menu. DVD/BD/DVR player CH +/- Selects channels. VCR/DVD/DVR player AUDIO Changes the audio language or DVD/BD/DVR channel. player SUBTITLE (SHIFT+ DISP) Displays/changes the subtitles on DVD/BD/DVR multilingual DVDs. player SHIFT+ AUDIO Switches to the VCR controls when VCR/DVD/DVR using a VCR/DVD/HDD recorder. player DISP Press to display information. DVD/BD/DVR player HDD (SHIFT+ CH-) Switches to the hard disk controls DVR player when using a DVD/HDD recorder. DVD (SHIFT+ CH+) Switches to the DVD controls DVR player when using a DVD/HDD recorder. Operating other Pioneer components with this unit's sensor Many Pioneer components have SR CONTROL jacks which can be used to link components together so that you can use just the remote sensor of one component. When you use a remote control, the control signal is passed along the chain to the appropriate component.1 Important • Note that if you use this feature, make sure that you also have at least one set of analog audio, video or HDMI jacks connected to another component for grounding purposes. 1 Decide which component you want to use the remote sensor of. When you want to control any component in the chain, this is the remote sensor at which you'll point the corresponding remote control. 2 Connect the CONTROL OUT jack of that component to the CONTROL IN jack of another Pioneer component. Use a cable with a mono mini-plug on each end for the connection. RECEIVER SSYSOTUERMCOEFF AANTATLO G RECEIVER ROOM2/3 TV CONT CLASS ENTER DISC C HMLEENVUE L ST T.EDIT RETURN BAND VOL SR+ DIMMER VSIEDLEO TUNER XM RADIO VIDEO 1 VIDEO 2 RECEIVER SIENLPECUTT TV SAT CD-R i Pod STANDARD ADV. SURR MCACC S.DIRECT DVD CH STEREO REC STOP MEMORY HDD MUTE SLEEP TV CH DTV INFO TV CONTROL ENTER DVD DVR2 DVR1 CD TUNE CH SBch SIENLPECUTT REC GUIDE CATEGORY TUNE ST TAVOPPAMREANMUETìER D.ACCESS +10 ISOPHASE STATUS SIGNAL SEL MULTI OPE THX SUBTITLE DTV MENU SETUP TV VOL AUDIO DISP MPX SHIFT MULTI-ZONE & SOURCE /REC SEL OUT1 ZONE3 OUT2 LAN (10/100) OPTICAL IN 1 (TV/SAT) IN 1 MAIN MUL & SO IN 2 HDMI IN 1 ZONE2 CONTROL IN IN 1 (D IN 2 (B IN 2 (BD) IN 3 (DVR/ VCR 1) IN 4 (CD-R) 14 ASSIGNABLE IN 1 1 2 (DVD/ LD) IN 2 (CD) COAXIAL IN OUT IN 2 IN 1 Y (DVD/ LD) IN 3 PB PR IN 4 IN 2 Y (BD) PB OUT XM PR ASSIGNABLE 14 DIGITAL (VIDEO ASSIGNABLE COMPONENT V CONTROL IN OUT CONTROL IN OUT 3 Continue the chain in the same way for as many components as you have. Note 1 • If you want to control all your components using this receiver's remote control, refer to Setting the remote to control other components on page 77. If you have connected a remote control to the CONTROL IN jack (using a mini-plug cable), you won't be able to control this unit using the remote sensor. • See Using this receiver with a Pioneer plasma display on page 62 if you are connecting a Pioneer plasma display. 82 En
-
 1
1 -
2
-
3
-
4
-
5
-
6
-
7
-
8
-
9
-
10
-
11
-
12
-
13
-
14
-
15
-
16
-
17
-
18
-
19
-
20
-
21
-
22
-
23
-
24
-
25
-
26
-
27
-
28
-
29
-
30
-
31
-
32
-
33
-
34
-
35
-
36
-
37
-
38
-
39
-
40
-
41
-
42
-
43
-
44
-
45
-
46
-
47
-
48
-
49
-
50
-
51
-
52
-
53
-
54
-
55
-
56
-
57
-
58
-
59
-
60
-
61
-
62
-
63
-
64
-
65
-
66
-
67
-
68
-
69
-
70
-
71
-
72
-
73
-
74
-
75
-
76
-
 77
77 -
 78
78 -
 79
79 -
 80
80 -
 81
81 -
 82
82 -
 83
83 -
 84
84 -
 85
85 -
 86
86 -
 87
87 -
88
-
89
-
90
-
91
-
92
-
93
-
94
-
95
-
96
-
97
-
98
-
99
-
100
 |
 |
