Ricoh AP2610 Setup Guide - Page 40
Connecting the 1394 Interface Cable to the Printer, Interface Connector, Required cable - supplies
 |
UPC - 026649007576
View all Ricoh AP2610 manuals
Add to My Manuals
Save this manual to your list of manuals |
Page 40 highlights
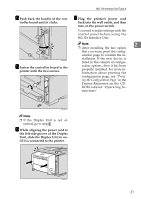
Installing Options Connecting the 1394 Interface Cable to the Printer -1394 Interface Unit specifications A Attach the 1394 interface cable to ❖ Interface Connector: the jack on the 1394 Interface IEEE 1394 (6 pins × 2) Unit. 2 Both types of jack are available. ❖ Required cable: 1394 interface cable (6 pins x 4 pins, 6 pins x 6 pins) Important ❒ You cannot plug devices togeth- er to create loops. ❒ Do not use a cable more than 4.5 meters (14.8 feet) long. ZGDX550J B Connect the other end of the 1394 interface cable to the computer or the other IEEE 1394 node. Note ❒ After installing the last option that you want, print the configuration page to confirm the installation. If the new device is listed in the column of configuration options, then it has been properly installed. For more information about printing the configuration page, see "Printing the Configuration Page" in the Printer Reference on the CD-ROM labeled "Operating Instructions". ❖ Connectable number of devices in a bus: Maximum 63 ❖ Allowed cable hops in a bus: Maximum 16 ❖ Power supply: Nonpower supply Cable Power repeated (IEEE 1394a-2000 compliant) 28
-
 1
1 -
2
-
3
-
4
-
5
-
6
-
7
-
8
-
9
-
10
-
11
-
12
-
13
-
14
-
15
-
16
-
17
-
18
-
19
-
20
-
21
-
22
-
23
-
24
-
25
-
26
-
27
-
28
-
29
-
30
-
31
-
32
-
33
-
34
-
 35
35 -
 36
36 -
 37
37 -
 38
38 -
 39
39 -
 40
40 -
 41
41 -
 42
42 -
 43
43 -
 44
44 -
 45
45 -
46
-
47
-
48
-
49
-
50
-
51
-
52
-
53
-
54
-
55
-
56
-
57
-
58
-
59
-
60
-
61
-
62
-
63
-
64
-
65
-
66
-
67
-
68
-
69
-
70
-
71
-
72
-
73
-
74
-
75
-
76
-
77
-
78
-
79
-
80
-
81
-
82
-
83
-
84
-
85
-
86
-
87
-
88
-
89
-
90
-
91
-
92
 |
 |
