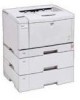
Ricoh AP2610 Setup Guide - Page 55
Network Setup, IP Address, Network Boot, Enter, Escape
 |
UPC - 026649007576
View all Ricoh AP2610 manuals
Add to My Manuals
Save this manual to your list of manuals |
Page 55 highlights
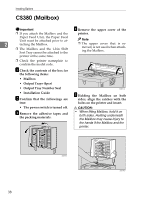
Ethernet Configuration G If you use TCP/IP, assign the IP address to the printer. E Repeat steps C and D to enter the IP address. Note ❒ To get the IP address for the printer, contact your network administrator. A Press {U} or {T} until the following message appears. IP Address: 192.168.000.011 Check if the pointer (k) is at the rightmost position, and press {Enter #} to register the IP address you selected. Network Setup: IP Address Network Setup: 3 IP Address B Press {Enter #}. The current IP address appears on the panel display. IP Address: 011.022.033.044 C Press {U} or {T} to enter the left most entry field of the IP address. IP Address: 192.022.033.044 D Press {Enter #}. The pointer (k) moves to the next entry field automatically. H If you use TCP/IP, assign "Subnet Mask" and "Gateway Address" following the same procedure for entering the IP address. I If you use TCP/IP, you can make settings for "Network Boot". You can select how to assign the printer's address using the computer. Select one of the items below if necessary. • None (Default) • DHCP A Press {U} or {T} to display "Network Boot". IP Address: 192.02k.033.044 Network Setup: Network Boot B Press {Enter #}. Note ❒ The value moves by 10 if {U} or {T} is kept pressed. ❒ You can return the pointer (k) to the previous (left) entry field by pressing {Escape}. ❒ If you press {Escape} when the pointer (k) is on the leftmost position, the selected IP address is reset. The current setting appears on the panel display. Network Boot: *None C Press {U} or {T} to display the method you want to use. D Press {Enter #}. 43
-
 1
1 -
2
-
3
-
4
-
5
-
6
-
7
-
8
-
9
-
10
-
11
-
12
-
13
-
14
-
15
-
16
-
17
-
18
-
19
-
20
-
21
-
22
-
23
-
24
-
25
-
26
-
27
-
28
-
29
-
30
-
31
-
32
-
33
-
34
-
35
-
36
-
37
-
38
-
39
-
40
-
41
-
42
-
43
-
44
-
45
-
46
-
47
-
48
-
49
-
 50
50 -
 51
51 -
 52
52 -
 53
53 -
 54
54 -
 55
55 -
 56
56 -
 57
57 -
 58
58 -
 59
59 -
 60
60 -
61
-
62
-
63
-
64
-
65
-
66
-
67
-
68
-
69
-
70
-
71
-
72
-
73
-
74
-
75
-
76
-
77
-
78
-
79
-
80
-
81
-
82
-
83
-
84
-
85
-
86
-
87
-
88
-
89
-
90
-
91
-
92
 |
 |
