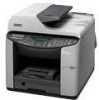
Ricoh GX3050SFN User Guide - Page 20
Multi Bypass Tray Type BY1000, Detaching and Reattaching the Multi Bypass Tray Optional - error messages
 |
UPC - 026649055515
View all Ricoh GX3050SFN manuals
Add to My Manuals
Save this manual to your list of manuals |
Page 20 highlights
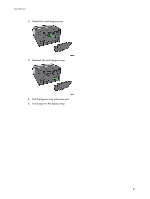
Read This First 8. Display Displays current printer status and error messages. 9. Alert indicator Lights up whenever a printer error occurs. A red light indicates an error has occurred that makes printing impossible; the yellow light indicates a potential error during printing. If the red light is on, follow the instructions that appear on the display. 10. [ ] [ ] keys Use these keys to increase or decrease values on the display when making settings. Keep the key pressed to quicken scrolling, and increase or decrease values on the display in units of 10. 11. Data In indicator Blinks when the printer is receiving data from a computer. The Data In indicator is lit if there is data to be printed. 12. [#Enter] key Press this key to execute menu items selected on the display. z For details about switching to Energy Saver mode, see p.61 "System Menu". Option Multi Bypass Tray Type BY1000 Use this tray to feed in sheets manually. 1. Bypass tray Load paper here. 2. Bypass tray extension You can pull this bypass tray extension out by 2 clicks. Pull this out according to the paper size. Detaching and Reattaching the Multi Bypass Tray (Optional) To clear a paper jam, you might have to detach the multi bypass tray. This section explains how to detach and reattach the multi bypass tray. 1. Remove any paper in the bypass tray. 2. Push the bypass tray extension in. 20
-
 1
1 -
2
-
3
-
4
-
5
-
6
-
7
-
8
-
9
-
10
-
11
-
12
-
13
-
14
-
 15
15 -
 16
16 -
 17
17 -
 18
18 -
 19
19 -
 20
20 -
 21
21 -
 22
22 -
 23
23 -
 24
24 -
 25
25 -
26
-
27
-
28
-
29
-
30
-
31
-
32
-
33
-
34
-
35
-
36
-
37
-
38
-
39
-
40
-
41
-
42
-
43
-
44
-
45
-
46
-
47
-
48
-
49
-
50
-
51
-
52
-
53
-
54
-
55
-
56
-
57
-
58
-
59
-
60
-
61
-
62
-
63
-
64
-
65
-
66
-
67
-
68
-
69
-
70
-
71
-
72
-
73
-
74
-
75
-
76
-
77
-
78
-
79
-
80
-
81
-
82
-
83
-
84
-
85
-
86
-
87
-
88
-
89
-
90
-
91
-
92
-
93
-
94
-
95
-
96
-
97
-
98
-
99
-
100
-
101
-
102
-
103
-
104
-
105
-
106
-
107
-
108
-
109
-
110
-
111
-
112
-
113
-
114
-
115
-
116
-
117
-
118
-
119
-
120
-
121
-
122
-
123
-
124
-
125
-
126
-
127
-
128
-
129
-
130
-
131
-
132
-
133
-
134
-
135
-
136
-
137
-
138
-
139
-
140
-
141
-
142
-
143
-
144
-
145
-
146
-
147
-
148
-
149
-
150
-
151
-
152
-
153
-
154
-
155
-
156
-
157
-
158
-
159
-
160
-
161
-
162
-
163
-
164
-
165
-
166
-
167
-
168
-
169
-
170
-
171
-
172
-
173
-
174
-
175
-
176
-
177
-
178
-
179
-
180
-
181
-
182
-
183
-
184
-
185
-
186
-
187
-
188
-
189
-
190
-
191
-
192
-
193
-
194
-
195
-
196
-
197
-
198
-
199
-
200
-
201
-
202
-
203
-
204
-
205
-
206
-
207
-
208
-
209
-
210
-
211
-
212
-
213
-
214
-
215
-
216
-
217
-
218
-
219
-
220
-
221
-
222
-
223
-
224
-
225
-
226
-
227
-
228
-
229
-
230
-
231
-
232
-
233
-
234
-
235
-
236
-
237
-
238
-
239
-
240
-
241
-
242
-
243
-
244
-
245
-
246
-
247
-
248
-
249
-
250
-
251
-
252
-
253
-
254
 |
 |
