Ricoh GX3050SFN User Guide - Page 59
Maintenance, Maintenance, Registration, Registration, Pr.Test Pattern, Pr.Test Pattern, Tray 1,
 |
UPC - 026649055515
View all Ricoh GX3050SFN manuals
Add to My Manuals
Save this manual to your list of manuals |
Page 59 highlights
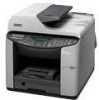
Making Printer Settings Registration Follow the procedure below to adjust where to start printing on paper loaded in each paper tray after checking the test pattern printed. 1. Press the [Menu] key. 2. Press the [ ] or [ ] key to display [Maintenance], and then press the [#Enter] key. Menu: Maintenance 3. Press the [ ] or [ ] key to display [Registration], and then press the [#Enter] key. Maintenance: Registration 4. Press the [ ] or [ ] key to display [Pr.Test Pattern], and then press the [#Enter] key. Registration: Pr.Test Pattern 5. Press the [ ] or [ ] key to select a paper tray, and then press the [#Enter] key. Pr.Test Pattern: Tray 1 6. Press the [ ] or [ ] key to select a paper type, and then press the [#Enter] key. Pr.Test Pattern: *Plain Paper A test pattern to adjust the print start position is printed. 7. Check the optimal adjustment values on the printed test pattern. 59
-
 1
1 -
2
-
3
-
4
-
5
-
6
-
7
-
8
-
9
-
10
-
11
-
12
-
13
-
14
-
15
-
16
-
17
-
18
-
19
-
20
-
21
-
22
-
23
-
24
-
25
-
26
-
27
-
28
-
29
-
30
-
31
-
32
-
33
-
34
-
35
-
36
-
37
-
38
-
39
-
40
-
41
-
42
-
43
-
44
-
45
-
46
-
47
-
48
-
49
-
50
-
51
-
52
-
53
-
 54
54 -
 55
55 -
 56
56 -
 57
57 -
 58
58 -
 59
59 -
 60
60 -
 61
61 -
 62
62 -
 63
63 -
 64
64 -
65
-
66
-
67
-
68
-
69
-
70
-
71
-
72
-
73
-
74
-
75
-
76
-
77
-
78
-
79
-
80
-
81
-
82
-
83
-
84
-
85
-
86
-
87
-
88
-
89
-
90
-
91
-
92
-
93
-
94
-
95
-
96
-
97
-
98
-
99
-
100
-
101
-
102
-
103
-
104
-
105
-
106
-
107
-
108
-
109
-
110
-
111
-
112
-
113
-
114
-
115
-
116
-
117
-
118
-
119
-
120
-
121
-
122
-
123
-
124
-
125
-
126
-
127
-
128
-
129
-
130
-
131
-
132
-
133
-
134
-
135
-
136
-
137
-
138
-
139
-
140
-
141
-
142
-
143
-
144
-
145
-
146
-
147
-
148
-
149
-
150
-
151
-
152
-
153
-
154
-
155
-
156
-
157
-
158
-
159
-
160
-
161
-
162
-
163
-
164
-
165
-
166
-
167
-
168
-
169
-
170
-
171
-
172
-
173
-
174
-
175
-
176
-
177
-
178
-
179
-
180
-
181
-
182
-
183
-
184
-
185
-
186
-
187
-
188
-
189
-
190
-
191
-
192
-
193
-
194
-
195
-
196
-
197
-
198
-
199
-
200
-
201
-
202
-
203
-
204
-
205
-
206
-
207
-
208
-
209
-
210
-
211
-
212
-
213
-
214
-
215
-
216
-
217
-
218
-
219
-
220
-
221
-
222
-
223
-
224
-
225
-
226
-
227
-
228
-
229
-
230
-
231
-
232
-
233
-
234
-
235
-
236
-
237
-
238
-
239
-
240
-
241
-
242
-
243
-
244
-
245
-
246
-
247
-
248
-
249
-
250
-
251
-
252
-
253
-
254
 |
 |