Samsung CLX-9250ND Installation Guide - Page 19
If the gap is more than 0.5 mm 0.02 inch, adjust the screw on both sides as shown below until
 |
View all Samsung CLX-9250ND manuals
Add to My Manuals
Save this manual to your list of manuals |
Page 19 highlights
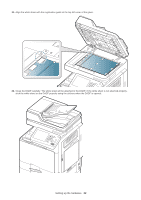
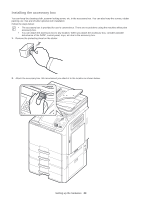
13. Make sure the two rubber pads (left side) and two plastic projections (right side) on the bottom of the DADF on both sides touch the top of the machine as shown below. • If you skip this step, it could cause originals to jam. • If the gap is more than 0.5 mm (0.02 inch), adjust the screw on both sides as shown below until the gap is smaller 0.5 mm (0.02 inch). You have to check all rubber pads and plastic projections. 14. Fit the plastic covers in the both hinges of the DADF. Setting up the hardware_ 18
-
 1
1 -
2
-
3
-
4
-
5
-
6
-
7
-
8
-
9
-
10
-
11
-
12
-
13
-
 14
14 -
 15
15 -
 16
16 -
 17
17 -
 18
18 -
 19
19 -
 20
20 -
 21
21 -
 22
22 -
 23
23 -
 24
24 -
25
-
26
-
27
-
28
-
29
-
30
-
31
-
32
-
33
-
34
-
35
-
36
-
37
-
38
-
39
-
40
-
41
-
42
-
43
-
44
-
45
-
46
-
47
-
48
-
49
-
50
-
51
-
52
-
53
-
54
-
55
-
56
-
57
-
58
-
59
-
60
-
61
-
62
-
63
-
64
-
65
-
66
-
67
-
68
-
69
 |
 |

Setting up the hardware
_ 18
13.
Make sure the two rubber pads (left side) and two plastic projections (right side) on the bottom of the DADF on both
sides touch the top of the machine as shown below.
•
If you skip this step, it could cause originals to jam.
•
If the gap is more than 0.5 mm (0.02 inch), adjust the screw on both sides as shown below until the gap is
smaller 0.5 mm (0.02 inch). You have to check all rubber pads and plastic projections.
14.
Fit the plastic covers in the both hinges of the DADF.