Samsung CLX-9250ND Installation Guide - Page 28
Installing the toner cartridges
 |
View all Samsung CLX-9250ND manuals
Add to My Manuals
Save this manual to your list of manuals |
Page 28 highlights
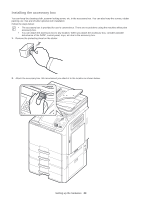
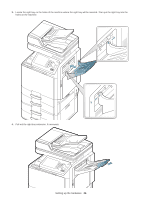
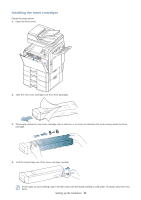
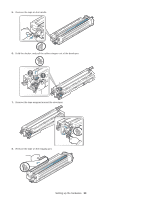
Installing the toner cartridges Follow the steps below: 1. Open the front cover. 2. Take the new toner cartridges out from their packages. 3. Thoroughly shake the new toner cartridge side to side five or six times to distribute the toner evenly inside the toner cartridge. 4. Pull the sealed tape out of the toner cartridge carefully. If toner gets on your clothing, wipe it off with a dry cloth and wash clothing in cold water. Hot water sets toner into fabric. Setting up the hardware_ 27
-
 1
1 -
2
-
3
-
4
-
5
-
6
-
7
-
8
-
9
-
10
-
11
-
12
-
13
-
14
-
15
-
16
-
17
-
18
-
19
-
20
-
21
-
22
-
 23
23 -
 24
24 -
 25
25 -
 26
26 -
 27
27 -
 28
28 -
 29
29 -
 30
30 -
 31
31 -
 32
32 -
 33
33 -
34
-
35
-
36
-
37
-
38
-
39
-
40
-
41
-
42
-
43
-
44
-
45
-
46
-
47
-
48
-
49
-
50
-
51
-
52
-
53
-
54
-
55
-
56
-
57
-
58
-
59
-
60
-
61
-
62
-
63
-
64
-
65
-
66
-
67
-
68
-
69
 |
 |

Setting up the hardware
_ 27
Installing the toner cartridges
Follow the steps below:
1.
Open the front cover.
2.
Take the new toner cartridges out from their packages.
3.
Thoroughly shake the new toner cartridge side to side five or six times to distribute the toner evenly inside the toner
cartridge.
4.
Pull the sealed tape out of the toner cartridge carefully.
If toner gets on your clothing, wipe it off with a dry cloth and wash clothing in cold water. Hot water sets toner into
fabric.