Samsung CLX-9250ND Installation Guide - Page 32
Be careful not to scratch the surface of the imaging unit.
 |
View all Samsung CLX-9250ND manuals
Add to My Manuals
Save this manual to your list of manuals |
Page 32 highlights
9. Pull out the OPC protecting pad. If toner gets on your clothing, wipe it off with a dry cloth and wash clothing in cold water. Hot water sets toner into fabric. • Be careful not to scratch the surface of the imaging unit. • To prevent damage, do not expose the imaging unit to light for more than a few minutes. Cover it with a piece of paper to protect it if necessary. 10. Labels inside the machine identify each imaging unit's position. Hold the handles on the new imaging unit, and push the imaging unit until it locks into place. Setting up the hardware_ 31
-
 1
1 -
2
-
3
-
4
-
5
-
6
-
7
-
8
-
9
-
10
-
11
-
12
-
13
-
14
-
15
-
16
-
17
-
18
-
19
-
20
-
21
-
22
-
23
-
24
-
25
-
26
-
 27
27 -
 28
28 -
 29
29 -
 30
30 -
 31
31 -
 32
32 -
 33
33 -
 34
34 -
 35
35 -
 36
36 -
 37
37 -
38
-
39
-
40
-
41
-
42
-
43
-
44
-
45
-
46
-
47
-
48
-
49
-
50
-
51
-
52
-
53
-
54
-
55
-
56
-
57
-
58
-
59
-
60
-
61
-
62
-
63
-
64
-
65
-
66
-
67
-
68
-
69
 |
 |

Setting up the hardware
_ 31
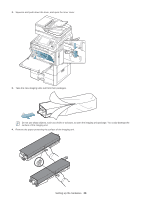
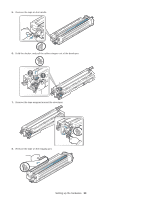
9.
Pull out the OPC protecting pad.
If toner gets on your clothing, wipe it off with a dry cloth and wash clothing in cold water. Hot water sets toner into
fabric.
•
Be careful not to scratch the surface of the imaging unit.
•
To prevent damage, do not expose the imaging unit to light for more than a few minutes. Cover it with a
piece of paper to protect it if necessary.
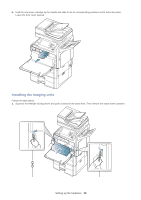
10.
Labels inside the machine identify each imaging unit’s position. Hold the handles on the new imaging unit, and push
the imaging unit until it locks into place.