Samsung CLX-9250ND Installation Guide - Page 52
A Front Side, Start, Apply to all trays
 |
View all Samsung CLX-9250ND manuals
Add to My Manuals
Save this manual to your list of manuals |
Page 52 highlights
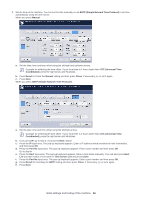
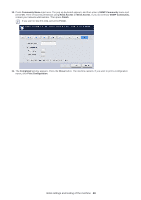
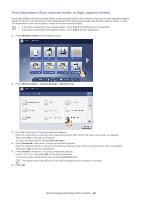
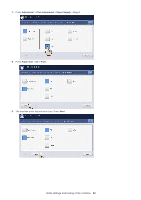
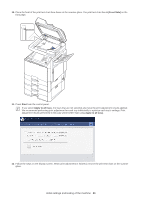
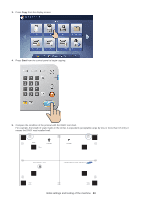
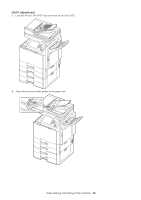
10. Place the front of the print test chart face down on the scanner glass. The print test chart has A (Front Side) on the front page. 11. Press Start from the control panel. If you select Apply to all trays, the trays that are not selected also have the print adjustment results appllied. We recommend performing print adjustment for each tray individually to optimize each tray's settings. Print adjustment results performed in this way will be better than using Apply to all trays. 12. Follow the steps on the display screen. When print adjustment is finished, remove the print test chart on the scanner glass. Initial settings and testing of the machine_ 51
-
 1
1 -
2
-
3
-
4
-
5
-
6
-
7
-
8
-
9
-
10
-
11
-
12
-
13
-
14
-
15
-
16
-
17
-
18
-
19
-
20
-
21
-
22
-
23
-
24
-
25
-
26
-
27
-
28
-
29
-
30
-
31
-
32
-
33
-
34
-
35
-
36
-
37
-
38
-
39
-
40
-
41
-
42
-
43
-
44
-
45
-
46
-
 47
47 -
 48
48 -
 49
49 -
 50
50 -
 51
51 -
 52
52 -
 53
53 -
 54
54 -
 55
55 -
 56
56 -
 57
57 -
58
-
59
-
60
-
61
-
62
-
63
-
64
-
65
-
66
-
67
-
68
-
69
 |
 |

Initial settings and testing of the machine
_ 51
10.
Place the front of the print test chart face down on the scanner glass. The print test chart has
A (Front Side)
on the
front page.
11.
Press
Start
from the control panel.
If you select
Apply to all trays
, the trays that are not selected also have the print adjustment results appllied.
We recommend performing print adjustment for each tray individually to optimize each tray’s settings. Print
adjustment results performed in this way will be better than using
Apply to all trays
.
12.
Follow the steps on the display screen. When print adjustment is finished, remove the print test chart on the scanner
glass.