Samsung DVD-HR720 Quick Guide (easy Manual) (ver.1.0) (English) - Page 25
Step 5 : Connecting the, Power Cord
 |
View all Samsung DVD-HR720 manuals
Add to My Manuals
Save this manual to your list of manuals |
Page 25 highlights
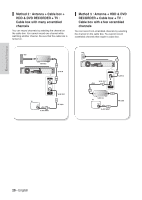
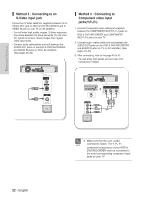
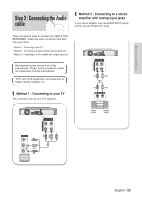
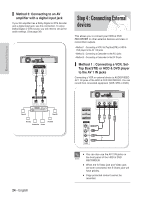
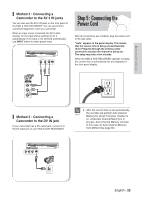
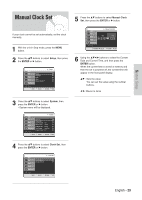
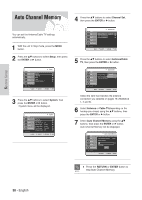
Connecting & Setting up Method 2 : Connecting a Camcorder to the AV 2 IN jacks You can also use the AV 2 IN jacks on the front panel of the HDD & DVD RECORDER. You can record from connected equipment, such as a camcorder. When an input source is inserted into AV 2 while viewing TV, the input will be switched to AV 2 automatically. If the input is not selected automatically, use INPUT button to select proper input. Step 5 : Connecting the Power Cord After all connections are complete, plug the power cord in the wall outlet. "Auto" appears in the panel display. This means that the current time is being set automatically (Auto Program) through the antenna under connection and also the channel is being set. The setup may take a few minutes. When the HDD & DVD RECORDER operates normally, the current time is automatically set and displayed in the front panel display. Method 3 : Connecting a Camcorder to the DV IN jack If your camcorder has a DV output jack, connect it to the DV input jack of your HDD & DVD RECORDER. I After the current time is set automatically, the recorder will perform Auto Channel NOTE Memory for about 3 minutes. If power is on, while Auto Channel Memory is in process, Auto Channel Memory will stop. In this case, do Auto Channel Memory from MENU (See page 30). English - 25
-
 1
1 -
2
-
3
-
4
-
5
-
6
-
7
-
8
-
9
-
10
-
11
-
12
-
13
-
14
-
15
-
16
-
17
-
18
-
19
-
 20
20 -
 21
21 -
 22
22 -
 23
23 -
 24
24 -
 25
25 -
 26
26 -
 27
27 -
 28
28 -
 29
29 -
 30
30 -
31
-
32
-
33
-
34
-
35
-
36
-
37
-
38
-
39
-
40
-
41
-
42
-
43
-
44
-
45
-
46
-
47
-
48
-
49
-
50
-
51
-
52
-
53
-
54
-
55
-
56
-
57
-
58
-
59
-
60
-
61
-
62
-
63
-
64
-
65
-
66
-
67
-
68
-
69
-
70
-
71
-
72
-
73
-
74
-
75
-
76
-
77
-
78
-
79
-
80
-
81
-
82
-
83
-
84
-
85
-
86
-
87
-
88
-
89
-
90
-
91
-
92
-
93
-
94
-
95
-
96
-
97
-
98
-
99
-
100
-
101
-
102
-
103
-
104
-
105
-
106
-
107
-
108
-
109
-
110
-
111
-
112
-
113
-
114
-
115
-
116
-
117
-
118
-
119
-
120
-
121
-
122
-
123
-
124
-
125
-
126
-
127
-
128
-
129
-
130
 |
 |
