Samsung DVD-HR720 Quick Guide (easy Manual) (ver.1.0) (English) - Page 79
Copying from a Camcorder
 |
View all Samsung DVD-HR720 manuals
Add to My Manuals
Save this manual to your list of manuals |
Page 79 highlights
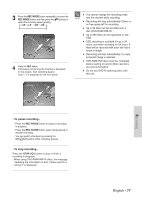
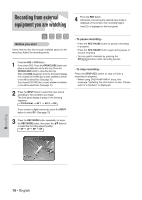
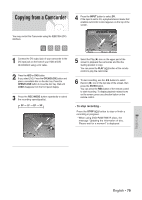
Copying from a Camcorder You may control the Camcorder using the IEEE1394 (DV) interface. 4 Press the INPUT button to select DV. If the input is set to DV, a playback/record menu that enables camcorder control appears on the top of the screen. DV The DV device is connected. 1 Connect the DV output jack of your camcorder to the DV input jack on the front of your HDD & DVD RECORDER using a DV cable. 2 Press the HDD or DVD button. If you select DVD, Press the OPEN/CLOSE button and place a recordable disc on the disc tray. Press the OPEN/CLOSE button to close the disc tray. Wait until LOAD disappears from the front panel display. 3 Press the REC MODE button repeatedly to select the recording speed(quality). © SP © LP © EP © XP Record Mode SP 031:39 MOVE SELECT RETURN 5 Select the Play (√) icon on the upper part of the screen to playback the camcorder and find the starting position to copy. You can press the PLAY ( ) button of the remote control to play the camcorder. 6 To start recording, use the œ √ buttons to select Record ( G ) icon in the top side of the screen, then press the ENTER button. You can press the REC button of the remote control to start recording. To display playback related icons on the screen, press any direction button on the remote control. - To stop recording - Press the STOP ( ) button to stop or finish a recording in progress. • When using DVD-RAM/-RW/-R discs, the message "Updating the information of disc. Please wait for a moment" is displayed Recording English - 79
-
 1
1 -
2
-
3
-
4
-
5
-
6
-
7
-
8
-
9
-
10
-
11
-
12
-
13
-
14
-
15
-
16
-
17
-
18
-
19
-
20
-
21
-
22
-
23
-
24
-
25
-
26
-
27
-
28
-
29
-
30
-
31
-
32
-
33
-
34
-
35
-
36
-
37
-
38
-
39
-
40
-
41
-
42
-
43
-
44
-
45
-
46
-
47
-
48
-
49
-
50
-
51
-
52
-
53
-
54
-
55
-
56
-
57
-
58
-
59
-
60
-
61
-
62
-
63
-
64
-
65
-
66
-
67
-
68
-
69
-
70
-
71
-
72
-
73
-
 74
74 -
 75
75 -
 76
76 -
 77
77 -
 78
78 -
 79
79 -
 80
80 -
 81
81 -
 82
82 -
 83
83 -
 84
84 -
85
-
86
-
87
-
88
-
89
-
90
-
91
-
92
-
93
-
94
-
95
-
96
-
97
-
98
-
99
-
100
-
101
-
102
-
103
-
104
-
105
-
106
-
107
-
108
-
109
-
110
-
111
-
112
-
113
-
114
-
115
-
116
-
117
-
118
-
119
-
120
-
121
-
122
-
123
-
124
-
125
-
126
-
127
-
128
-
129
-
130
 |
 |
