Samsung DVD-HR720 Quick Guide (easy Manual) (ver.1.0) (English) - Page 29
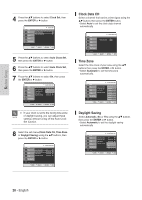
Setup, ENTER, System, Clock Set, Manual Clock
 |
View all Samsung DVD-HR720 manuals
Add to My Manuals
Save this manual to your list of manuals |
Page 29 highlights
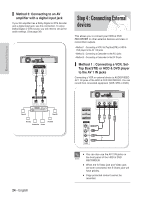
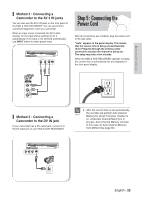
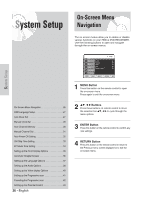
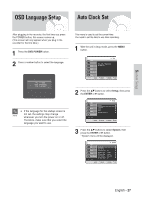
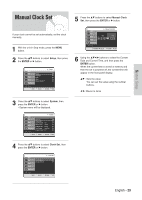
System Setup Manual Clock Set 5 Press the ...† buttons to select Manual Clock Set, then press the ENTER or √ button. If your clock cannot be set automatically, set the clock manually. 1 With the unit in Stop mode, press the MENU button. 2 Press the ...† buttons to select Setup, then press the ENTER or √ button. HDD Title Music Photo Timer Record System Language Audio Video Parental Control Setup Setup MOVE SELECT RETURN EXIT HDD Title Music Photo Manual Clock Set Date Time JAN / 01 / 2005 SAT 12 : 00 AM Timer Record Setup 0~9 NUMBER SELECT RETURN EXIT 6 Using the buttons to select the Current Date and Current Time, and then press the ENTER button. When the current time is stored in memory and then the set is powered off, the current time will appear in the front panel display. ...† : Sets the value You can set the value using the number buttons. œ √: Moves to items 3 Press the ...† buttons to select System, then press the ENTER or √ button. • System menu will be displayed. HDD Title Music Photo Timer Record Setup System Clock Set √ Channel Set √ Auto Power Off : Off √ CM Skip Time : 15 Sec √ EP Mode Time : 6 Hour √ Front Display : Auto Dim √ Chapter Creator : Off √ MOVE SELECT RETURN EXIT 4 Press the ...† buttons to select Clock Set, then press the ENTER or √ button. HDD Title Music Auto Clock Set Manual Clock Set Clock Set √ √ Photo Timer Record Setup MOVE SELECT RETURN EXIT English - 29
-
 1
1 -
2
-
3
-
4
-
5
-
6
-
7
-
8
-
9
-
10
-
11
-
12
-
13
-
14
-
15
-
16
-
17
-
18
-
19
-
20
-
21
-
22
-
23
-
 24
24 -
 25
25 -
 26
26 -
 27
27 -
 28
28 -
 29
29 -
 30
30 -
 31
31 -
 32
32 -
 33
33 -
 34
34 -
35
-
36
-
37
-
38
-
39
-
40
-
41
-
42
-
43
-
44
-
45
-
46
-
47
-
48
-
49
-
50
-
51
-
52
-
53
-
54
-
55
-
56
-
57
-
58
-
59
-
60
-
61
-
62
-
63
-
64
-
65
-
66
-
67
-
68
-
69
-
70
-
71
-
72
-
73
-
74
-
75
-
76
-
77
-
78
-
79
-
80
-
81
-
82
-
83
-
84
-
85
-
86
-
87
-
88
-
89
-
90
-
91
-
92
-
93
-
94
-
95
-
96
-
97
-
98
-
99
-
100
-
101
-
102
-
103
-
104
-
105
-
106
-
107
-
108
-
109
-
110
-
111
-
112
-
113
-
114
-
115
-
116
-
117
-
118
-
119
-
120
-
121
-
122
-
123
-
124
-
125
-
126
-
127
-
128
-
129
-
130
 |
 |
