Samsung DVD-HR720 Quick Guide (easy Manual) (ver.1.0) (English) - Page 31
Manual Channel Set
 |
View all Samsung DVD-HR720 manuals
Add to My Manuals
Save this manual to your list of manuals |
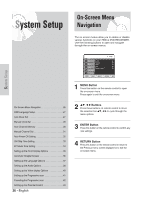
Page 31 highlights
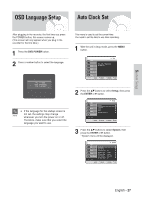
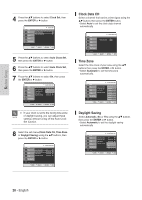
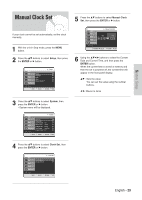
Manual Channel Set Manual Channel Set can be used after you have first selected Auto Channel Memory. Use the Manual Channel Setting to delete unnecessary channels after using the Auto Channel Memory. 5 Press the ...† buttons to select Channel Add/Delete, then press the ENTER or √ button. HDD Title Music Channel Add/Delete Select channel : 01 Photo Timer Record Add Delete Setup MOVE SELECT RETURN EXIT System Setup 1 With the unit in Stop mode, press the MENU button. 2 Press the ...† buttons to select Setup, then press the ENTER or √ button. HDD Title Music Photo Timer Record System Language Audio Video Parental Control Setup Setup MOVE SELECT RETURN EXIT 3 Press the ...† buttons to select System, then press the ENTER or √ button. • System menu will be displayed. HDD Title Music Photo Timer Record Setup System Clock Set √ Channel Set √ Auto Power Off : Off √ CM Skip Time : 15 Sec √ EP Mode Time : 6 Hour √ Front Display : Auto Dim √ Chapter Creator : Off √ MOVE SELECT RETURN EXIT 4 Press the ...† buttons to select Channel Set, then press the ENTER or √ button. HDD Title Music Photo Channel Set Antenna/Cable TV : Cable TV √ Auto Channel Memory √ Channel Add/Delete √ Timer Record Setup MOVE SELECT RETURN EXIT 6 Press the ...† or number buttons to select the channels you want to add or delete on the Select channel screen. Then, press the ENTER button. HDD Title Music Photo Timer Record Channel Add/Delete Select channel : 02 Channel is added. Add Delete Setup MOVE SELECT RETURN EXIT • Using ...† buttons for channel selection allows the user to add/delete one channel at a time. • Using CH ( ) buttons for channel selection jumps to the next channel memorized in Auto Channel Memory. 7 Press the œ √ buttons to select Add or Delete, then press the ENTER button. • The message "Channel is added." or "Channel is deleted." will be displayed in the center of the screen. • Continue to add or delete as many channels as you want to memorize or delete. This can be used to add channels not stored automatically due to weak signal strength. • Press the RETURN button to return to the previous menu. Press the MENU button to exit the menu. English - 31
-
 1
1 -
2
-
3
-
4
-
5
-
6
-
7
-
8
-
9
-
10
-
11
-
12
-
13
-
14
-
15
-
16
-
17
-
18
-
19
-
20
-
21
-
22
-
23
-
24
-
25
-
 26
26 -
 27
27 -
 28
28 -
 29
29 -
 30
30 -
 31
31 -
 32
32 -
 33
33 -
 34
34 -
 35
35 -
 36
36 -
37
-
38
-
39
-
40
-
41
-
42
-
43
-
44
-
45
-
46
-
47
-
48
-
49
-
50
-
51
-
52
-
53
-
54
-
55
-
56
-
57
-
58
-
59
-
60
-
61
-
62
-
63
-
64
-
65
-
66
-
67
-
68
-
69
-
70
-
71
-
72
-
73
-
74
-
75
-
76
-
77
-
78
-
79
-
80
-
81
-
82
-
83
-
84
-
85
-
86
-
87
-
88
-
89
-
90
-
91
-
92
-
93
-
94
-
95
-
96
-
97
-
98
-
99
-
100
-
101
-
102
-
103
-
104
-
105
-
106
-
107
-
108
-
109
-
110
-
111
-
112
-
113
-
114
-
115
-
116
-
117
-
118
-
119
-
120
-
121
-
122
-
123
-
124
-
125
-
126
-
127
-
128
-
129
-
130
 |
 |
