Samsung NA24T4230FS/AA Installation Guide - Page 19
Step 7. Check the ignition of cooktop burners, Step 8. Checking the flame quality, CAUTION
 |
View all Samsung NA24T4230FS/AA manuals
Add to My Manuals
Save this manual to your list of manuals |
Page 19 highlights
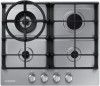
Step 7. Check the ignition of cooktop burners Check the operation of all cooktop burners after the cooktop has been installed and assembled, gas supply lines have been carefully checked for leaks, and electrical power cord has been plugged in. To turn on a cooktop burner 1. Fully press down the control knob for 2 the corresponding cooking position and turn it to the left, to the Lite position, and hold it here for a few seconds at 1 most until the burner ignites. After igniting, keep the control knob 2. pressed for about 5-8 seconds more because the heat sensor that opens the gas channel has to warm up first. Set control knob to the position you want. Repeat steps 1 and 2 to check the 3. operation of each cooktop burner in succession. The flame size can be set continuously 4. between maximum and minimum by slowing turning the control knob. NOTE • If the burner does not light within 4 seconds, turn the knob off and wait one minute before trying again. • When you push in and turn the control knob, all spark igniters will make a series of sparks, but only the burner turned to Lite will light. • If the igniters are dirty, this makes the burner harder to light, so you should keep them as clean as possible. Do this with a small brush and make sure that the ignition device is not hit or knocked violently. • The flame supervision device shall not be operated for more than 15 seconds. If after 15 seconds the burner has not lit, stop operating the device and open the compartment door and /or wait at least one minute before attempting to reignite the burner. flame supervision device 1. When you light the hob, the safety device starts to operate. 2. Because of the existence of gas safety devices, the hob can work normally. 3. When the flame of the hob is suddenly extinguished, the safety device will cut off the gas supply system of the hob within 60 seconds to ensure that the gas does not leak. 4. After the flame is extinguished, turn the knob to the OFF position, and then reignite the hob to resume normal operation; 5. When the knob is turned to the LO position, if the flame is relatively small and the safety device cannot be burned, the hob will suddenly go out. At this time, you need to adjust the small fire adjustment device clockwise according to the method on page 25, and then reignite the hob, it can work normally. Step 8. Checking the flame quality All combustion flames need to be visually checked to determine their flame quality. CAUTION If you attempt to measure the flame, please use caution. Burns could result. 1. Soft blue flames-Normal for natural gas 1 operation. 2. Yellow tips on outer cones-Normal for LP gas operation. 3. Yellow flames-Abnormal for any gas 2 operation; call for service. NOTE 3 If burner flame looks like 3, the cooktop should not be used until it is serviced. Call for service. Normal burner flames shall look like 1 or 2, depending on the gas type you use. English 19 Installation instructions
-
 1
1 -
2
-
3
-
4
-
5
-
6
-
7
-
8
-
9
-
10
-
11
-
12
-
13
-
 14
14 -
 15
15 -
 16
16 -
 17
17 -
 18
18 -
 19
19 -
 20
20 -
 21
21 -
 22
22 -
 23
23 -
 24
24 -
25
-
26
-
27
-
28
-
29
-
30
-
31
-
32
-
33
-
34
-
35
-
36
-
37
-
38
-
39
-
40
-
41
-
42
-
43
-
44
-
45
-
46
-
47
-
48
-
49
-
50
-
51
-
52
-
53
-
54
-
55
-
56
-
57
-
58
-
59
-
60
-
61
-
62
-
63
-
64
-
65
-
66
-
67
-
68
-
69
-
70
-
71
-
72
-
73
-
74
-
75
-
76
-
77
-
78
-
79
-
80
-
81
-
82
-
83
-
84
 |
 |
