Samsung NP-Q1 Quick Guide (easy Manual) (ver.1.0) (English) - Page 36
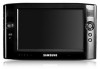
Overview, Front View
 |
View all Samsung NP-Q1 manuals
Add to My Manuals
Save this manual to your list of manuals |
Page 36 highlights
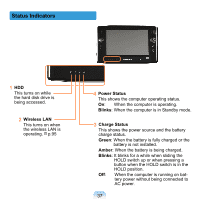
Overview ■ *The items marked with this symbol are optional items which may be changed or may not be provided depending on the computer model. ■ The actual color and appearance of the computer may differ from the pictures used in this guide. Front View 2 Speaker Used to generate sound. 1 LCD The screen images from the computer are displayed here. 2 Speaker Used to generate sound. 9 Quick Launch Button 3 Joystick Plays the same role as the direction keys on the keyboard. You can register a frequently used program to launch it just by pressing this button. p.55 Used as a joystick when playing 8 Enter Button games. Press this button to select an item. It 4 Auto Scaler Button (Automatic Resolution Adjustment Button) Press this button to change the screen resolution. 6 Array Microphone Used to record sound. is the same as the Enter key on the keyboard. p.64 7 Menu Button Press this button to launch Auto Scaler provides 3step resolutions. Whenever you press this button, the screen resolution changes to 800x480 (Default Resolution) > 800x600 > 1024x600 sequentially. p.58 5 Status Indicators Shows the operating status of the computer. The corresponding operating LED is lit when the corresponding function operates. p.37 the Menu Program. p.53 The Menu Program provides shortcuts to frequently used functions on the computer. You can easily change the settings. 36
-
 1
1 -
2
-
3
-
4
-
5
-
6
-
7
-
8
-
9
-
10
-
11
-
12
-
13
-
14
-
15
-
16
-
17
-
18
-
19
-
20
-
21
-
22
-
23
-
24
-
25
-
26
-
27
-
28
-
29
-
30
-
 31
31 -
 32
32 -
 33
33 -
 34
34 -
 35
35 -
 36
36 -
 37
37 -
 38
38 -
 39
39 -
 40
40 -
 41
41 -
42
-
43
-
44
-
45
-
46
-
47
-
48
-
49
-
50
-
51
-
52
-
53
-
54
-
55
-
56
-
57
-
58
-
59
-
60
-
61
-
62
-
63
-
64
-
65
-
66
-
67
-
68
-
69
-
70
-
71
-
72
-
73
-
74
-
75
-
76
-
77
-
78
-
79
-
80
-
81
-
82
-
83
-
84
-
85
-
86
-
87
-
88
-
89
-
90
-
91
-
92
-
93
-
94
-
95
-
96
-
97
-
98
-
99
-
100
-
101
-
102
-
103
-
104
-
105
-
106
-
107
-
108
-
109
-
110
-
111
-
112
-
113
-
114
-
115
-
116
-
117
-
118
-
119
-
120
-
121
-
122
-
123
-
124
-
125
-
126
-
127
-
128
-
129
-
130
-
131
-
132
-
133
-
134
-
135
-
136
-
137
-
138
-
139
-
140
-
141
-
142
-
143
-
144
-
145
-
146
-
147
-
148
-
149
-
150
-
151
-
152
-
153
-
154
-
155
-
156
-
157
-
158
-
159
-
160
-
161
-
162
-
163
-
164
-
165
-
166
-
167
-
168
-
169
-
170
-
171
-
172
-
173
-
174
-
175
-
176
-
177
-
178
-
179
-
180
-
181
-
182
-
183
-
184
-
185
-
186
-
187
-
188
-
189
-
190
-
191
-
192
-
193
-
194
-
195
-
196
-
197
-
198
-
199
-
200
-
201
-
202
-
203
-
204
 |
 |
