Samsung NX10 Quick Guide (easy Manual) (ver.1.2) (English) - Page 35
Using the Smart Auto mode
 |
UPC - 044701013655
View all Samsung NX10 manuals
Add to My Manuals
Save this manual to your list of manuals |
Page 35 highlights
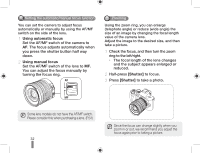
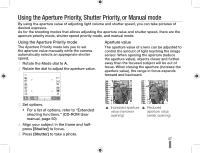
Using the Smart Auto mode The smart auto mode allows taking pictures under an optimized condition since the camera recognizes various photographing conditions automatically. Therefore, even a beginner can use the camera easily. 1 Rotate the mode dial to . 2 Align your subject in the frame. • The camera automatically detects the type of scene and displays the corresponding scene icon in the display. 14M 14M SMART RGB SMART WHITE The camera displays the scene icon corresponding to the scene it detects. 0001 Outdoor landscape shot Highly bright background shot Night landscape shot Outdoor portrait shot at night Backlight landscape shot without a man Portrait shot under backlight Portrait shot Close-up shot Close-up character shot Sunset shot Blue sky shot Nature shot such as forest and leaves Close-up shot for the subject with various colors Close-up portrait shot With the camera on a tripod, a shot of a subject that does not move for a period of time. Shot of fast moving subject or subject that moves frequently. • If the camera does not detect a type of scene, it takes pictures with the basic settings of the mode. • Even if it detcts a face, the camera may not select portrait mode because of the orientation and brightness of the face. • The camera may not recognize a scene because of adverse photograph conditions such as bad lighting, camera shake, and subject distance. • The camera may not recognize the mode, even if the camera is on a tripod, depending on the movement of the subject. 3 Half-press [Shutter] to focus. 4 Press [Shutter] to take a photo. 35
-
 1
1 -
2
-
3
-
4
-
5
-
6
-
7
-
8
-
9
-
10
-
11
-
12
-
13
-
14
-
15
-
16
-
17
-
18
-
19
-
20
-
21
-
22
-
23
-
24
-
25
-
26
-
27
-
28
-
29
-
 30
30 -
 31
31 -
 32
32 -
 33
33 -
 34
34 -
 35
35 -
 36
36 -
 37
37 -
 38
38 -
 39
39 -
 40
40 -
41
-
42
-
43
-
44
-
45
-
46
-
47
-
48
-
49
-
50
-
51
-
52
-
53
-
54
-
55
-
56
-
57
-
58
-
59
-
60
-
61
-
62
-
63
-
64
-
65
-
66
-
67
-
68
-
69
-
70
-
71
-
72
-
73
-
74
-
75
-
76
-
77
-
78
-
79
-
80
-
81
-
82
-
83
-
84
-
85
-
86
-
87
-
88
-
89
-
90
-
91
-
92
-
93
-
94
-
95
-
96
-
97
-
98
-
99
-
100
 |
 |