Samsung SGH-A707 User Manual (user Manual) (ver.f5) (English) - Page 125
Camera Shortcuts
 |
View all Samsung SGH-A707 manuals
Add to My Manuals
Save this manual to your list of manuals |
Page 125 highlights
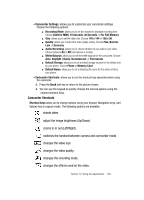
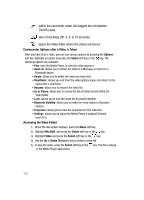
ⅷ Print via: allows you to make a selected graphic printable by either USB or Bluetooth printer. ⅷ Lock: allows you to lock the photo. ⅷ Properties: allows you to view the properties of a photo. • Camera Settings: allows you to customize your camera settings. Choose the following options: ⅷ Size: allows you to set the image size. The icon for the selected image size appears on the capture screen. ⅷ Quality: allows you to select the picture quality setting. Choose Super Fine, Fine, Normal, Low, or Economy. ⅷ Display: allows you to choose between Actual Screen, Full Screen & Guideline, Full Screen & Indicator, or Full Screen. ⅷ Scene Programs: allows you to set the lighting for the photos. Choose Normal or Night-time landscape. ⅷ Shutter Sound: allows you to select a shutter tone sound when taking a photo. ⅷ Multi Shot Speed: allows you to set the speed between each photo taken using a multi shot session. Choose Low, Normal, or High. ⅷ White Balance: allows you to set the white balance for the camera. Choose Auto, Daylight, Cloudy, Incandescent, or Fluorescent. ⅷ Default Storage: allows you to set a default storage location for the photos taken on your phone. Choose Phone or Memory Card. ⅷ Default Name: allows you to set a default prefix name for the photos taken on your phone. • Camera Shortcuts: allows you to see the shortcut keys associated when using the camera. 7. Press the Back soft key to return to the picture viewer. 8. You can use the keypad to quickly change the camera options using the camera shortcut keys. Camera Shortcuts Shortcut keys allow you to change options using your keypad, Navigation keys, and Volume key in capture mode. The following options are available. takes photo. adjust the image brightness (Up/Down). zooms in or out (Left/Right). Not allowed if the picture size is set to its maximum value. switches the handset between camera and camcorder mode. Section 12: Using the Applications 125
-
 1
1 -
2
-
3
-
4
-
5
-
6
-
7
-
8
-
9
-
10
-
11
-
12
-
13
-
14
-
15
-
16
-
17
-
18
-
19
-
20
-
21
-
22
-
23
-
24
-
25
-
26
-
27
-
28
-
29
-
30
-
31
-
32
-
33
-
34
-
35
-
36
-
37
-
38
-
39
-
40
-
41
-
42
-
43
-
44
-
45
-
46
-
47
-
48
-
49
-
50
-
51
-
52
-
53
-
54
-
55
-
56
-
57
-
58
-
59
-
60
-
61
-
62
-
63
-
64
-
65
-
66
-
67
-
68
-
69
-
70
-
71
-
72
-
73
-
74
-
75
-
76
-
77
-
78
-
79
-
80
-
81
-
82
-
83
-
84
-
85
-
86
-
87
-
88
-
89
-
90
-
91
-
92
-
93
-
94
-
95
-
96
-
97
-
98
-
99
-
100
-
101
-
102
-
103
-
104
-
105
-
106
-
107
-
108
-
109
-
110
-
111
-
112
-
113
-
114
-
115
-
116
-
117
-
118
-
119
-
 120
120 -
 121
121 -
 122
122 -
 123
123 -
 124
124 -
 125
125 -
 126
126 -
 127
127 -
 128
128 -
 129
129 -
 130
130 -
131
-
132
-
133
-
134
-
135
-
136
-
137
-
138
-
139
-
140
-
141
-
142
-
143
-
144
-
145
-
146
-
147
-
148
-
149
-
150
-
151
-
152
-
153
-
154
-
155
-
156
-
157
-
158
-
159
-
160
-
161
-
162
-
163
-
164
-
165
-
166
-
167
-
168
-
169
-
170
-
171
-
172
-
173
-
174
-
175
-
176
-
177
 |
 |
