Samsung SM-N920T User Manual - Page 53
Camera Settings, Live Broadcast, To access the Live Broadcast - flash file
 |
View all Samsung SM-N920T manuals
Add to My Manuals
Save this manual to your list of manuals |
Page 53 highlights
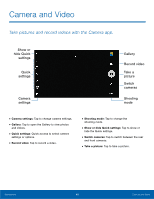
Camera Settings 1. From a Home screen, tap Apps > Camera. 2. Quick settings are listed across one side of the camera view finder. Available options vary depending on the camera or recording mode used. Default settings include: • Effect: Add special graphical effects. • HDR AUTO (rich tone): Save the picture in HDR (rich tone) only. • Timer: Take time-delayed pictures or videos. • Flash: Activate or deactivate the flash (rear camera only). • Beauty: Take a picture with lightened faces for gentler images (front camera only). • Picture size: Select a resolution. Use higher resolution for higher quality. Higher resolution pictures take up more memory. 3. Tap Settings to configure settings for Camera. Available options vary depending on the camera/recording mode used. Both cameras • Video size: Select a resolution. Use higher resolution for higher quality. Higher resolution videos take up more memory. • Video stabilization: Activate anti-shake. Anti‑shake helps to keep the focus steady when the camera is moving. • Grid lines: Display viewfinder grid lines to help composition when selecting subjects. • Location tags: Attach a GPS location tag to the picture. • Review pictures: Set to show pictures after taking them. • Quick launch: Open camera by pressing the Home key twice in quick succession. • Voice control: To take pictures say "smile", "cheese", "capture", or "shoot". To record videos, say "Record video". • Volume keys function: Use the Volume key as the capture key, the record key, or as a zoom key. • Shutter sound: Enable or disable a shutter sound when pictures are taken. • Reset settings: Reset the camera settings. • Help: View information on using the camera. Rear camera • Save as RAW file: Save pictures without compression. A viewer app is required to view pictures saved as RAW files. • Tracking AF: Focus on and track a subject selected on the preview screen. Front camera • Gesture control: Detect palm and automatically take a picture two seconds later. • Save pictures as previewed: Save the self‑portrait or self‑recording as viewed on the camera screen. Live Broadcast Share what is happening around you via YouTube. To access the Live Broadcast: ►► From a Home screen, tap Apps > > MODE > Live Broadcast. Camera Note: You need to sign in to your Google Account and to enable live broadcasting in your YouTube settings to use this feature. Applications 48 Camera and Video
-
 1
1 -
2
-
3
-
4
-
5
-
6
-
7
-
8
-
9
-
10
-
11
-
12
-
13
-
14
-
15
-
16
-
17
-
18
-
19
-
20
-
21
-
22
-
23
-
24
-
25
-
26
-
27
-
28
-
29
-
30
-
31
-
32
-
33
-
34
-
35
-
36
-
37
-
38
-
39
-
40
-
41
-
42
-
43
-
44
-
45
-
46
-
47
-
 48
48 -
 49
49 -
 50
50 -
 51
51 -
 52
52 -
 53
53 -
 54
54 -
 55
55 -
 56
56 -
 57
57 -
 58
58 -
59
-
60
-
61
-
62
-
63
-
64
-
65
-
66
-
67
-
68
-
69
-
70
-
71
-
72
-
73
-
74
-
75
-
76
-
77
-
78
-
79
-
80
-
81
-
82
-
83
-
84
-
85
-
86
-
87
-
88
-
89
-
90
-
91
-
92
-
93
-
94
-
95
-
96
-
97
-
98
-
99
-
100
-
101
-
102
-
103
-
104
-
105
-
106
-
107
-
108
-
109
-
110
-
111
-
112
-
113
-
114
-
115
-
116
-
117
-
118
-
119
-
120
-
121
-
122
-
123
-
124
-
125
-
126
-
127
 |
 |