Samsung SM-T350 User Manual - Page 8
Assemble Your Device, This helps you - battery
 |
View all Samsung SM-T350 manuals
Add to My Manuals
Save this manual to your list of manuals |
Page 8 highlights
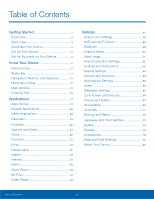
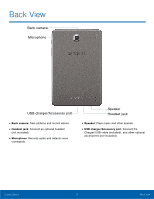
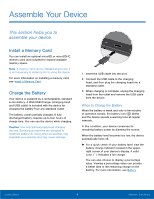
Assemble Your Device This section helps you to assemble your device. Install a Memory Card You can install an optional microSD or microSDHC memory card (not included) to expand available memory space. Note: A memory card can be installed at any time; it is not necessary to install it prior to using the device. For more information on installing a memory card, see Install a Memory Card. Charge the Battery Your device is powered by a rechargeable, standard Li-Ion battery. A Wall/USB Charger (charging head and USB cable) is included with the device for charging the battery from any standard outlet. The battery comes partially charged. A fully discharged battery requires up to four hours of charge time. You can use the device while charging. Caution: Use only Samsung-approved charging devices. Samsung accessories are designed to maximize battery life. Using other accessories may invalidate your warranty and may cause damage. 1. Insert the USB cable into the port. 2. Connect the USB cable to the charging head, and then plug the charging head into a standard outlet. 3. When charging is complete, unplug the charging head from the outlet and remove the USB cable from the device. When to Charge the Battery When the battery is weak and only a few minutes of operation remain, the battery icon ( ) blinks and the device sounds a warning tone at regular intervals. In this condition, your device conserves its remaining battery power by dimming the screen. When the battery level becomes too low, the device automatically turns off. ► For a quick check of your battery level, view the battery charge indicator located in the upperright corner of your device's display. A solid color ( ) indicates a full charge. You can also choose to display a percentage value. Viewing a percentage value can provide a better idea of the remaining charge on the battery. For more information, see Battery. Getting Started 4 Assemble Your Device
-
 1
1 -
2
-
 3
3 -
 4
4 -
 5
5 -
 6
6 -
 7
7 -
 8
8 -
 9
9 -
 10
10 -
 11
11 -
 12
12 -
 13
13 -
14
-
15
-
16
-
17
-
18
-
19
-
20
-
21
-
22
-
23
-
24
-
25
-
26
-
27
-
28
-
29
-
30
-
31
-
32
-
33
-
34
-
35
-
36
-
37
-
38
-
39
-
40
-
41
-
42
-
43
-
44
-
45
-
46
-
47
-
48
-
49
-
50
-
51
-
52
-
53
-
54
-
55
-
56
-
57
-
58
-
59
-
60
-
61
-
62
-
63
-
64
-
65
-
66
-
67
-
68
-
69
-
70
-
71
-
72
-
73
-
74
-
75
-
76
-
77
-
78
-
79
-
80
-
81
-
82
-
83
-
84
 |
 |