Samsung SPH-A460SS User Manual (user Manual) (ver.f3) (English) - Page 96
Set Time, To Set Time using the menu options, Adding New Events
 |
View all Samsung SPH-A460SS manuals
Add to My Manuals
Save this manual to your list of manuals |
Page 96 highlights
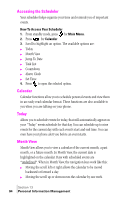
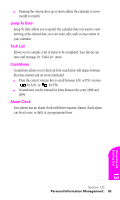
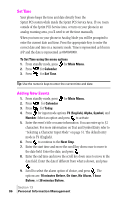
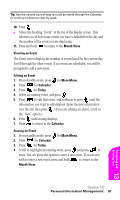
Set Time Your phone keeps the time and date directly from the Sprint PCS system while inside the Sprint PCS Service Area. If you roam outside of the Sprint PCS Service Area, or turn on your phone in an analog roaming area, you'll need to set the time manually. When you turn on your phone in Analog Mode you will be prompted to enter the current date and time. Press the appropriate keys to enter the correct date and time in a numeric mode. Time is represented as hh:mm A/P and the date is represented as 00/00/0000. To Set Time using the menu options 1. From standby mode, press for Main Menu. 2. Press for Calendar. 3. Press for Set Time. Tip: Use the numeric keys to enter the current time and date. Adding New Events 1. From standby mode, press for Main Menu. 2. Press for Calendar. 3. Press for Today. 4. Press for input mode options T9 (English), Alpha, Symbol, and Number. Select an option and press to activate. 5. Enter the event's title or name information. You can enter up to 32 characters. For more information on Text and Symbol Entry refer to "Selecting a Character Input Mode" on page 51. The default entry mode is T9 (English). 6. Press to continue to the Next Step. 7. Enter the start time and move the scroll key down once to move to the date field. Enter the date, and press . 8. Enter the end time and move the scroll key down once to move to the date field. Enter the date if different from what is shown, and press . 9. Scroll to select the alarm option of choice, and press . The options are: 10 minutes Before, On time, No Alarm, 1 hour Before, or 30 minutes Before. Section 13 96 Personal Information Management
-
 1
1 -
2
-
3
-
4
-
5
-
6
-
7
-
8
-
9
-
10
-
11
-
12
-
13
-
14
-
15
-
16
-
17
-
18
-
19
-
20
-
21
-
22
-
23
-
24
-
25
-
26
-
27
-
28
-
29
-
30
-
31
-
32
-
33
-
34
-
35
-
36
-
37
-
38
-
39
-
40
-
41
-
42
-
43
-
44
-
45
-
46
-
47
-
48
-
49
-
50
-
51
-
52
-
53
-
54
-
55
-
56
-
57
-
58
-
59
-
60
-
61
-
62
-
63
-
64
-
65
-
66
-
67
-
68
-
69
-
70
-
71
-
72
-
73
-
74
-
75
-
76
-
77
-
78
-
79
-
80
-
81
-
82
-
83
-
84
-
85
-
86
-
87
-
88
-
89
-
90
-
 91
91 -
 92
92 -
 93
93 -
 94
94 -
 95
95 -
 96
96 -
 97
97 -
 98
98 -
 99
99 -
 100
100 -
 101
101 -
102
-
103
-
104
-
105
-
106
-
107
-
108
-
109
-
110
-
111
-
112
-
113
-
114
-
115
-
116
-
117
-
118
-
119
-
120
-
121
-
122
-
123
-
124
-
125
-
126
-
127
-
128
-
129
-
130
-
131
-
132
-
133
-
134
-
135
-
136
-
137
-
138
-
139
-
140
-
141
-
142
-
143
-
144
-
145
-
146
-
147
-
148
-
149
-
150
-
151
-
152
-
153
-
154
-
155
-
156
-
157
-
158
-
159
 |
 |