Samsung SRN-3250 User Manual - Page 56
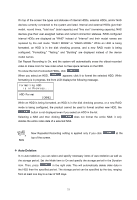
Auto Deletion
 |
View all Samsung SRN-3250 manuals
Add to My Manuals
Save this manual to your list of manuals |
Page 56 highlights
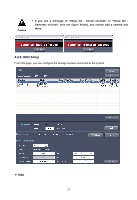
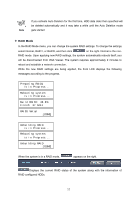
On top of the screen the types and statuses of internal HDDs, external HDDs, and/or NAS devices currently connected to the system are listed. Internal and external HDDs give their model, record times, "total size" (total capacity) and "free size" (remaining capacity); NAS devices give their user-assigned names and current connection statuses. RAID-configured internal HDDs are displayed as "RAID" instead of "Internal" and their model names are replaced by the raid mode: "RAID1 MODE" or "RAID5 MODE." While an HDD is being formatted, an HDD is in the disk checking process, and a new RAID mode is being configured; "Formatting," "Testing," and "Building" are displayed instead of the device model names. Set Repeat Recording to On, and the system will automatically erase the oldest recorded video to make room for new video when no free space remains on the HDD. To renew the list of connected HDDs, click . When you select an HDD, appears; click it to format the selected HDD. While formatting is in progress, the front LCD displays the following message. Formatting HDD is in Progress... HDD Format [DONE] While an HDD is being formatted, an HDD is in the disk checking process, or a new RAID mode is being configured, the product cannot be used to format another new HDD; the button is not displayed even if you select an HDD in the list. Selecting a NAS and then clicking does not format the entire NAS; it only deletes the entire video data of a selected NAS. Note New Repeated Recording setting is applied only if you click top of the screen. at the ™ Auto Deletion In In Auto Deletion, you can select and specify necessary items of Auto Deletion as well as the storage period. Set the Mode item to On and specify the storage period in the Duration item. Then, press in the right side. This will automatically delete older data in the HDD than the specified period. The storage period can be specified by the day, ranging from at least one day to a max of 365 days. 54
-
 1
1 -
2
-
3
-
4
-
5
-
6
-
7
-
8
-
9
-
10
-
11
-
12
-
13
-
14
-
15
-
16
-
17
-
18
-
19
-
20
-
21
-
22
-
23
-
24
-
25
-
26
-
27
-
28
-
29
-
30
-
31
-
32
-
33
-
34
-
35
-
36
-
37
-
38
-
39
-
40
-
41
-
42
-
43
-
44
-
45
-
46
-
47
-
48
-
49
-
50
-
 51
51 -
 52
52 -
 53
53 -
 54
54 -
 55
55 -
 56
56 -
 57
57 -
 58
58 -
 59
59 -
 60
60 -
 61
61 -
62
-
63
-
64
-
65
-
66
-
67
-
68
-
69
-
70
-
71
-
72
-
73
-
74
-
75
-
76
-
77
-
78
-
79
-
80
-
81
-
82
-
83
-
84
-
85
-
86
-
87
-
88
-
89
-
90
-
91
-
92
-
93
-
94
-
95
-
96
-
97
-
98
-
99
-
100
-
101
-
102
-
103
-
104
-
105
-
106
-
107
-
108
-
109
-
110
-
111
-
112
-
113
-
114
-
115
-
116
-
117
-
118
-
119
-
120
-
121
-
122
-
123
-
124
-
125
-
126
-
127
-
128
-
129
-
130
-
131
-
132
 |
 |
