Samsung SWD-M100 Installation Guide (user Manual) (ver.f1) (English) - Page 73
Your name, Account display, Save password, password, Outgoing server requires authentication
 |
View all Samsung SWD-M100 manuals
Add to My Manuals
Save this manual to your list of manuals |
Page 73 highlights
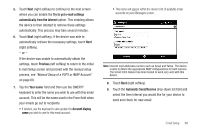
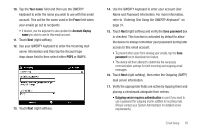
10. Tap the Your name: field and then use the QWERTY keyboard to enter the name you wish to use with this email account. This will be the name used in the From field when your emails go out to recipients. • If desired, use the keyboard to also update the Account display name you wish to use for this email account. 11. Touch Next (right softkey). 12. Use your QWERTY keyboard to enter the Incoming mail server information and then tap the Account type drop-down field to then select either POP3 or IMAP4. 13. Touch Next (right softkey). 14. Use the QWERTY keyboard to enter your account User Name and Password information. For more information, refer to "Entering Text Using the QWERTY Keyboard" on page 31. 15. Touch Next (right softkey) and verify the Save password box is checked. This function is activated by default to allow the device to always remember your password during later access to this email account. • To prevent other users from viewing your emails, tap the Save password box to deactivate the feature. • The device will then attempt to determine the necessary communication settings for both incoming and outgoing email messages. 16. Touch Next (right softkey), then enter the Outgoing (SMTP) mail server information. 17. Verify the appropriate fields are active by tapping them and placing a checkmark alongside their entries. • Outgoing server requires authentication is used if you need to use a password for outgoing mail in addition to incoming mail. (Please contact your System Administrator for detailed server requirements.) Email Setup 70
-
 1
1 -
2
-
3
-
4
-
5
-
6
-
7
-
8
-
9
-
10
-
11
-
12
-
13
-
14
-
15
-
16
-
17
-
18
-
19
-
20
-
21
-
22
-
23
-
24
-
25
-
26
-
27
-
28
-
29
-
30
-
31
-
32
-
33
-
34
-
35
-
36
-
37
-
38
-
39
-
40
-
41
-
42
-
43
-
44
-
45
-
46
-
47
-
48
-
49
-
50
-
51
-
52
-
53
-
54
-
55
-
56
-
57
-
58
-
59
-
60
-
61
-
62
-
63
-
64
-
65
-
66
-
67
-
 68
68 -
 69
69 -
 70
70 -
 71
71 -
 72
72 -
 73
73 -
 74
74 -
 75
75 -
 76
76 -
 77
77 -
 78
78 -
79
-
80
-
81
-
82
-
83
-
84
-
85
-
86
-
87
-
88
-
89
-
90
-
91
-
92
-
93
-
94
-
95
-
96
-
97
-
98
-
99
-
100
-
101
-
102
-
103
-
104
-
105
-
106
-
107
-
108
-
109
-
110
-
111
-
112
-
113
-
114
-
115
-
116
-
117
-
118
-
119
-
120
-
121
-
122
-
123
-
124
-
125
-
126
-
127
-
128
-
129
-
130
-
131
-
132
-
133
-
134
-
135
-
136
-
137
-
138
-
139
-
140
-
141
-
142
-
143
-
144
-
145
-
146
-
147
-
148
-
149
-
150
-
151
-
152
-
153
-
154
-
155
-
156
-
157
-
158
 |
 |
